Check out this post from MiniTool MovieMaker, a beginner-friendly video editor, to discover the essential steps for exporting videos from DaVinci Resolve. Enhance your editing workflow and ensure your projects are ready for sharing quickly.
DaVinci Resolve is widely recognized as the best free and most powerful video editing software in the industry, renowned for its all-in-one suite for editing, color correction & grading, visual effects, motion graphics, and audio post-production.
Whether you’re a beginner or an experienced content creator, knowing how to export your project is crucial for the best quality output. In this guide, I’ll show you how to export video from Davinci Resolve, including some of the best export settings for different platforms to avoid poor video quality, unnecessarily large file sizes, or compatibility issues with playback devices.
![How to Fix the DaVinci Resolve Media Offline Issue [Full Guide]](https://images.minitool.com/moviemaker.minitool.com/images/uploads/2023/03/davinci-resolve-media-offline-thumbnail.jpg)
How to Export Video from DaVinci Resolve
Before proceeding to the export settings, ensure your edits are finished and preview your video. Then, follow the steps below to export the video.
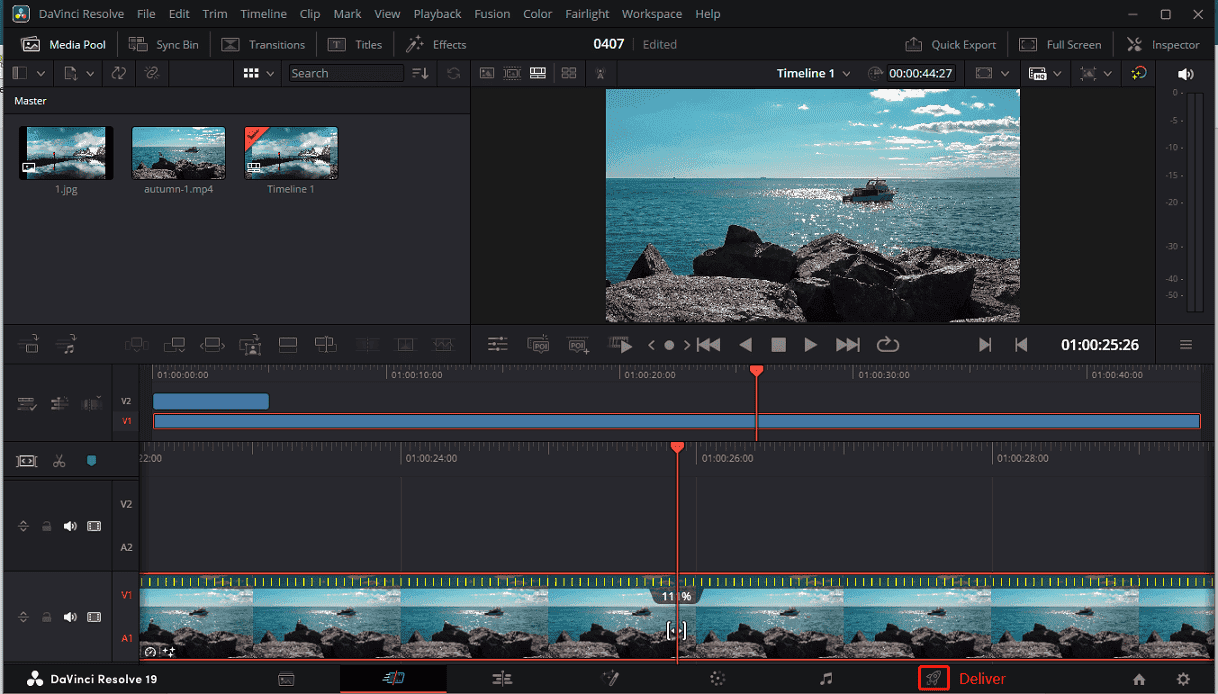
Step 1. Navigate to the Deliver page. DaVinci Resolve has a dedicated page for exporting. To access it, click the Deliver button in the lower right corner to open Render Settings.
Step 2. By default, you’ll be taken to the Custom Export tab, which means you can customize your export settings.
Step 3. Then, click Browse to select a location to save your exported video and make sure the Video option is checked below.
Step 4. Scroll down to the Export Video section and expand the Format drop-down list to select your target output format. Generally speaking, MP4 is currently the most popular video format with the best compatibility and high video quality.
Next, open the Codec drop-down list and choose a codec to compress the video. If you select MP4 format only H.264 and H.265 are available.
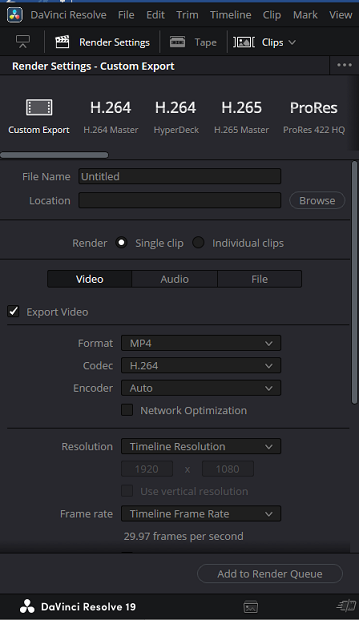
Step 5. Select the video resolution. By default, the resolution of your video is set to the timeline resolution. Click the Resolution menu and change it. Likewise, you can change the frame rate.
Step 6. Finally, click the Add to Render Queue button. If you don’t select the output folder at first, you’ll need to choose the file destination after clicking Add to Render Queue, then click Save.
Then, this task will be added to Render Queue in the top right, and click the Render all button to start rendering your video.
In addition to custom export, DaVinci Resolve provides multiple quick export options. In the top left of Render Settings, you can see many options like H.264, H.265, and ProRes on the right of Custom Export. Drag the lower slider to the right, and you can access more options, such as YouTube 1080p, Vimeo 1080p, TikTok 1080p, Final Cut Pro7, Premiere XML, and others.
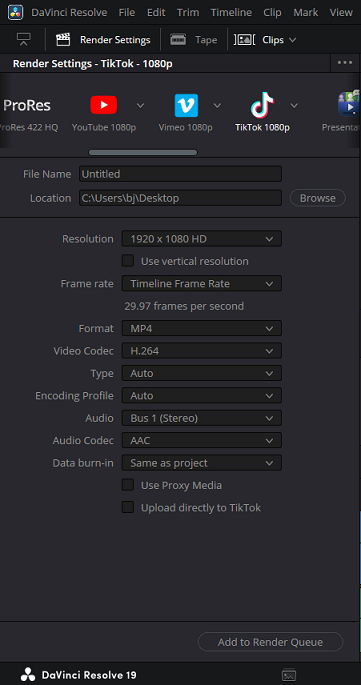
You can select a preset for a specific platform and click the Add to Render to Queue button to export the video. If you choose a codec like H.265, you can still change the format in the Export Video section.
Bonus Tip: An Alternative to DaVinci Resolve for Beginners
DaVinci Resolve is a free and professional-grade video editing application, but it is probably not easy to master for entry-level users, especially the complicated Fusion, Color, and Fairlight pages. Consequently, here is an easy alternative to DaVinci Resolve for beginners: MiniTool MovieMaker.
MiniTool MovieMakerClick to Download100%Clean & Safe

This video editor has a simple and intuitive interface that is easy for starters to learn. Also, the editing tools – trim, crop, split, rotate, and flip are easy to operate without complicated steps or settings. In addition, the software offers a huge collection of preset filters, transitions, motion effects, and special effects that can be easily applied with one click.
What’s more, MiniTool MovieMaker supports exporting videos up to 4k/1080P for free and without watermarks.
Conclusion
By following the steps above, you can ensure high-quality exports from DaVinci Resolve every time. Whether you’re sharing online or archiving a master file, DaVinci Resolve gives you full control over your final output.
About The Author

Position: Columnist
Cora is a tech writer specializing in digital media workflows, with over six years of hands-on experience in video post-production, media transcoding, and screen capture. Her writing is always clear and practical. Cora also produces in-depth software reviews for users across skill levels to help them find the right tool and enjoy video editing.
User Comments :