How to Add Text in Final Cut Pro
Final Cut Pro is an excellent professional video editing program that has all features from basic editing to advanced editing. You can easily add text in different styles to your video, such as titles, subtitles, credits, and captions. Text can help you communicate important information, improve your storytelling, and make your videos more engaging. Let’s see how to add text in Final Cut Pro using different methods.
Before that, here are some basic steps you need to follow:
Step 1. Launch Final Cut Pro on your Mac and create a new project by choosing File > New > Project.
Step 2. You can create events for different types of media, such as audio, raw footage, graphics, and so on. To create a new event, select a library in the sidebar and choose File > New > Event. You can name your event and choose the storage location.
Step 3. Use the Media Import window to browse and select files from your Mac. To open the Media Import window, choose File > Import > Media.
Step 4. Select files in the browser and click Import Selected or drag them into an event in the sidebar.
After importing your footage, you can view it in the browser or in the timeline, and then make changes to it, including adding text.
Add Basic Title Using the Edit Menu
This is the easiest way to insert basic text in Final Cut Pro. Follow these steps:
Step 1. Move your playhead to where you want the text to start on the clip.
Step 2. Go to the Edit menu.
Step 3. Hover over Connect Title and click Basic Title. It will add a title on the timeline.
Step 4. Once you click on the title to start typing, you will notice that the Text Inspector will open on the right side. Here you can edit text in Final Cut Pro, such as changing the font, size, position, alignment, spacing, tracking, and other details.
Add Text Using Keyboard Shortcut
Keyboard shortcuts are another quick and easy way to create a title. Simply press Control + T, which will automatically add the title clip to any video clips selected on the timeline.
Add Text Using the Title Menu
Follow the steps below to add text to video in Final Cut Pro using the Title menu:
Step 1. Go to the Title menu with a T icon in the top left corner of the window.
Step 2. Select a text type from the list and drag it to the timeline at the bottom of the screen.
Step 3. Click on the title in the timeline and open Text Inspector at the top right for editing the text.
Adding Text to Video with a Final Cut Pro Alternative
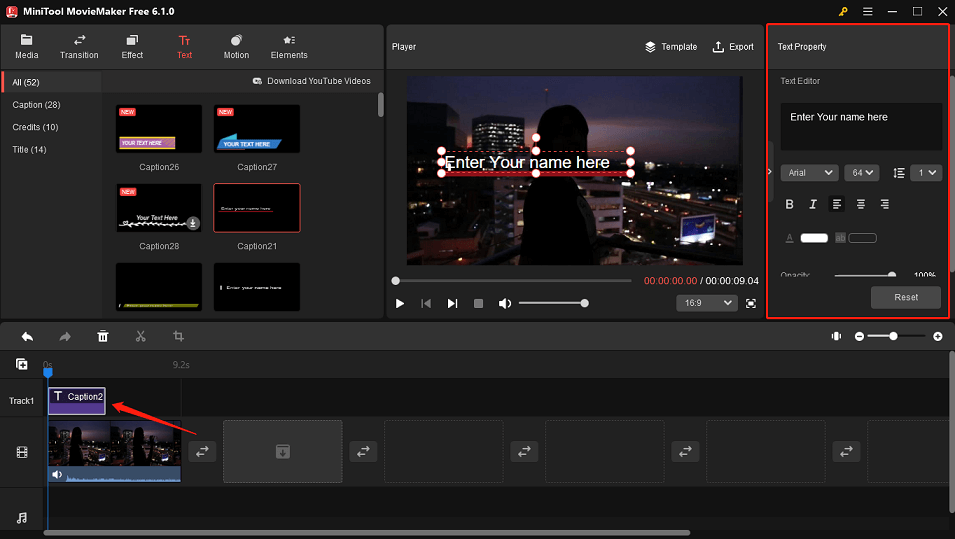
The best alternative program to add text to a video with Final Cut Pro is to use MiniTool MovieMaker. It involves only a few simple and easy steps that anyone with basic video editing knowledge can follow. With it, you can easily add titles, credits, and captions to your video. To do it using the Final Cut Pro alternative – MiniTool MovieMaker, just follow the instructions below:
Step 1. Download and install MiniTool MovieMaker on your computer.
MiniTool MovieMakerClick to Download100%Clean & Safe
Step 2. Click on Import Media Files to import footage to this program. Drag and drop the imported footage onto the timeline.
Step 3. Go to the Text tab and choose a text type you’d like to add.
Step 4. To add it, drag and drop it onto the video clip on the timeline or click + in the lower right corner.
Step 5. Select the title on the timeline and edit the text under Text Property.

Step 6. Once you’re done, click on Export to save this video with text to your PC.
Bottom Line
Wondering how to add text in Final Cut Pro? Adding text in Final Cut Pro is a simple and effective way to enhance your videos with information. You can use different methods depending on your needs and preferences. Or, use an easier way to add text to video with an alternative to Final Cut Pro – MiniTool MovieMaker.


User Comments :