A freeze frame is a technique that enables editors to suddenly halt motion in a movie. This makes it look like a photograph. Then the still shot in the film is generally utilized to add emphasis to a scene or to create suspense. When a freeze frame is added at the end of a movie, it leaves the audience guessing what is going to happen next.
Freezing or extending the frame will allow you to better pace your videos. What’s more, the freeze frame is applied on a per-track basis, which helps buy users extra time for an annotation or a voiceover. Here, you will learn how to use the Camtasia freeze frame or extend frame.
How to Freeze Frame in Camtasia? How to Extend Frame in Camtasia?
If you would like to add more creativity to your video clips by doing freeze frame in Camtasia or extend frame in Camtasia, follow this step-by-step guide:
Step 1. Select the Video Part and Type the Duration
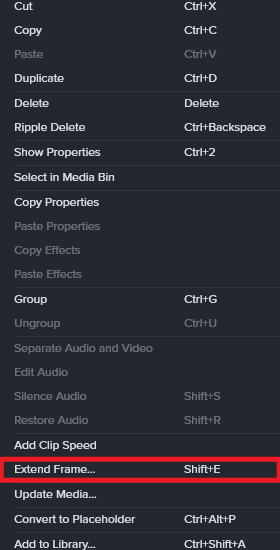
You need to drag the playhead to the frame if you wish to extend it. Next, right-click on the track you want to extend to select the Extend Frame option or use Shift+E.
Choose the track first for the keyboard shortcut to work.

At this point, type the duration you want in seconds.
In turn, this will create a stitched clip, unless the auto-stitch in preferences has been disabled.
Additionally, the clip will be divided into three if the auto-stitch has been disabled. The middle clip contains an extended frame.
Step 2. Adjust the Duration
To adjust the freeze duration, right-click on the still part of the clip and select the Duration option. But this will work with split and stitched segments.
What Is Camtasia’s Best Freeze Frame Video Editing Effect?
The freeze frame in Camtasia is a wonderful feature with a distinct, exquisite glitch and warp design. This well-organized and simple template is ideal for any event and includes a full HD version as well as different freeze-time effects. It is simple to use and customize, render your new amazing video, and add media.
The following shows you how to extend the frame and how to customize the amount of time in Camtasia Studio:
Step 1. Upload Your Video
Download the Camtasia application, install and launch it on your computer. Next, add the video that has to be frozen-frame on the timeline.
Step 2. Choose the Video Part and Duration
Play the click on the timeline and when it reaches the point where you wish to freeze frame, pause the video and left-click on the playhead to select extend the frame.
Step 3. Extend Frame
The next thing to do is to return to the timeline and left-click on the playhead to choose the extend frame, then click the Split tool. When you are done, drag the extended frame onto the upper new layer.
Step 4. Apply Add Clip Speed
Right-click on the extended frame and apply the option Add Clip Speed to choose the amount of time you need.
Step 5. Export and Save Your Video
Lastly, move it back to the main track and play the video. And, when you are happy with the result, export and save it on your computer.
MiniTool MovieMakerClick to Download100%Clean & Safe
Conclusion
After reading the step-by-step instructions above, you now have a certain understanding of how to use freeze frame in Camtasia or extend frame in Camtasia. Hopefully, this post is helpful to you.
Also Read


User Comments :