What Is Freeze Frame in Premiere Pro?
Before talking about how to do freeze frame in Premiere Pro, let’s discuss the freeze frame term in this program.
Frame freezing, also referred to as Frame Hold, in Adobe Premiere Pro is nothing more than the process of taking a static image from the video and then placing it in a specific part of the video. When that image appears, the screen will be frozen, and you will have the ability to freeze images on the screen.
A variety of things motivate you to use this feature since you might want to describe a story in your video and then pause the video at a specific moment.
How to Freeze Frame in Premiere Pro?
Adobe Premiere Pro makes it fairly easy to freeze frame. Here is how to add freeze frame in Premiere Pro using four great methods.
Way 1. Insert Frame Hold Segment in Clip
Premiere Pro includes several ways to freeze frames but opting for the Insert Frame Hold Segment in Clip is regarded as one of the most effective methods for accomplishing your tasks.
- Start the most recent version of Premiere Pro and click New Project. Then, click on the Choose media icon to import the video that you want to edit. And, click on the Open icon after you choose the media file.
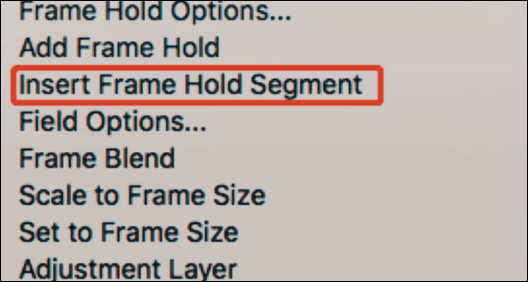
- Create a new sequence after you drag and drop the imported video into the timeline. Then, right-click on the specific video’s portion to get the desired frame. As soon as the drop-down menu appears, you will select Insert Frame Hold Segment.
- The way will clip the video’s frame for just a few seconds. Also, you can increase the time by sliding the edge of the frame.

Way 2. Set Frame Hold
You will need to find out how you would like to make the frame holds work.
- Open Premiere Pro. Import video clips you wish to freeze frame in this software.
- Head to the Toolbar and select Clip and Video options. Then, click on the Frame Hold Options icon.
- Select the Hold on checkbox and then the option you wish. After that, you can choose how you want to use the frame.
Way 3. Add Frame Hold
Another excellent method to freeze frames in Premiere Pro is with the Add Frame Hold function.
- After you launch Premiere Pro on your computer, you will have to import the video to its primary interface. You can then drop and drag the imported video onto your timeline.
- Choose the portion of the video you wish to use to freeze frame and right-click it. Next, select Add Frame Hold.
- The procedure will cut the portion of the video and apply it as a freezing frame to the rest of the video.
MiniTool MovieMakerClick to Download100%Clean & Safe
Way 4. Time Remapping
The remapping feature in Adobe Premiere Pro assists you in freezing a specific portion of the changing speed of the selected clip.
- Import the video to Premiere Pro’s primary interface. Drag and drop the video onto the timeline. Select the portion of the video you would like to freeze.
- After you go to the clip effect menu, you should click on the Remapping icon. Then, click on the speed icon to continue.
- Create the speed keyframe after you click the rubber band option that displays. Next, you will have to hold down the Option-Command key and begin dragging the outer keyframe to the duration of the video you wish to frame. You can find the lower rectangular area showing the freeze frame.
Conclusion
The above are four great ways we give you about how to freeze frame in Premiere Pro. We hope you enjoy this post. Thanks for your time!


User Comments :