Ken Burns, a documentary filmmaker, used this special effect so frequently that it was named after him. The Ken Burns effect entails slow-paced zoom and pan over a still photo to create a sense of movement so that the viewers believe that they’re watching a video rather than just a slideshow of still images. There are a lot of editing software that can assist you in adding the Ken Burns effect to your videos and one of them is Camtasia.
One of the most positive impacts of the Camtasia Ken Burns effect is that it allows your still images to be included in a video as if they were a portion of it. Not only is the effect easy to understand, but it is also very user-friendly to use. For this reason, it is frequently used by novices, amateur YouTubers, and content creators to spice up their videos. Let’s look at how to use the Camtasia Ken Burns effect.
How to Add Ken Burns Effect in Camtasia?
Here are the steps to add the Ken Burns effect in Camtasia.
Step 1: Create a New Project and Import Photos
The first thing you have to do to add the Ken Burns effect to a video is to create a new project in Camtasia. The next thing you need to take is to import the photos you would like to use and then add them to the Media Bin. This will let you work on the photos and apply the Ken Burns effect.
Step 2: Add the Ken Burns Effect in Camtasia
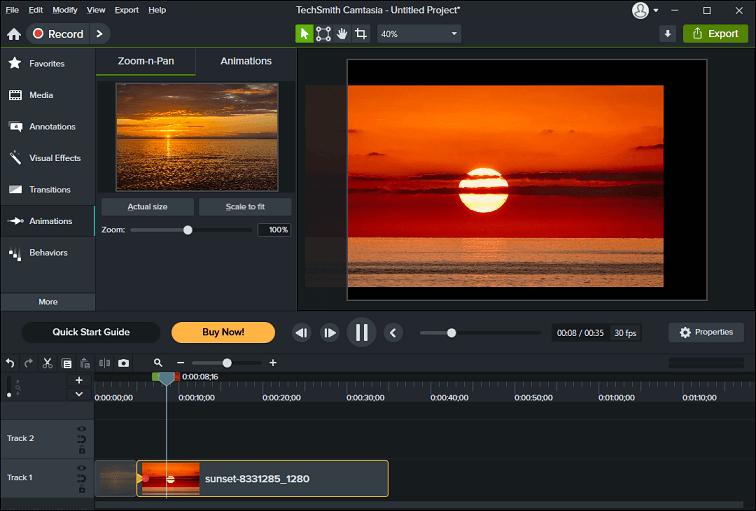
At this point, you have to right-click on the image on track 1 and select the Duration option. Adjust the duration to 30s. As soon as you’ve done that, you have to place the playhead at the end of the video. On the left-hand side of the interface, you’ll see a menu that enables you to select Animations. Make sure the Zoom and Pan tab is visible and active.
The square in the Zoom-n-Pan tab should be moved to the right so that it appears to be panning through the photo as the image moves to the left. From there, you’ll find a small arrow present on track 1 on the timeline.
Now, all you have to do is move the particular arrow to the left so that it spreads across the length of the video. Play the preview by clicking the Play icon or pressing Spacebar, and you’ll see the Ken Burns effect in motion.

In Camtasia, you can choose to play around with zooming and panning or both to make new styles of the Ken Burns effect. You will learn as you play around and will be able to make some really fun videos along the way.
Bonus Tip: Add the Ken Burns Effect Using an Alternative to Camtasia
If you are on the lookout for a great alternative to Camtasia that makes applying the Ken Burns effect (or motion effect) much easier, then you should consider using MiniTool MovieMaker. In addition to the Ken Burns effect, MiniTool MovieMaker is also an ideal video editing software for new YouTubers and content creators to perform other video editing tasks, such as adding transitions, filters, stickers, text, music or sound effects; splitting and trimming, cropping, flipping or rotating, speeding up or slowing down, reversing, and so on.
Here are the steps to add the motion effect to a video using MiniTool MovieMaker.
MiniTool MovieMakerClick to Download100%Clean & Safe
- Download, install, and open MiniTool MovieMaker on your computer.
- Start a new project in the promotion window and click Import Media Files to import the video to which you want to add the motion effect.
- Add the video you import to the timeline by dragging and dropping or clicking the + icon.
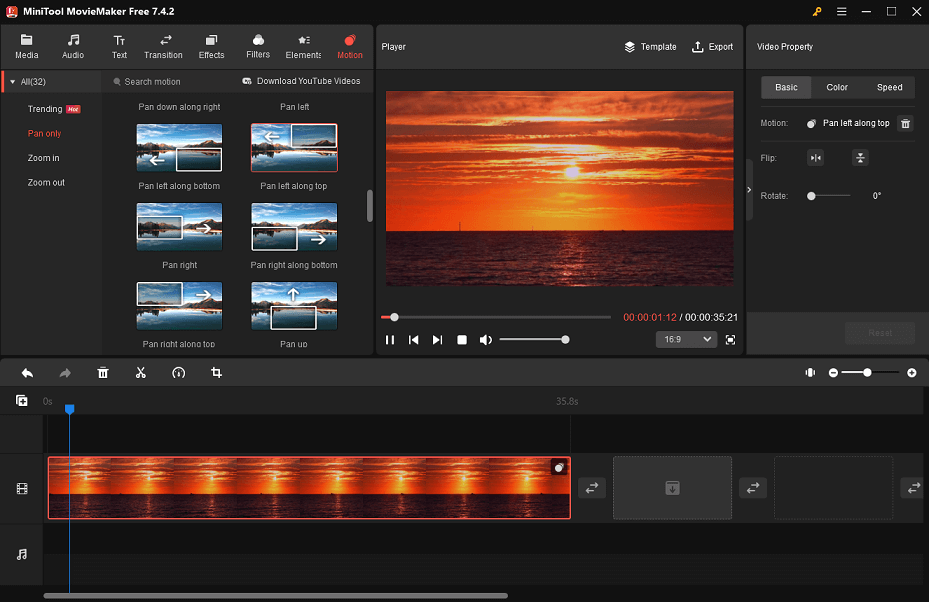
- Go to the Motion tab at the top of the interface and find the motion you would like to apply.
- Keep the video on the timeline selected and click the + icon on the desired motion effect to add it.
- After that, you can click the Play button or press Space to preview the video from the preview window.
- Finally, click Export to adjust the export parameters and save the video to your computer.

Conclusion
After reading this post, you now know how to use the Camtasia Ken Burns effect. We hope these steps can be of great help to you.


User Comments :