Would you like to make a “Frozen” or still scene to tell the most interesting or exciting moment of the story? Or want to freeze something to add some freshness to a familiar story? In fact, it is fairly simple to freeze a video to add some captions or emphasize an action if you have the right tool at your fingertips.
In this guide, we will take you step by step through the process of how to freeze frame in Wondershare Filmora. Let’s start!
Why Should You Freeze Frame in a Video?
You can show your preferred scene by freezing a video to allow viewers to easily understand your idea. This way, the core of your video would be displayed naturally. After applying the freeze video, the video will be split into two portions since the edited frame will be in the middle of the clip. But it will have no effect on the completeness of the video. Safe and simple!
How to Freeze Frame in Filmora?
How to add freeze frame in Filmora? Follow the step-by-step instructions below:
Step 1. Import the Media Files
If Wondershare Filmora is installed on your PC, launch it now. Click New Project to enter the primary window. Next, click the Import button to browse through your folders and load the files you need to the software.
It supports a huge selection of media files, including MP4, WMV, MOV, AVI, MKV, 3GP, M4V, MTS, DV, TS, etc.
When you import all of them, they will appear as thumbnails in the Media Library. Drag and drop them to the Video Timeline and prepare for step 2.
Step 2. Freeze Video
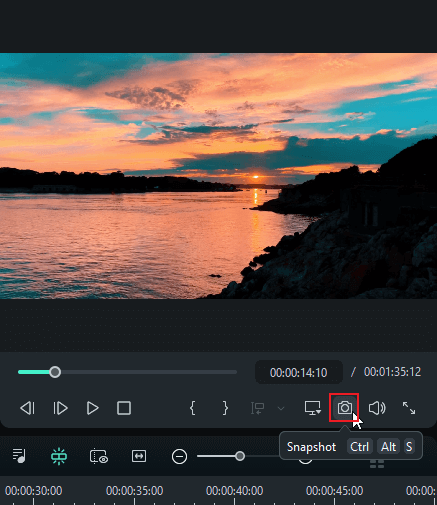
At this point, play the video clip you would like to create a frozen image and pause it when it comes to the right point. Click on the Snapshot icon located under the Viewer panel. There will be an image added to the media library immediately. Drag and drop the image to the PIP track above the primary video track, then adjust the duration of the still image.

Right now, you have created a frozen frame, wish to further customize it? Double-click on the image icon to display the editing window. From there, you can rotate it 90° clockwise and change the duration, contrast, and brightness.
Also, you can choose your favorite fade in or out or zoom in or out effect from the Motion pane.
Step 3. Save What You Create
When everything is to your satisfaction, just click the Export button to export your creation. In the pop-up window displayed, pick from a wide range of format options to save onto your PC. Or directly upload it to Facebook, Twitter, or YouTube to share with your family or friends.
Conclusion
These are the steps you can follow on how to freeze frame in Filmora. We hope you find this post helpful. Thank you!
You may also like:
- How to Freeze Frame in After Effects?
- How to Freeze Frame in DaVinci Resolve (Step-by-Step Guide)
- How to Freeze Frame in Final Cut Pro? This Guide Is for You!
Featured Tip: Improve Your Video Projects with a Fantastic Video Editor
MiniTool MovieMaker
MiniTool MovieMaker is simple to use and offers extensive editing capabilities that allow you to split, trim, crop, rotate, flip videos, and more. Also, it features numerous transitions, filters, text templates, motions, and animated stickers to spice up your videos. When you are finished with the editing, you can use it to quickly export HD videos without watermarks.


User Comments :