If you always use GIFs in your communications, sometimes you may want to add frame to GIF. If you don’t know how to achieve this effect, this article from MiniTool MovieMaker (a Windows video editor) will help you.
GIFs are a popular way to share animated content on social media, in emails, and in messaging. Sometimes, you may want to enhance your GIFs by adding a frame around them to make them stand out more. This article will show you how to add frame to GIF using online tools and offline tools like MiniTool MovieMaker.
How to Add Frame to GIF Online
Adding a frame to a GIF online is a fast and simple method, especially for users who do not want to download extra software. There are various online tools available that allow you to add frame to GIF. Here are a few of the most popular ones:
Online GIF Tools
Online GIF Tools is a user-friendly GIF editor that allows you to add frame to GIF. It provides an easy-to-use interface that doesn’t require you to have any prior experience in editing GIFs.
Here’s how to add a frame using Online GIF Tools:
Step 1: Visit the Online GIF Tools website in your browser.
Step 2: Click on the Click to load an image area and select the GIF from your computer.
Step 3: After uploading the GIF, you will see options to customize the frame. You can select the type of the frame under Border Type. Then, under Border Color and Width, you can select the thickness of the border and the color.
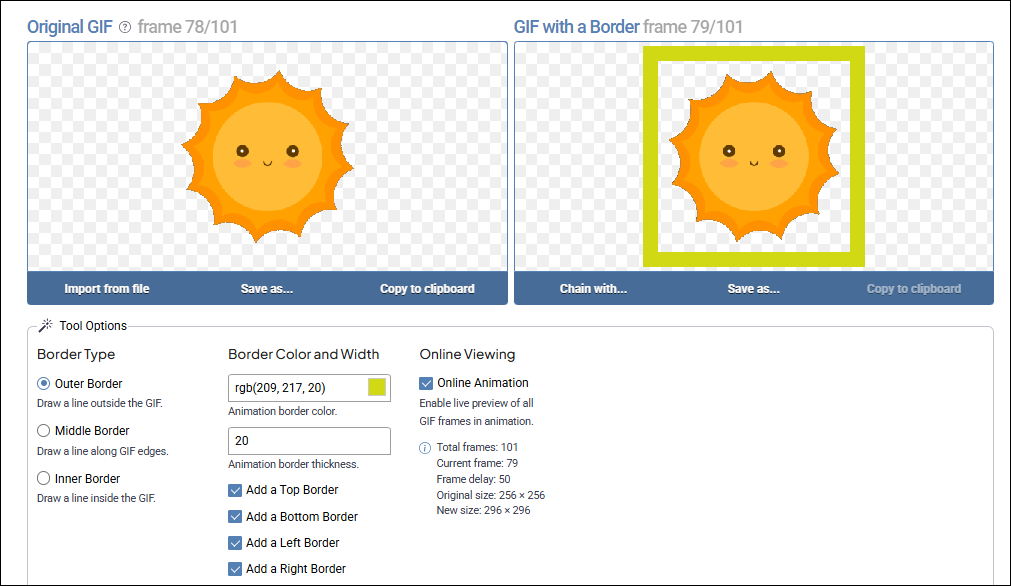
Step 4: Once you are happy with your settings, click Save as > Download to save the GIF to your computer.
Kapwing
Kapwing is one of the most popular online platforms for editing GIFs. You can use it add frame to GIF easily. Here’s how to do it:
Step 1: Go to Kapwing’s website and choose Tools > Add border > GIF to enter the desired page.
Step 2: Click on the Upload GIF button to upload your GIF from your computer.
Step 3: Once your GIF is uploaded, click on the Expand padding button and choose one option.
Step 4: Once done, click on the Export Project button to process and save the GIF.
How to Add Frame to GIF Offline
MiniTool MovieMaker is a free desktop application that allows you to create and edit GIFs. It has a wide range of features, including the ability to add frames to GIFs. Unlike other tools, MiniTool MovieMaker allows you to create more advanced edits, such as adding text, and effects, combining multiple GIFs, and even converting video to GIF.
Step 1: First, click the button below to download this app and install it on your computer. It’s free to use, and the installation process is simple.
MiniTool MovieMakerClick to Download100%Clean & Safe
Step 2: Once you’ve installed the software, open it and click on the Import Media Files button. Select the GIF file you want to edit and add it to your project.
Step 3: Drag your GIF onto the timeline. To add a frame, click on the Effects tab and choose the Overlay option. Choose your favorite frame style and drop it above the GIF clip in the timeline.
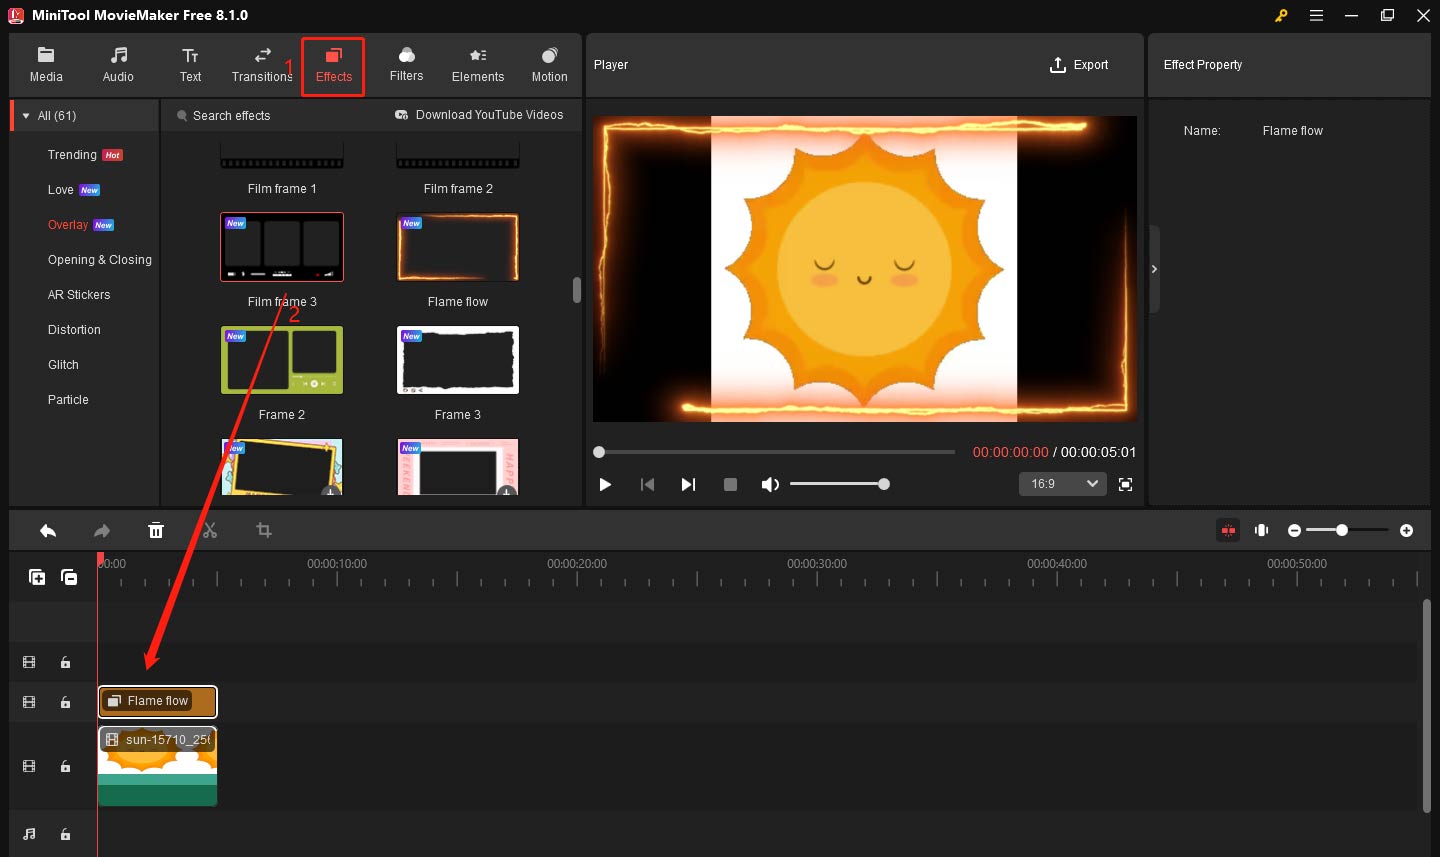
Step 4: After adding the frame, click on the Play (Space) button to preview your GIF. Make sure the frame complements the animation.
Step 5: Once you are happy with the result, click the Export button to save your edited GIF. Remember to select GIF as the export format on the export page.
If you’re looking for a GIF maker, you can read: Top 10 Best GIF Makers + How to Make a GIF
Bottom Line
In conclusion, knowing how to add frame to GIF can be a valuable skill to elevate your content, whether you’re enhancing a GIF for personal use or professional purposes. By learning this skill, you can make your animations stand out, giving them a polished and visually appealing edge.
About The Author

Position: Columnist
Yulia has a great passion for life. She enjoys photography and travel, and is always eager to record cherished moment through her lens. This also led to her strong interest in video editing, and she kept learning multimedia-related knowledge, hoping to bring readers better advice on images, audio, video, and related topics.
User Comments :