The purpose of making text animation is not limited to the word that appears on screen to inform viewers of the film's title or creators. You can also use animated text for opening titles and closing credits. We are going to give you a detailed guide on how to do text animation in Premiere Pro and where to look for it in this article from MiniTool MovieMaker.
What Is Text Animation?
Text animation is a broad term in computer graphics that refers to the process of animating letters, words, or paragraphs.
In animation, it entails designing text that moves in a certain way on the screen, within a region, or following a motion pattern. According to only using text characters in the context of animation, each animation element consists of letters, numbers, punctuation marks, and symbols. Text is frequently animated in movies, videos, talk shows, television, and presentations to explain significant information or to provide intriguing changes between subjects.
How to Make Text Animation in Premiere Pro?
With the help of the Essential Graphics panel, you can significantly improve your project’s media. To create engaging intros and animated slideshows, you can develop your own or choose a template and add your content. Let’s take a closer look.
#1. Add Text
To begin with, you need to find Essential Graphics in the Premiere Pro main Window after starting it up. Then, you can use the Text Tool (T) to type a title. A new text layer will appear in the panel under the Edit tab. You can choose the text layer to check the corresponding properties and tools.
Tip: With the Align and Transform area, you can center your title. In the Text section, you can select which font and style to use. If you want to change the color, you can make it under Appearance. In addition, you can also add several strokes, a drop shadow, and a configurable background.
#2. Design a Background
You can click the New Layer button at the top of the panel to generate a new Rectangle layer. And, you can slightly enlarge the new layer as the background element. Next, you can add a mask to crop everything and change its color with the Fill in the Appearance section. At last, you need to arrange the two layers, placing the text layer at the top and the background layer at the bottom.
#3. Add Mask
Masking is one of the functions available in the Essential Graphics panel. When you add a new rectangle layer, you can customize its size and position. In the Appearance section, you can choose the Mask with Shape option. Meanwhile, the mask will be placed at the bottom.
#4. Animate Text
The Y Position shift is required in this stage if you plan to animate the text. To end the animation, you need to drag the Playhead to the two-second mark. If you click the Text layer, you can find the Position icon in the Align and Transform area. When a keyframe is added at the location of the current time indicator, the property toggle will animate. The icon will change to blue to indicate that the animation is active. Now, you can move the Playhead to the one-second mark and change the Y attribute to put the text in its start location. When you adjust the attribute, a keyframe will automatically add to the location.
#5. Adjust the Keyframe
In the Effect Controls panel, if you change an effect here, a graphic layer will be displayed and highlighted. Under Temporal Interpolation, if you right-click on a keyframe, you will see the Easing. You can add an Ease Out to all of the start keyframes and an Ease In to all of the last keyframes for each element to smooth out the animation. Moreover, you can change the Speed Curve to fine-tune the timing of the animation. You can access the curve by clicking the drop-down arrow to the left of the Position property.
Text Animation Makers for Premiere Pro
With the introduction of animated text generators, anyone can easily make text move, blink and change color using a computer or smartphone. There are several animated text makers available. Which ones, though, are worth your time and effort?
MiniTool MovieMaker
MiniTool MovieMaker is a free, no ads, no bundle video editor without a watermark. It enables users to import videos, photos, and background music. This free tool offers free text animation that can be easily added to videos. It offers three different kinds of animated text templates, including captions, credits, and titles. Here is more detailed information.
How to Add Text Animation to Your Video
MiniTool MovieMakerClick to Download100%Clean & Safe
Step 1: Import Your Files
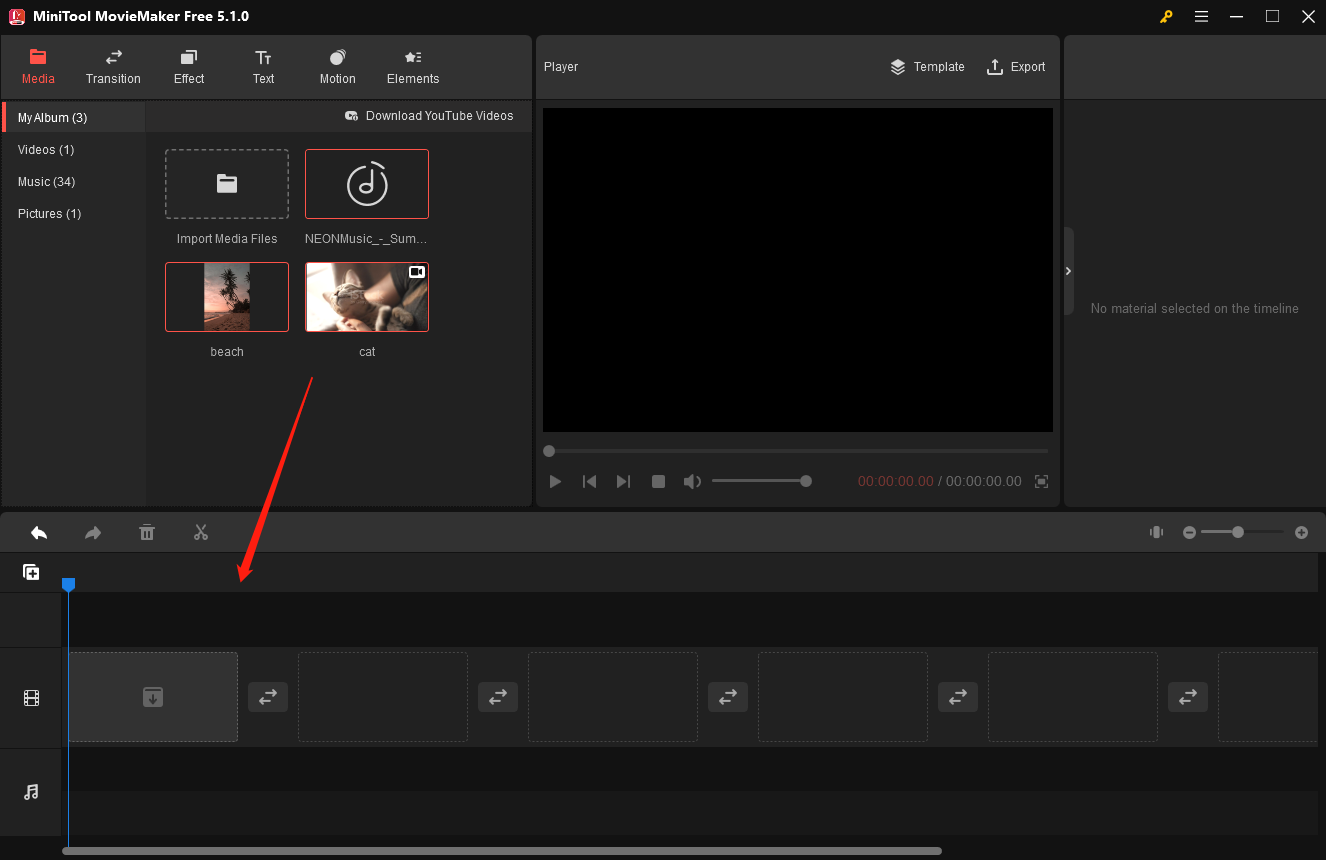
Download and install the free video editor on your computer. Open it to go to its main interface. Under the Media tab, you can click the Import Media Files to import your videos, photos, and music. After that, you can hold down the Ctrl key and select the imported files one by one. Then, click the + icon in the lower right corner of one of the clips to add them to the timeline.
Step 2: Add Text Animation
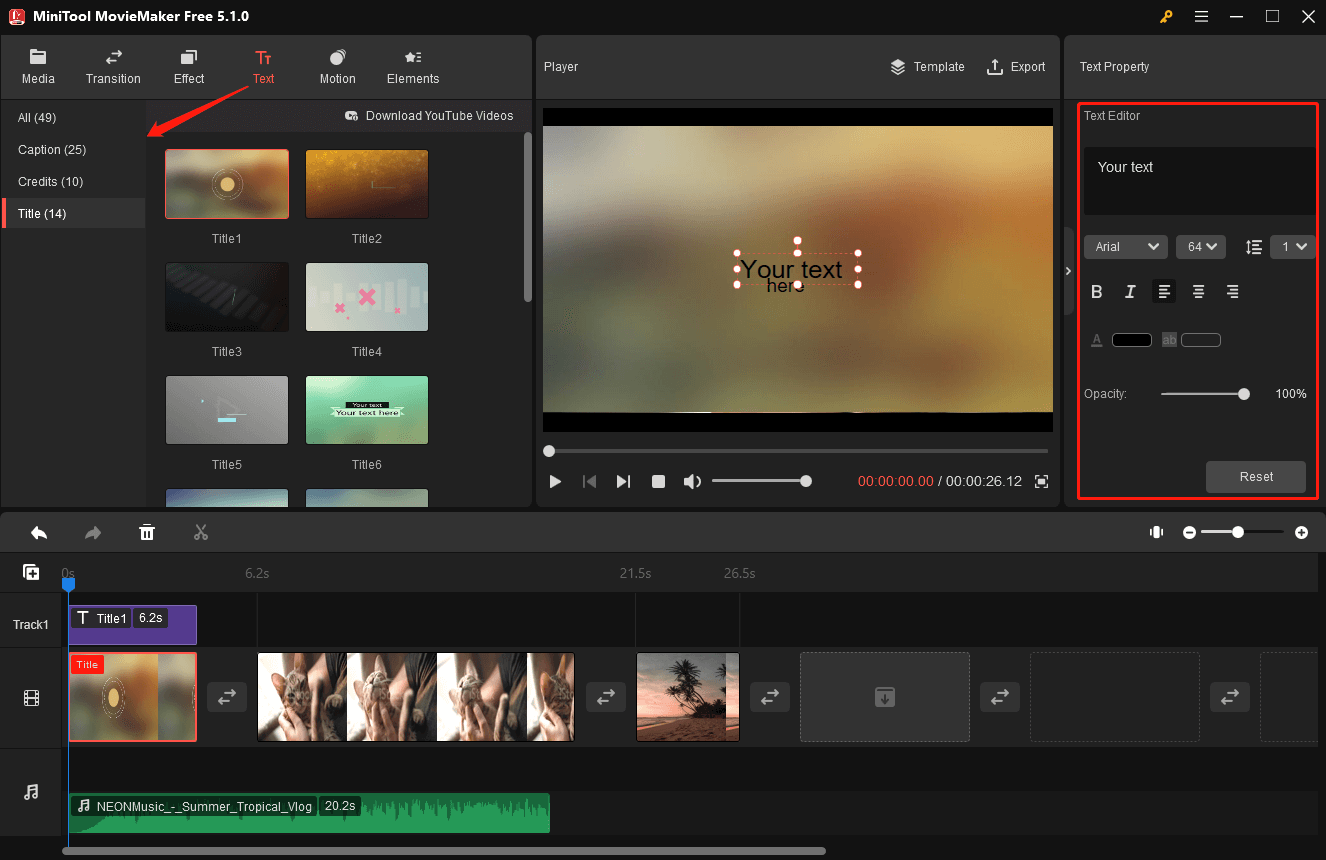
You can click on Text to access the text library. When you find the desired text animation, you can click the + icon or simply drag it to the track above the target videos and photos. After selecting the text on the timeline, you can go to the Text Editor to type your text. To edit the text animation, you can adjust the text color, font, size, alignment, and background color. And, you can drag the edge of the text on the track to make it longer and move it to change its place.
Step 3: Edit the Animated Text Video
Add Transitions: You can click Transition to access the transition library. To add a transition between multiple clips, you need to select the clips where you want to add the same transition and right-click the desired transition to select Apply to Selected Clips. To add the same transition to all clips, you need to select all the clips on the timeline and right-click the desired transition to select Apply to All.
Add Elements: There are different types of cartoon animated elements like business, emoji, food, nature, pets, and props in the element library. You can choose a suitable one to decorate your video.
Reverse Video: To make your video play from the end to the start, you can select the desired clip on the timeline to highlight it and click the Speed button above the timeline, and select Reverse. The clip will be instantly reversed.
Step 4: Export the Edited Video
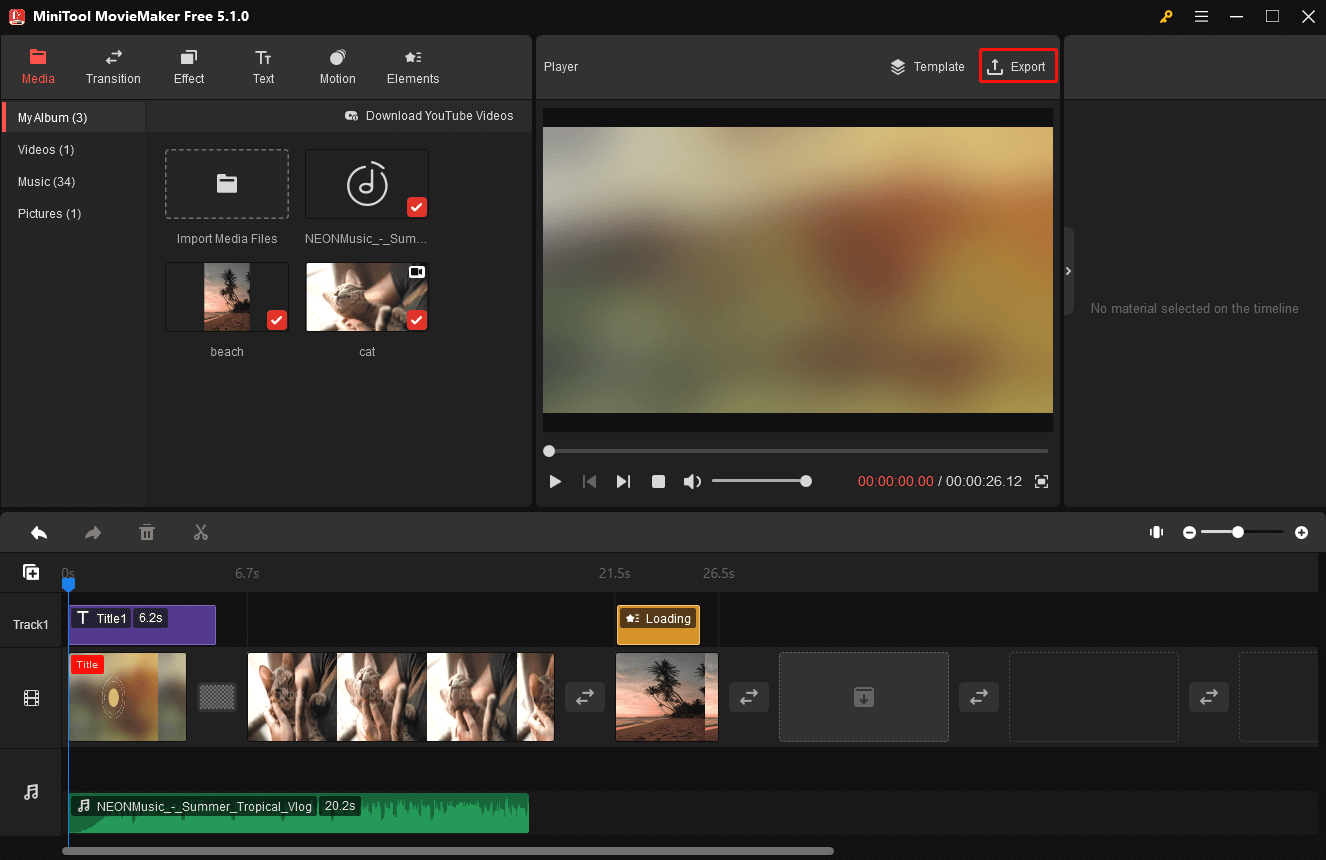
MiniTool MovieMaker allows you to export edited videos to your PC and devices. You can click Export in the toolbar. In the PC or Device tab, you will be guided to customize the export setting. Then, click the Export button to save your video.
OpenToonz
OpenToonz is a free and open-source 2D animation software for Windows, Linux, and OSX. Tooz is the basis of OpenToonz, which was created by Digital Video S.p.A. in Italy. The app was adapted by Studio Ghibli and has been used to create its works for many years.
Features:
- Effective digital drawing tools.
- Combined with full graphics tablet compatibility, vector, and bitmap drawing.
- Capabilities enable you to create artwork of any intricacy.
- Drawing sequences can be quickly drawn using automated tools.
- Composite scenes and animated special effects can be added easily.
- Effects including blur, lighting, key, mask, and distortion are accessible.
Express Animate
For experienced animators and graphic artists., it is a professional tool for making vector masks, and blending modes. As a graph tool for accurate animation, it gives your character some energy. The animation process can be improved by animating specific body parts or collections of various items. You can make adjustments and add effects to visual items to show your creativity.
Features:
- Add video and picture materials to your project.
- Objects can be scaled, flipped, and relocated.
- Use digital effects like brightness, contrast, and negative.
- Each object and parameter can have a keyframe attached to it.
- Make your video project word-based.
- Animate your text as well as the speech bubbles.
- Put effects on the audio tracks.
- Organize your objects for easier editing.
TISFAT
The final tool we have for you is TISFAT. You can make text animations in any style or format with this free and open-source stick animation generator. The great free program TISFAT belongs to the group of design, photography, and animations. It is only available in English and is suitable for users of Windows XP and previous operating systems. In terms of the download, TISFAT is an application that uses less storage space.
Text Animation Templates for Premiere Pro
This section gives a collection of animated text templates to help you narrow down your options and select your favorite. Let’s get started with the amazing text animation templates for Premiere Pro.
Motion Array
Motion Array is a subscription-based website that can help you design a high-quality video. You can produce stunning videos that satisfy your needs by employing its tools. When you factor in the price of design, animation, and even music, budgets can quickly get out of hand. You can quickly download the premium After Effects templates, stock soundtracks, and stock movies at an excellent deal. You can find stunning themes for your text animation in Premiere Pro by using the simple search features. Furthermore, the most comprehensive collection of Premiere Pro plugins may immediately improve your films with stunning drag-and-drop transitions, filters, and effects.
MixKit
MixKit provides a wide range of free video footage for commercial or non-commercial use. It is simple to navigate the quickly growing library according to its well-defined categories. Under the Mixkit License, all of the Premiere Pro templates are available for free download and can be used in your future video projects. It includes about 200 stunning free Premiere Pro title templates and tells your story with professional title templates, like wedding animations and special days animations. The following are some examples for your reference.
Premiere Pro Templates for Titles
Animated Drop Title: A straightforward headline can be seen through the frame’s many vibrant drips.
Festive Line Title: A holiday title with a star, tree, and underlining pattern in animated line art.
Slide In Title: The title animation is three lines long and slides in from the left.
Cupid Heart Title: A contemporary bordered line title. Two headers are divided by a heart and an arrow.
Colorful Heading Blocks: Page transitions using a single, centered title block on a solid background.
Recommend post: 4 Best YouTube Title Generators to Generate Viral Video Titles
Webflow
Webflow brings your design concept to life by using clean, semantic HTML5, CSS, and JavaScript. It is simple to make engaging animations and interactions. It also allows for the creation of coding-free experiences. The templates here are useful for you to edit animated text.
Text Animation by Webflow Community
- Plink Webflow Rebuild
- Candy Brittle
- Scroll & Text Animations
- No Code Round Text Effect
- Clipped Text with Moving Background
- No Code Broken Text Effect
- Cloneable Reveal Text On Scroll
- Angry Butterfly
Conclusion
Animated text components can help your video look more professional and deliver your narrative more engagingly and uniquely.
As you can see, this article shows you how to add text animation in Premiere Pro, which animated text generator is best for adding text to your movies, and where to find great text animation templates for use. Unleash your imagination today!
If you have any questions or concerns about using MiniTool software, please send an email to [email protected] which will allow you to get in touch with us.


User Comments :