If you are wondering how to merge multiple MP3 files into a single file, then you’ve come to the right place. There are both online audio merging sites and offline audio merging software programs that you can use, including the best MP3 merger and video editor for Windows – MiniTool MovieMaker.
Why do people want to merge MP3 files? Here are several possible reasons:
1. Merge MP3 files to enjoy your songs constantly.
2. Merge multiple MP3 files into one for use in videos.
3. Merge MP3 files when deleting unwanted parts.
How to merge MP3 files into one? Below are the useful methods to merge MP3 files. You can pick whichever method you think would work best for your situation.
How to Merge MP3 Files on Windows
MiniTool MovieMaker
If you frequently need to merge MP3 files on Windows, it is recommended to use MiniTool MovieMaker. It is a free video editor without watermark. As an all-in-one professional video editor, it enables creators to edit photos, videos, and audio on multiple tracks.
MiniTool MovieMaker supports a wide range of audio formats, including MP3, WAV, FLAC, M4R, M4A, AAC, and more. Besides, it can also handle various audio editing tasks such as splitting, trimming, changing audio speed, adjusting volume, and applying fade-in/out effects.
Follow the steps below to merge MP3 files using MiniTool MovieMaker.
Step 1. Download and Install
Click the button below to download the software, then follow the on-screen instructions to install it on your computer.
MiniTool MovieMakerClick to Download100%Clean & Safe
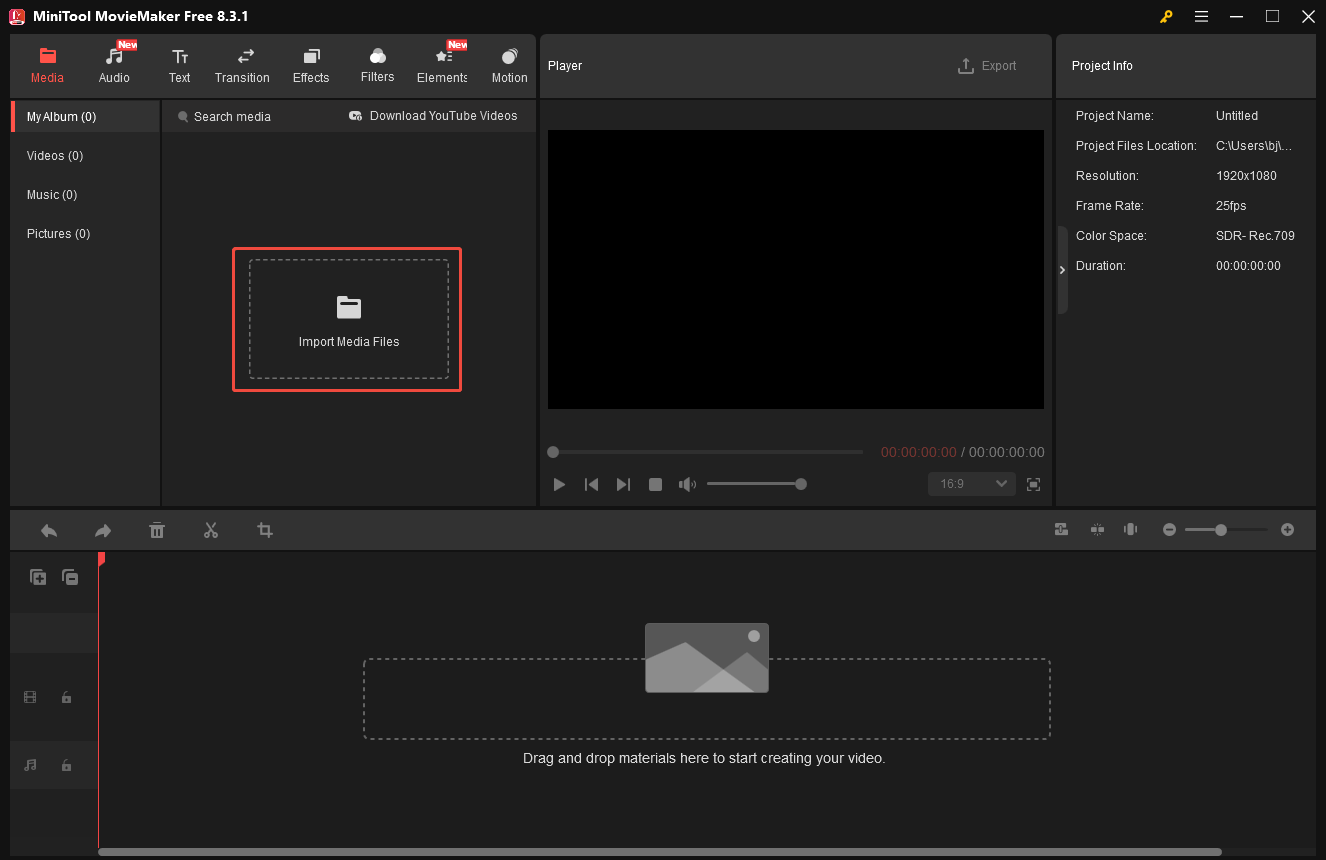
Step 2. Import MP3 Files
Launch the software and click the New Project button to enter the main interface. Click the Import Media Files area to open the File Explorer and locate your MP3 file.
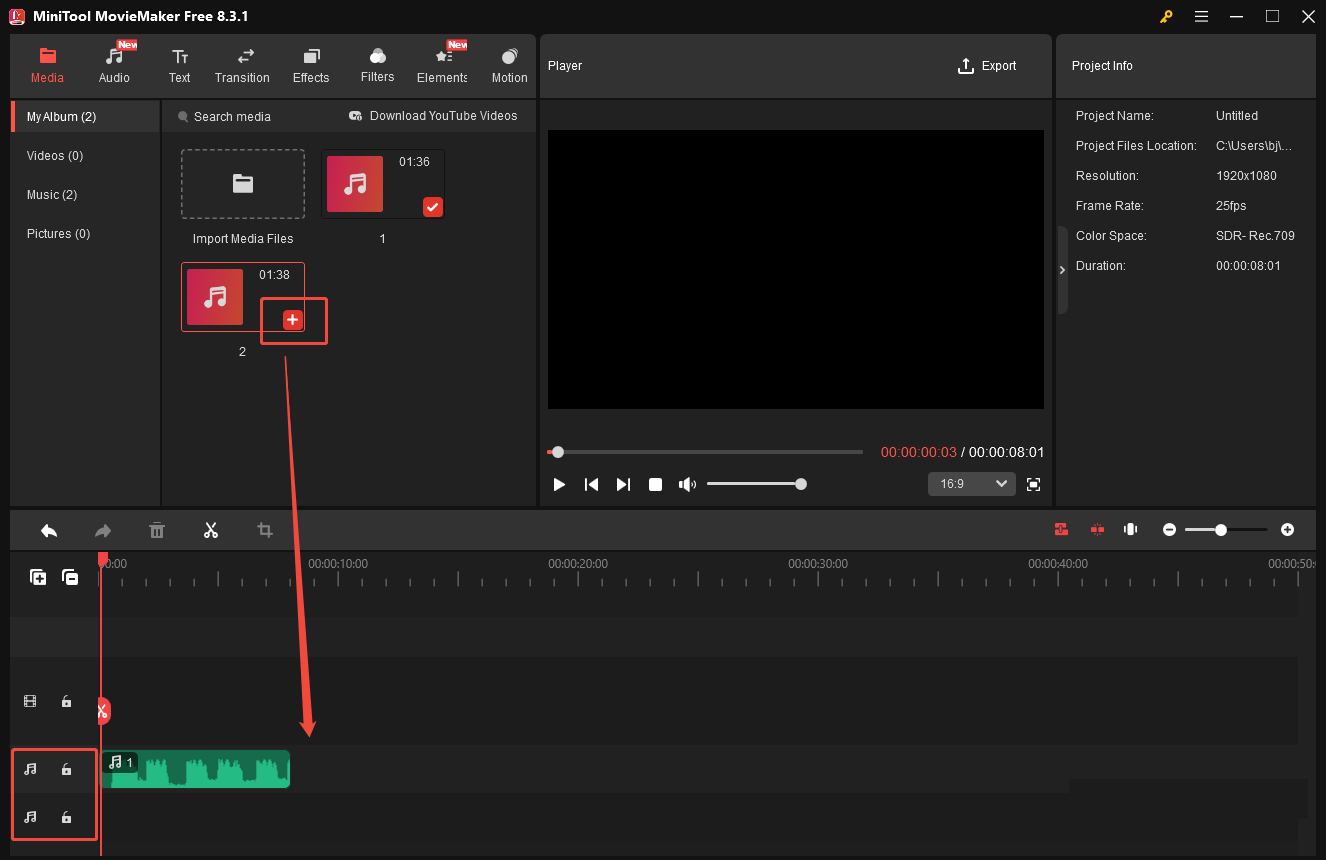
Step 3. Add MP3 Files to the Timeline
Click the plus icon at the corner of each imported audio clip to add it to the timeline one by one. Or you can press the Shift key on your keyboard and select the MP3 files you want to merge to add multiple media files at a time. MiniTool MovieMaker offers two audio tracks, allowing you to drag and position clips where you want them on the timeline.
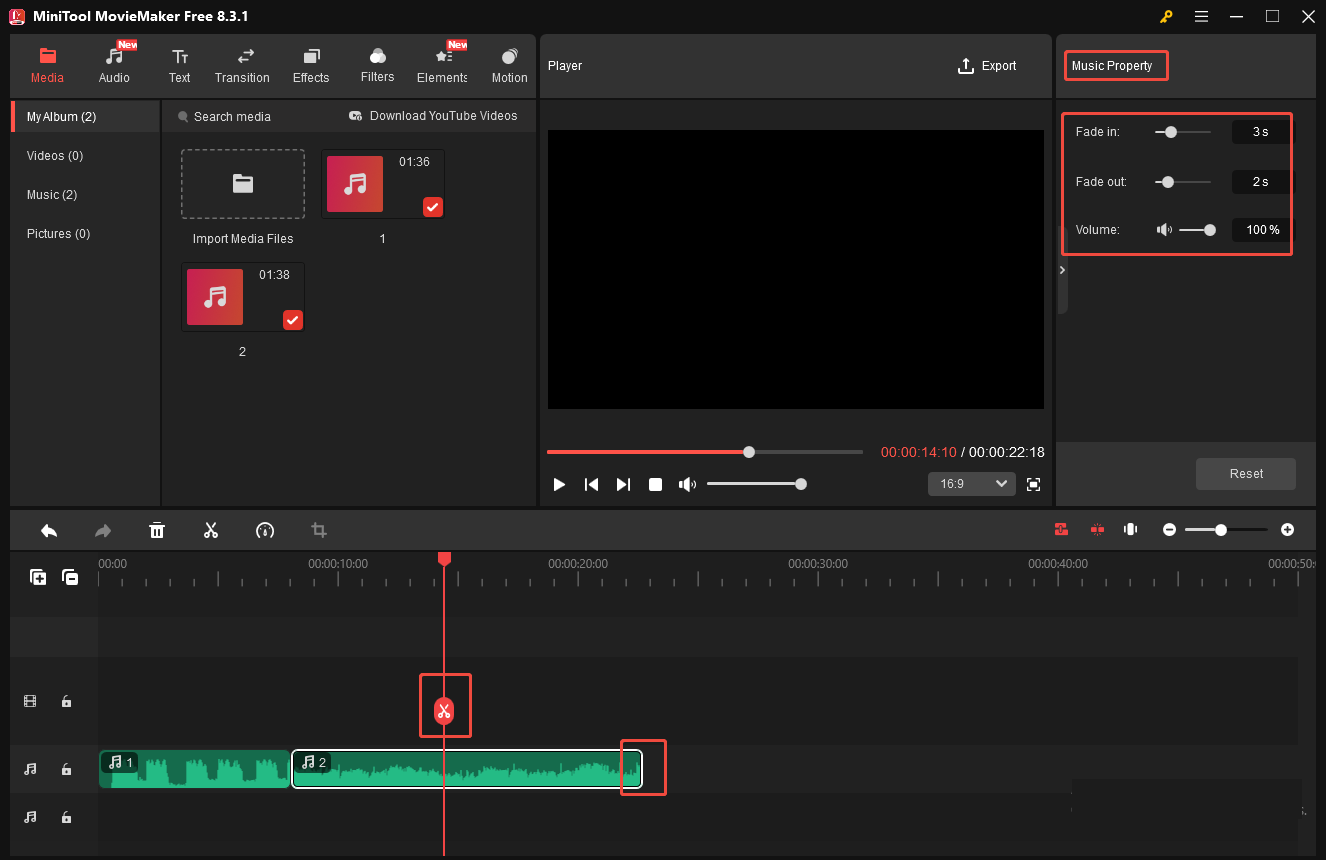
Step 4. Edit the MP3 Clips
After placing all your audio files on the timeline, you can split, trim, or adjust any of them.
Split audio: Select an audio clip, move the blue marker to the point you want the split to occur, and then click the Scissors icon.
Trim audio: Select an audio clip, and hover your mouse at the edge of the audio clip to get the trim icon. Drag it inward or outward to remove unwanted parts.
Adjust speed: Click the Speed icon on the timeline toolbar and choose Slow or Fast. Pick the desired speed to speed up or slow down the audio. There is also a Reverse option from the list. You can also select Reverse to play the audio backward.
Adjust audio property: Click an audio clip on the timeline, and you can see the Music Property panel on the right of the interface. Here, you can drag the sliders or input the suitable seconds value to change the duration of the fade-in and fade-out effects. Move the Volume slider leftwards or rightwards to adjust the volume of the video.
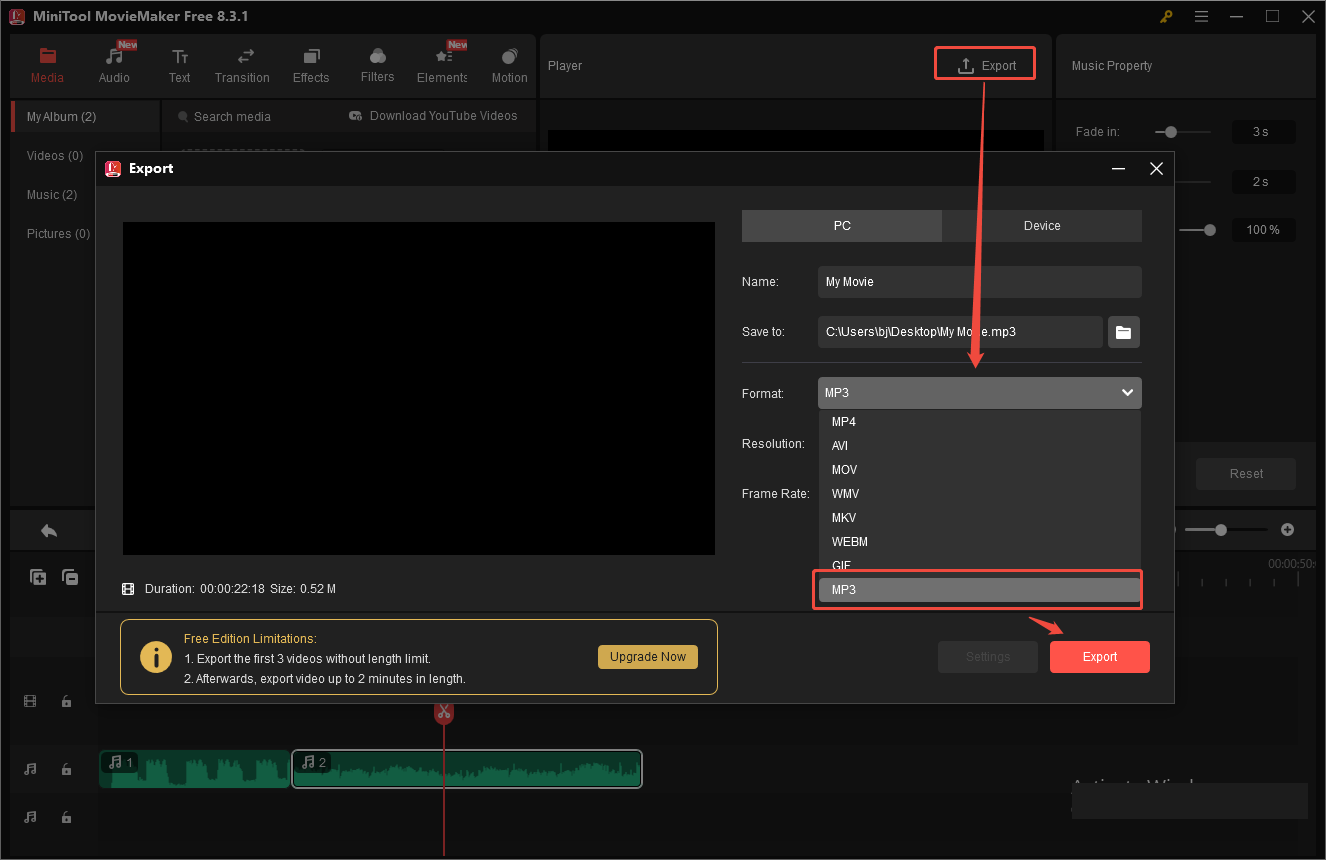
Step 5. Export the Merged MP3 File
Click the Export button to access a pop-up window. Select the MP3 format, rename the merged MP3 file, and specify the save location. Then click the Export button to save the audio to your computer.
Additional Features:
- Add audio to video
- Create video from images
- Numerous popular video effects, transitions, and motions
- Add text (titles, captions, and credits) into the video
- Quickly split, trim, and combine GIF & video & audio clips
- Reverse video & GIF
- Speed up or slow down GIF & video
- Extract audio from video
- Make GIFs from images or videos
DVDFab Audio Merger
DVDFab Toolkit is a one-step multimedia editing toolbox, which includes more than 20 convenient video, audio, and image conversion and editing tools that people often use in daily life, and each of them can complete the work independently.
To merge multiple MP3 files into one, you can try its Audio Merger tool, which allows you to merge multiple audio files of any format into one without requiring any professional skills. On top of that, it also comes with many powerful tools to help you trim audio, normalize audio, convert audio, etc.
Step 1: Run the Software
Download DVDFab Audio Merger from the official site, install it on your PC, and then double-click on its desktop icon to run it.
Step 2. Add the MP3 Files
Select the Merge tool under the Audio Tools section. Then, a new window appears where you can click the + icon to add your MP3 files, or simply drop them here.
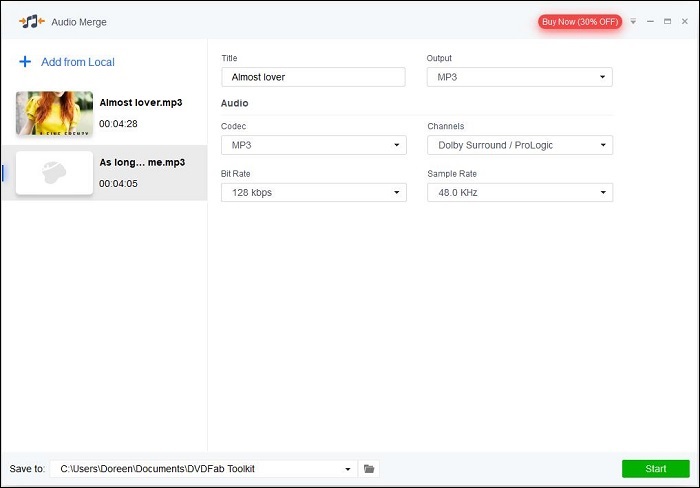
Step 3. Edit the Output File
Give a title for the merged audio file and Set MP3 as the output format. After that, you can change Channels, Bit Rate, Sample Rate, etc. And you can even reorder the MP3 files you uploaded
Step 4. Start Merging the MP3 Files
Click the Folder icon at the bottom to choose a location for your to-be-merged MP3 file. Then hit the Start button.
How to Merge MP3 Files on Mac
Audacity
Audacity is the go-to program if you’re looking for an MP3 merger for your Mac computer because it can help you merge audio files in different formats, such as WAV, AIFF, MP2, MP3, FLAC, and OGG, and it can handle your multi-track audio files.
With it, you can split any bit of audio into as many pieces as you want, or you can merge as many MP3 files as you want in whatever order. Better yet, you have access to other features, including removing background noise, adding effects to the MP3 files.
Step 1. Open Audacity
If you have installed the Audacity program on your computer, just hit the desktop icon to run it. Otherwise, download the right version, install it on your PC, and then launch it.
Step 2. Import the MP3 Files
Click File > Import > Audio, select the two MP3 files that you want to merge by clicking each one while holding the Apple key, and then click the Open button.
Step 3. Merge the MP3 Files
After that, two Audacity windows will appear – one window for an MP3 file. Select the MP3 file you want to appear first in the final merged file, and then click Select > All, and then click Edit > Copy. Next, bring another Audacity window to the foreground, select Edit > Paste.
Step 4. Preview the merged File
You can use the Play button to enjoy the newly combined MP3 file.
Step 5. Export the File
Once you’re satisfied with the result, go to File > Export and select Export as MP3. Then give a name for the merged MP3 file and click Save.

How to Merge MP3 Files Online
Audio Joiner
Audio Joiner is an online free audio merger, which is very suitable for beginners. With this excellent tool, you can easily merge unlimited MP3 audio files. Not limited to MP3, you can also import other audio formats, such as M4A, OGG, WAV, etc.
When you merge MP3 files, you can use your own way to adjust the interval, apply fade in/out effects to produce a smooth and natural audio synthesis. In addition, you don’t have to worry about privacy issues, because all uploaded data will be automatically deleted after a few hours.
Step 1. Open Audio Joiner
Visit the Audio Joiner site on your web browser.
Step 2. Add the MP3 Files
Click the Add tracks button to add your MP3 audio files, and the number of tracks you can upload is unlimited.
Step 3. Edit the MP3 Tracks
Now, you can change the order of tracks and adjust their duration. Then use the small square buttons on the sides of the tracks to select the merge mode.
1. Crossfade: Each track is gradually fading into silence, while the next track is fading in and gradually becomes louder.
2. Fade in: The first track gradually becomes louder.
3. Fade out: The last track gradually fades into silence.

Step 4. Start Merging the MP3 Files
Click the Join button to start the merge process. After the MP3 files have been joined, click Download to save the merged file.
Clideo
Another online service to merge MP3 files is to use Clideo. As a free video editor, it provides various powerful tools to help you elevate your videos. It’s also a secure MP3 merger that gives you the possibility to add multiple files at once from your PC, Google Drive, Dropbox, or by URL.
This audio merger keeps everything straightforward. You can adjust the order of MP3 files to be played in the to-be merged audio file, change the file name and output format to your preference, and then merge MP3 files in a few seconds.
Step 1. Open Clideo
Visit the Clideo site in a web browser, and then click All tools to select Merge Audio.
Step 2. Upload Your MP3 Files
Click the Choose Files button to import your MP3 files. You can also add the files from Google Drive, Dropbox, or by URL.
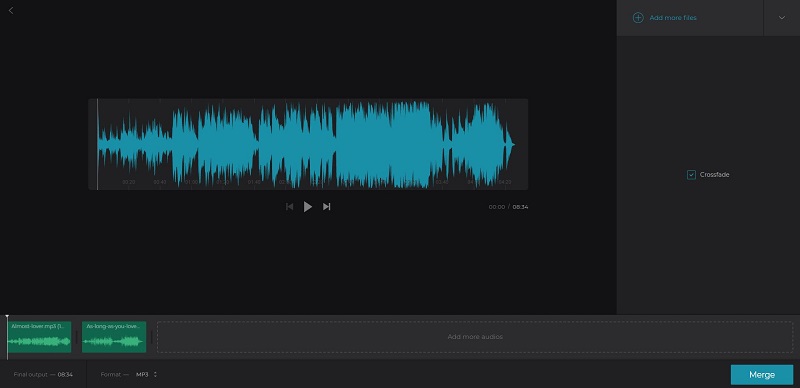
Step 3. Edit the MP3 Files
After you’ve uploaded the MP3 files you want to merge, drag and drop them on the timeline to change the order if needed. You can also choose to tick the Crossfade option to create a seamless mix.
Step 4. Merge the MP3 Files
Set MP3 as the output format in the lower left corner. Hit the Merge button, and then the online service will take a moment to process. When it’s done, click Download to save the merged MP3 file to your computer.
Conclusion
Now that you’ve already known how to merge MP3 files online or offline, which method do you prefer?
If you’re looking for a tool that can not only help you merge MP3 files but also edit MP3 files, MiniTool MovieMaker could be the ideal solution.
If you have any questions or suggestions when merging MP3 files, please let us know via [email protected] or share them in the comments section below.
Merge MP3 Files FAQ
2. Click Import Media Files to import your video and audio files.
3. Drag and drop them to the timeline.
4. Tap on Export to choose an output format and specify the destination.
5. Hit Export again to save it.
2. Select the Merger option.
3. Add your MP3 files to the app.
4. When the files are added, click Merge to start merging your files.
5. Tap on Save to save the merged file to your device.
2. Pick the MP3 Merger option.
3. Click Track 1 to add the first MP3 file.
4. Tap on Track 2 to add your second MP3 file.
5. Once the files are added, give a name for the output file and hit Start.
About The Author

Position: Columnist
Alice is a tech writer at MiniTool, specializing in tutorials and guides on video editing and screen recording. She stays up to date with the latest tools and techniques to ensure her content is accurate and easy to follow. By combining hands-on testing with continuous learning, Alice aims to help readers solve tech problems efficiently.
User Comments :