How to Add Audio Tracks in Premiere Pro?
How to Add an Audio Track in Premiere Pro?
To add an audio track, simply grab an audio clip in the timeline and drag it below the other audio tracks and the Master track.
A new audio track will be automatically created when you let go of the mouse.
Use the Add Tracks Tool
Also, there is another method to add a new track in Premiere Pro, using the Add Tracks tool. Select the Add Track option from the right-click menu in the Timeline panel.
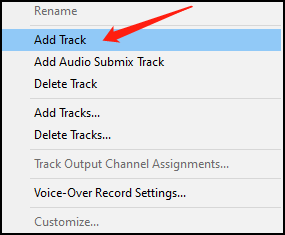
The new track will display instantly in the timeline while you click the audio timeline.
How to Add Multiple Audio Tracks in Premiere Pro?
You can layer audio clips and organize your project by adding multiple audio tracks. Audio layering is important for producing complex soundscapes, providing a more complete and professional sound for your projects.
For instance, you can layer dialogue, music, and sound effects to make a distinctive audio mix. To add multiple audio tracks, select the Add Tracks option from the track header menu.
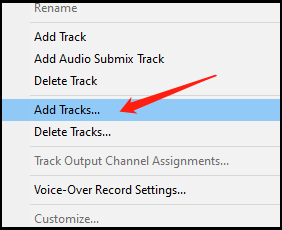
Then, the Tracks dialog box will come up, where you can specify the number of audio tracks to add and where to place them. After that, click OK.
How to Delete Audio Tracks in Premiere Pro?
To delete an audio track, right-click on an empty area in the track you want to delete and select Delete Track from the pop-up menu. This will instantly delete the track.
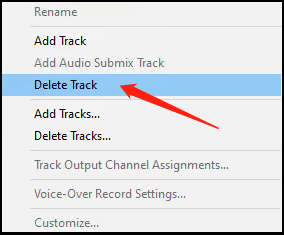
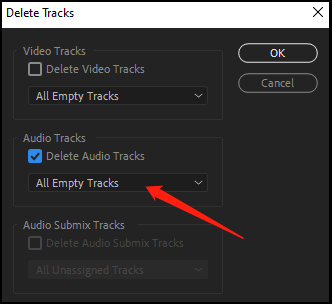
You can see the Delete Tracks window. To delete one or more audio tracks, select Delete Video Tracks or Delete Audio Tracks for any track deletion.
Choose which track you would like to delete from the dropdown menu. For instance, All Empty Tracks, Audio 1, Audio2, or Audio 3.
How to Delete Audio from a Video in Premiere Pro?
To delete audio from a video, you should first right-click the video clip in the timeline and then select Unlink. This efficiently separates the audio and video tracks, making it easier to work on the audio part of the clip separately without affecting the video itself.
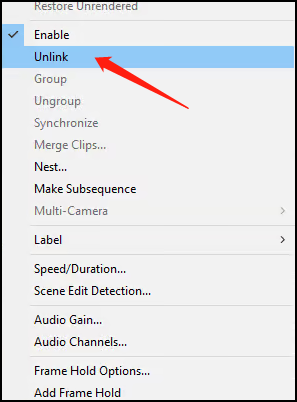
Use the Unlink Feature
Another method to separate is to use the unlink feature by clicking it to unlink. Following that, select the audio and press the Delete hotkey on your keyboard.
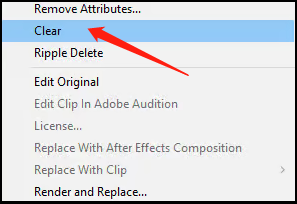
Or, you can right-click the audio layer displayed in the timeline after clicking Unlink and select the Clear option from the pop-up menu. In any case, the audio will be removed from your video.
Also read: How to Separate Audio from Video (Free Ways Are Included)
How to Delete Empty Tracks in Premiere Pro?
If you want to declutter your timeline by removing unwanted audio tracks, just follow this process and you can do it in a few easy steps:
Right-click in the track header box and then select Delete Tracks.
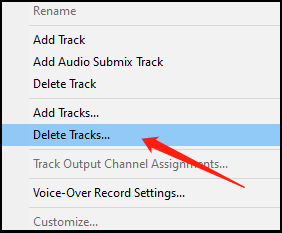
Select Delete Tracks and Delete Audio Tracks in the new box to remove audio tracks. Note the All Empty Tracks section at the bottom and make sure you click on it and hit OK.
How to Delete a Specific Part from an Audio Clip without Affecting the Video?
When separating audio and video files, it’s easy to remove a specific part from an audio clip without affecting the video. Alternatively, you can use the method of locking the video layer without locking the audio layer.
Drag the playhead to where you want to start deleting, then press C on your keyboard to select the cut tool. Just cut off the parts you don’t need.
Conclusion
How to add audio tracks in Premiere Pro? How to delete audio tracks in Premiere Pro? After reading the above guide, do you think it is easy to get started? If you have any questions about this topic, please leave a message in the comments section below.
Featured Tip: Boost Your Video Projects with a Great Video Editor
MiniTool MovieMaker is a professional video editing app that provides a simple timeline with 1 video track, 1 music track, and 9 additional tracks. Also, it allows you to add music to a video, add text to a video, add subtitles to a video, and more. Most importantly, you can save the desired part of the video by splitting, trimming, and cropping. Try it now to spice up your video projects!



User Comments :