Case study videos can visually demonstrate the success and effectiveness of a project. This guide from MiniTool MovieMaker – one of the best video editing software will share how to make case study videos to help you tell your story effectively and engage your target audience.
In the digital age, video has become an effective tool for communicating stories and demonstrating results. Therefore, if you want to present a success story of a certain project, you can create a case study video, which can help the audience understand your product or service more intuitively. This guide explains the case study videos’ meaning, common types of case study videos, and how to make case study videos free to help you create the best case study videos.
What Is a Case Study Video
A case study video is a type of video content that showcases the successful application of a specific project, product, or service. Such videos are usually centered around real cases. It shows the capabilities and achievements of a brand or business by telling the customer’s challenges, solutions, and final results.
When creating a case study video, it is common to include the following key elements: first, a clear description of the problem or need faced by the client; next, a demonstration of the solution and how it was implemented; and finally, highlighting the result and the client’s feedback. This structure can convey the message effectively and engage the viewer through vivid storytelling.
The main purpose of case study videos is to enhance brand credibility and attract potential customers. Through real-life examples, viewers can understand the value of a product or service more intuitively. Especially in a competitive market environment, case study videos provide an effective marketing tool to help you stand out among your target audience.
Which Types of Case Study Videos Can You Create
Case study videos are a great tool for showcasing a brand’s success story. It can help potential customers understand the true value of a product or service. Here are a few common types of best case study videos
Customer Testimonial Video: Customer testimonial videos are usually created by interviewing satisfied customers and asking them to share their experiences. This form can convey the real feelings of customers and enhance the brand’s credibility. Through the customer’s personal experience, potential customers are more likely to resonate with the brand, and thus increase their willingness to buy.
Review Video: Review videos are usually produced by third-party experts or influencers, focusing on product features, strengths and weaknesses, and actual performance. These videos provide an objective assessment that can help consumers make more intelligent purchasing decisions. Review videos often include detailed product displays and usage demonstrations, and are suitable for various consumer products.
Narrative Video: Narrative videos are storytelling videos that focus on the customer’s challenges and solutions. These videos usually have a clear plot line that shows the customers’ changes before and after using the product. Through vivid storytelling, viewers are able to better understand how the product solves real problems and increase emotional engagement.
Question-and-Answer Interview Videos: The Q&A interview video answers viewers’ concerns through conversations with customers or experts. These videos show the real voice of the customer and also provide professional insights for potential customers who have questions about the product. By answering frequently asked questions, such videos can help viewers understand the value of a product more fully.
How to Make Case Study Videos
Reading here, I’m sure you’re clear about the definition and types of case study videos, so how to make the best case study videos? There are nine key parts here.
1. Define the Objectives
Before making a video, it is important to define the goals of the video first. This includes the message you want to convey and the effect you want to achieve. The goal could be to demonstrate the use of a product in a specific scenario, share the success of a project, or educate viewers on how to deal with a similar problem.
Clarifying the objective can help you focus your content and ensure that the message is delivered clearly and effectively. In addition, understanding the characteristics and needs of your target audience can help you better design content.
2. Select the Right Case
Choosing the right case is a key part of producing best case study videos. A good case should be representative and inspiring, and be able to effectively demonstrate problem-solving methods and results. When choosing, consider the relevance and impact of the case. Ideal cases should have a storytelling sense and attract viewers’ attention. For example, you can choose a success story of a customer that demonstrates the change they experienced after using your product or service. Make sure that the case is supported by enough data and facts to convince the audience.
3. Write a Case Study Video Script
The script is the core content of the video, and the structure and logic should be taken into consideration when writing. The video usually should be divided into three parts: introduction, main body, and ending.
The introduction part briefly introduces the background of the case, the main body part describes the solution and implementation process in detail, and the end summarizes the key points and provides a call to action. The script language should be simple and easy to understand, avoiding overly specialized terminology to ensure that the viewer can easily understand.
4. Collect Material
In the process of writing a script, it is vital to gather information relevant to the case. Information can include statistics, charts, customer feedback, images, and video footage. This information can enhance the credibility of the video, and enrich the video content, making the viewer understand the success factors of the case deeply. At the same time, you should ensure the reliability of the sources and avoid using unverified information.
5. Record the Video
Once you have prepared the script and material, you can record the video. Choose a quiet, well-lighted place and make sure the recording device (e.g., camera or cell phone) has good sound and picture quality. During the recording process, you can give explanations, interview relevant people, or film actual scenes.
Pay attention to the speed and tone of voice when recording to make the content more attractive. You can shoot from multiple angles, which can make the video more dynamic and professional.
6. Edit Your Video
After recording, enter the video editing stage. Use video editing software to edit the material, and add necessary visual effects, transition effects, and background music to make the video more enjoyable. When editing, pay attention to the logical flow of information to ensure that viewers can easily follow the content of the video, while not losing the focus and core information.
Before editing your video, you first need to choose a good video editing application. Here I recommend you to use MiniTool MovieMaker, which is a free video editor without watermark. It also provides an intuitive interface and rich features that allow you to quickly import video clips, trim video, add effects and subtitles, and music. In addition, it is also a photo video maker that allows you to make video from images.
Let’s look at how to make case study videos free using MiniTool MovieMaker.
Step 1: Launch MiniTool MovieMaker
Click the button below to download and install MiniTool MovieMaker on your PC. Launch this software, and close the promotion window to enter the main interface.
MiniTool MovieMakerClick to Download100%Clean & Safe
Step 2: Import your media files
Click Import Media Files to import all necessary media files from your computer. And then directly drag them onto the timeline.
Step 3: Cut your video
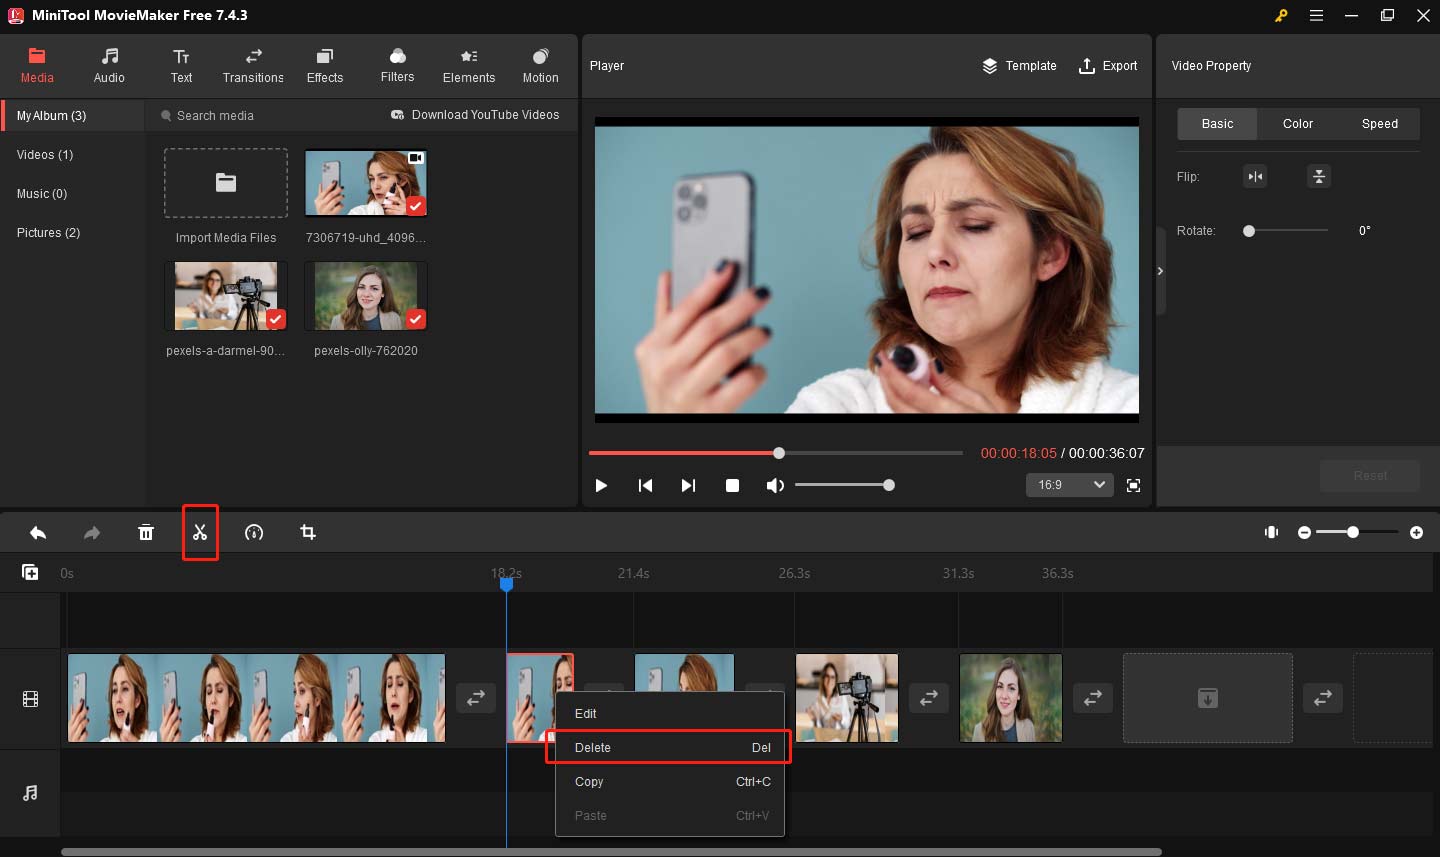
Select the target video clip on the timeline, drag the playhead to the position where you want to split, click the scissors icon, or click the Split icon above the timeline. Right-click on the unwanted video clip and select Delete to remove.
Step 4: Trim your video
Click your target video clip, and hover your mouse over the beginning or end of the video clip until you see the double-headed arrow. After that, drag this double-headed arrow to the right or left, and you will get the shortened clip.
Step 5: Add transition
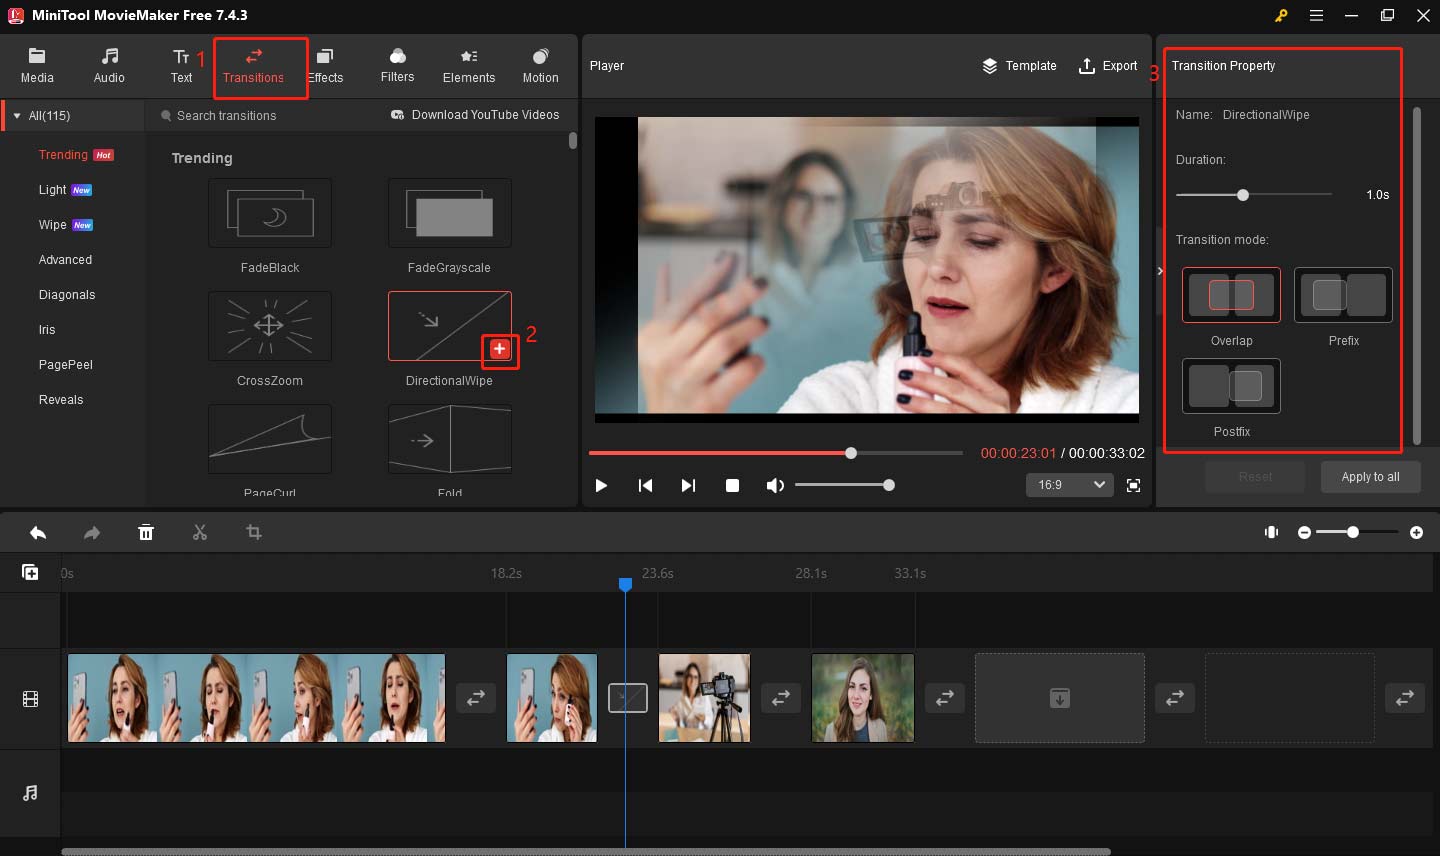
Select the clips you want to add transitions next to and go to the Transitions tab. You can hover your mouse over the target transition to preview its effect. Click the download icon on the desired transition and click the plus icon on it. You can change the Transition Property including Duration, Transition mode in the right window.
Step 6: Add text
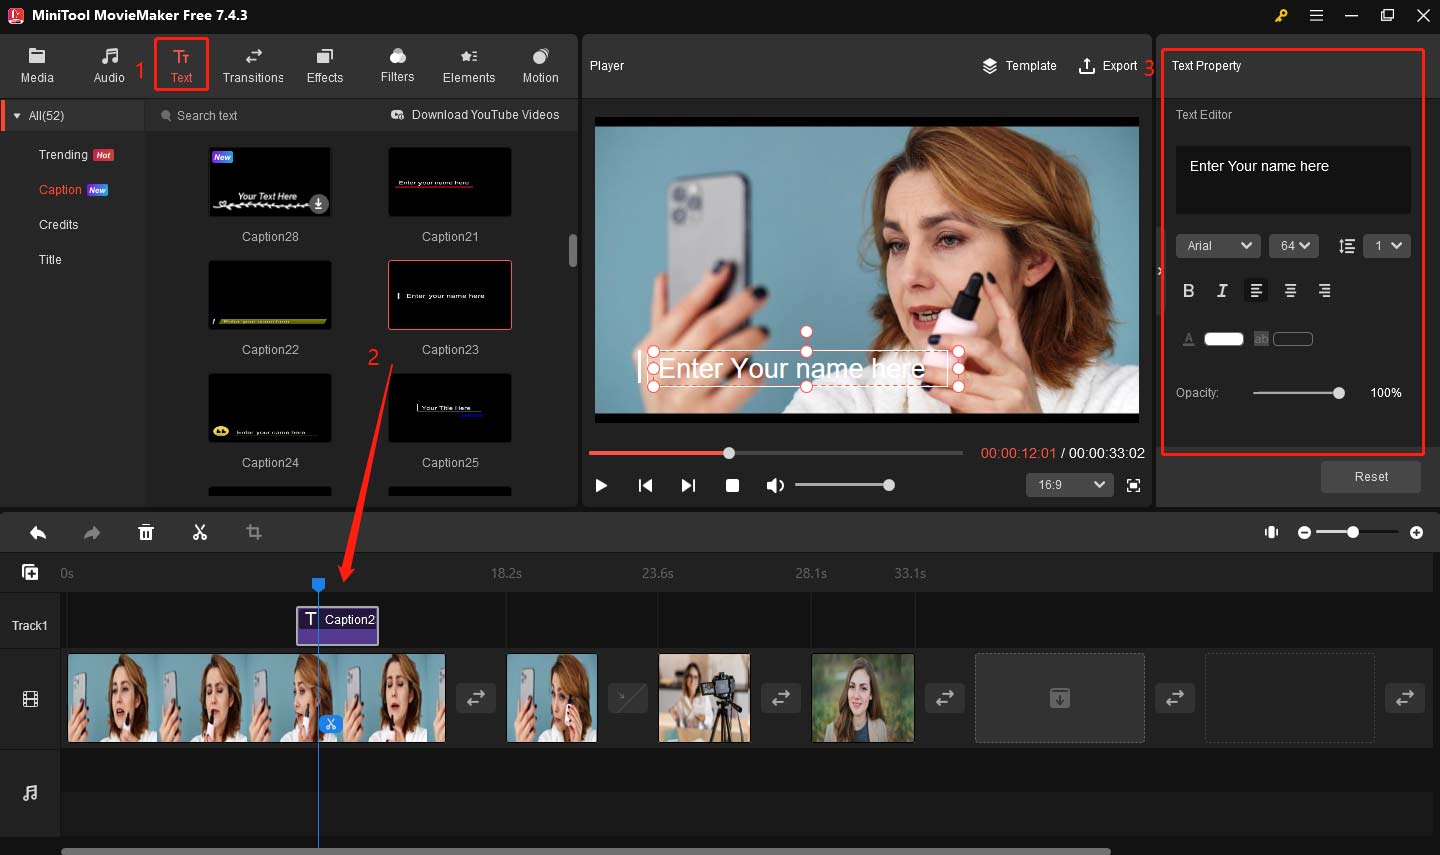
Click the Text button in the top toolbar, find the text template you want to add, click the download icon on the desired template, and directly drag it to the appropriate place on the timeline. After that, go to Text Property, type your text in Text Editor, and you can also set the text font, size, line spacing, color, and more in Text Property.
Step 7: Add background music
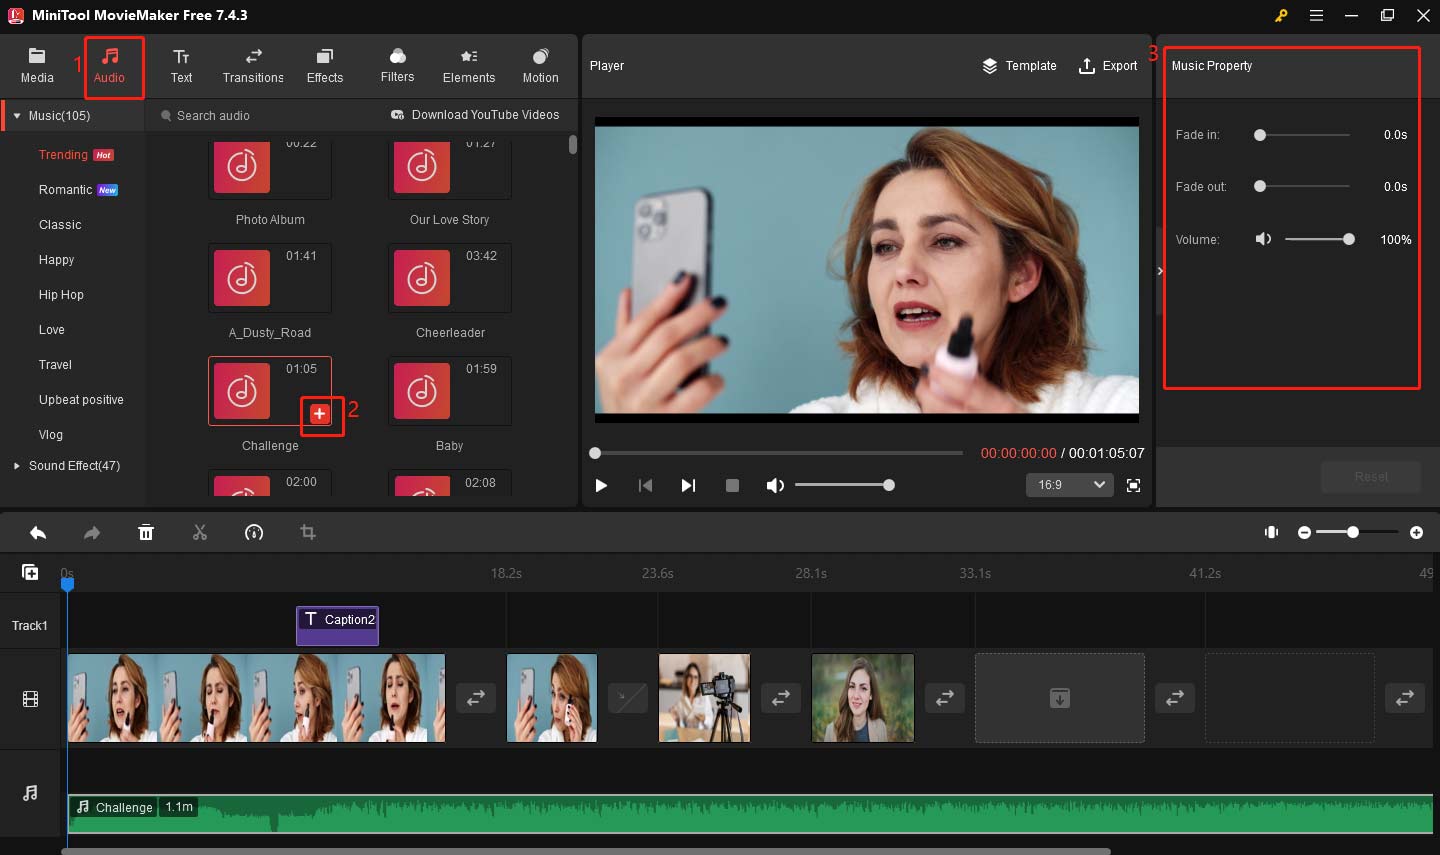
The background music is the soul of a video and it can make your video seem less monotonous. Go to theAudio tab, click the download icon on your favorite music, and click the plus icon to apply it. You can add the fade effect and change the music volume in Music Property. If you can’t find appropriate music, you can also import your music file just like importing your videos.
Step 8: Export your video
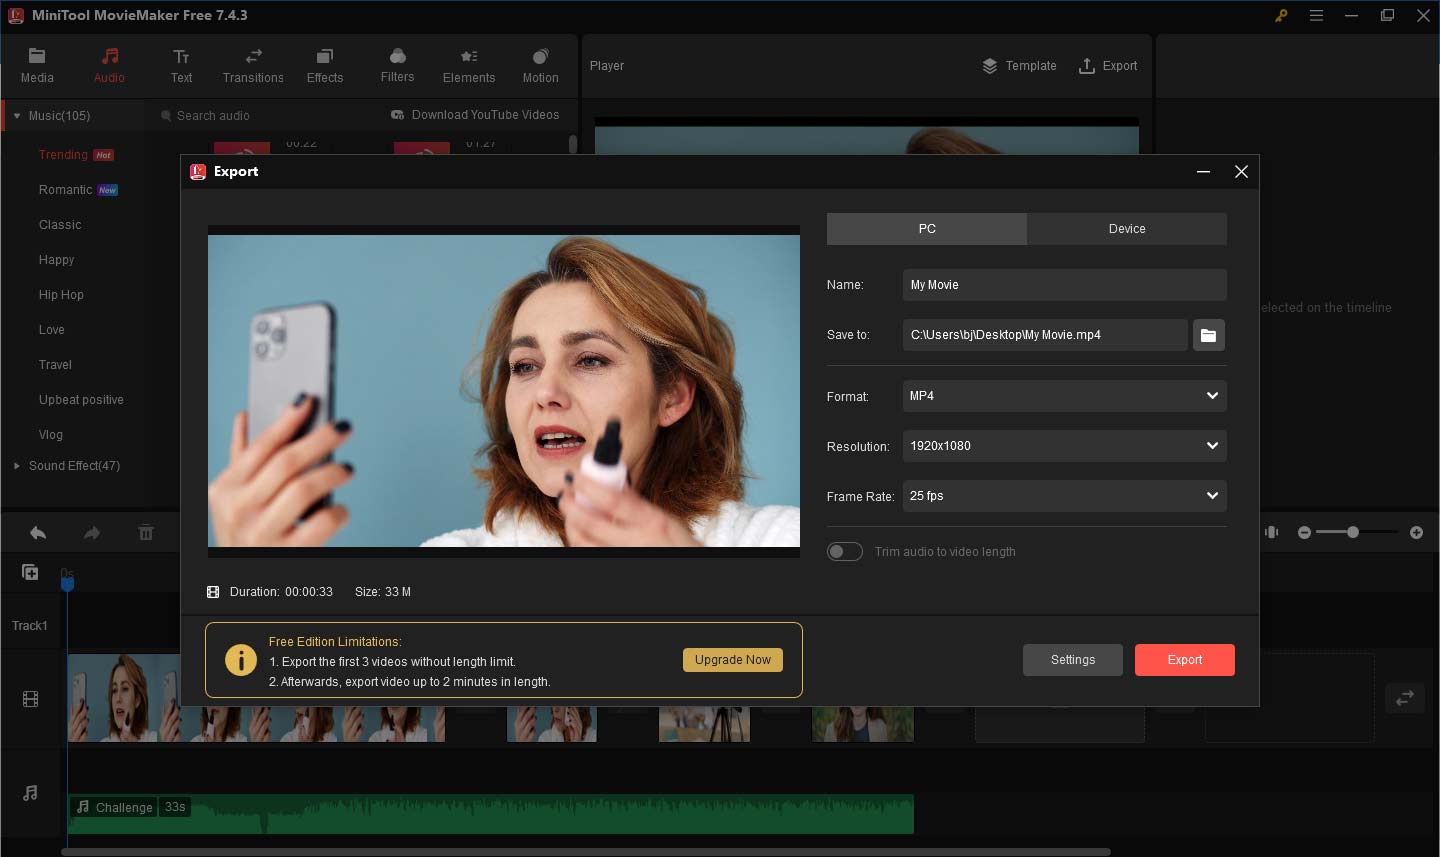
After completing all editing, you can click the Play icon to preview this final effect. If you think you don’t need to make any more changes, click the Export button, you can set the name, file location, format, resolution, and more in the Export window. Finally, click the Export button at the bottom of the window to save your work.
7. Review and Revise
Once editing is complete, reviewing the video is a very important step. Invite team members or relevant people to watch the video, provide feedback, and check the accuracy and completeness of the content. Pay attention to whether the audio and video are synchronized and ensure that there are no technical issues.
Make necessary changes based on the feedback to ensure the final version is optimal. This step not only improves the quality of the video but also gives you a useful experience for future productions.
8. Publish and Promote
After reviewing the video’s accuracy, publish the video to appropriate platforms, such as YouTube, TikTok, and the official website of the enterprise. Publish with an attractive title and detailed description to increase search engine visibility. To increase the exposure of the video, it can be promoted through social software, email, or online advertising to attract more viewers.
9. Collect Feedback
After the video is released, it is very important to actively collect feedback from viewers. You can get viewers’ opinions and suggestions through comment sections, questionnaires, or social media interactions. This feedback will help you evaluate the effectiveness of the video to continuously improve the video quality and audience experience.
Bottom Line
The process of producing a case study video requires meticulous planning and execution, from selecting the case study to recording and editing. By defining your objectives, writing a polished script, and using high-quality footage, you can convey your message to engage and impress your audience effectively.
It’s also important to collect feedback from the audience after releasing your video. This can help you evaluate the effect of your video and also provide a valuable reference for future projects.
With the accumulation of experience, you will improve your video production level and create more influential case study videos, which will further enhance your brand image and market competitiveness. Ultimately, these videos will become an important tool for showing your success stories.
Finally, this is all about how to make case study videos free and I hope this article will help you. If you have some problems editing your case study videos with MiniTool MovieMaker, please feel free to contact us via [email protected] for help.


User Comments :