Do you know white noise videos? If you want to make a white noise video to relieve people's stress, you can carefully read this article from MiniTool MovieMaker (a free video maker). This post will show you how to make a white noise video to help you.
White noise has become increasingly popular for its calming and soothing effects. Many people use it to help with sleep, relaxation, and focus. How to make a white noise video? If you’re interested in creating your own white noise video, this guide will walk you through the process, from understanding what white noise is to creating your video with simple tools.
What Is White Noise
White noise is a consistent sound that contains all the frequencies within the range of human hearing. It is often described as sounding like static electricity or a steady and constant humming sound. Imagine the hum of a fan or the sound of rain. These are examples of white noise.
White noise works by masking other sounds. It creates a constant auditory backdrop that drowns out disruptive noises, helping people concentrate, relax, or sleep better. The reason white noise is so effective is that it contains all frequencies at equal intensity, which prevents any specific sound from standing out.
White noise can be used in many situations. For example, it’s often used to help people who have trouble falling asleep in noisy environments. It’s also common in workplaces, where it helps to increase focus by masking distracting sounds. Whether you’re trying to block out city traffic, office chatter, or other noises, white noise is a reliable solution.
Why Make a White Noise Video
There are many reasons why someone might want to make a white noise video. Here are a few of the most common reasons:
- Helps with Sleep: Many people struggle with sleep due to noisy environments. A white noise video can create a calming atmosphere that helps people fall asleep faster and sleep more soundly.
- Creates a Relaxing Environment: White noise videos are often used in meditation and relaxation. They can help calm the mind, reduce stress, and create a peaceful atmosphere for relaxation or yoga.
- Share with Others: If you enjoy the benefits of white noise, you might want to share it with others. Creating a white noise video can be a helpful resource for people who need the same relaxation, sleep aid, or focus.
- Make Money: Creating a white noise video for platforms like YouTube can give you the chance to share this content with a wider audience. You can even monetize it if you want to make some income while helping others.
![How to Make a Meditation Video for YouTube [Ultimate Guide]](https://images.minitool.com/moviemaker.minitool.com/images/uploads/2025/03/how-to-make-a-meditation-video-thumbnail.jpg)
How to Prepare to Make a White Noise Video
Before you start making your white noise video, you need to prepare your resources and gather some basic tools. Here’s a breakdown of what you need to do:
Choose Your Audio Source
The first step is to choose your white noise audio. You can either generate the sound using software or record it manually.
- Generate Using Software: You can use audio-generating software like Audacity to create the white noise. Audacity is a free, easy-to-use tool that allows you to produce a constant white noise sound. You can adjust the volume and length of the sound to suit your needs.
- Record Yourself: If you prefer, you can also record white noise using a microphone. However, this method may be less consistent, and the sound quality may vary depending on the equipment you use. It’s usually easier to generate noise digitally, but recording yourself could add a personal touch.
Select Your Visuals
The visuals you choose will set the mood of your video. Since white noise is meant to be relaxing, your visuals should also be calming and unobtrusive. There are several options you can consider.
- Static Images: A simple and peaceful image, such as a beach, forest, or calm sky, can work well as a background. This gives your video a serene atmosphere without distracting the viewer.
- Animated Backgrounds: Some people prefer soft animations or slow-moving patterns. You could use gentle waves, clouds drifting, or steady drizzle. These can add a bit of life to your video while still maintaining a calm vibe.
- Plain Backgrounds: If you want to keep it as simple as possible, a plain background can also work well. It keeps the focus entirely on the sound of the white noise, which some viewers might find more soothing.
Choose Video Editing Software
Now that you have your audio and visuals, it’s time to put everything together using video editing software. MiniTool MovieMaker is a fantastic option for this task. It’s a user-friendly tool that’s perfect for beginners, and it comes with rich features that make editing quick and easy. Here are some reasons to choose MiniTool MovieMaker:
- User-Friendly Interface: The layout is simple and easy to navigate, making it perfect for beginners.
- Drag-and-Drop Functionality: You can easily add your audio and visuals by dragging them into the timeline.
- Audio Adjustments: You can adjust the volume and fade in or out your audio for a smoother listening experience.
- Video Trimming: You can trim video easily to make sure it fits the desired length.
- Multiple Output Formats: You can export your video in various formats, like MP4, AVI, MOV, etc., ensuring it works on different devices.
- Fast Rendering: The software renders your video quickly, so you don’t have to wait long to see the final result.
- No Watermark: It is a free video editor without watermark. Unlike many other free video editors, MiniTool MovieMaker doesn’t add a watermark to your video.
MiniTool MovieMakerClick to Download100%Clean & Safe

How to Make a White Noise Video
Now that you have all the necessary materials, it’s time to start creating your white noise video. Let’s see how to make a white noise video.
Generate White Noise
If you want to generate white noise using Audacity, please follow the steps below. The process is simple and quick.
Step 1: Go to the Audacity official website, download, and install it on your computer.
Step 2: After installation, open Audacity and create a new project by clicking on File in the menu bar, then selecting New. This will generate a fresh audio track where you can work on your project.
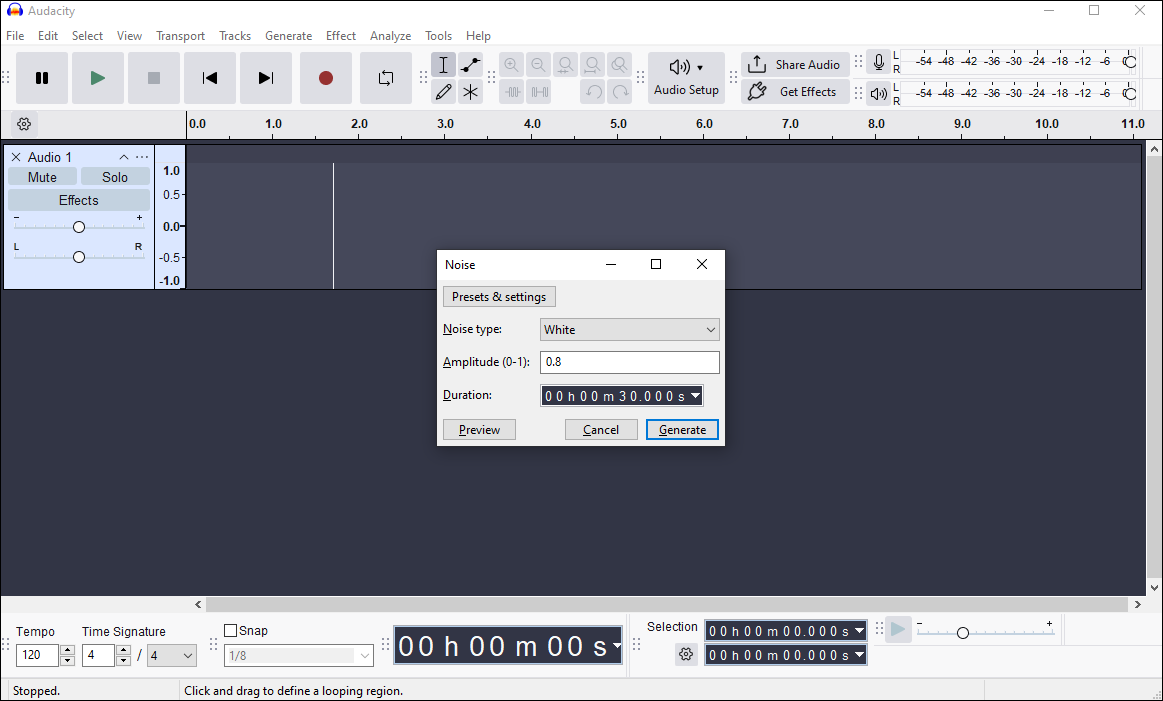
Step 3: To generate the white noise, go to the Generate tab in the menu and choose Noise. A Noise window will appear, where you can select the type of noise you want. Choose White from the available options. You can further adjust settings like Amplitude (which controls the volume) and Duration. Once you’ve made your adjustments, click Generate to proceed.
Step 4: Audacity will create a waveform that visually represents the white noise. You can preview the sound by pressing the play button. If you’re happy with the result, it’s time to save your file. Click on File and select Export.
Add Visuals to Your White Noise Video
Once you have your white noise sound, it’s time to add visuals to your video. Here’s how to make a white noise video using MiniTool MovieMaker.
Step 1: Download and Install MiniTool MovieMaker
Click the button below to download free video editor, and follow the instructions to install it on your PC. The installation process is quick. Once installed, launch it to start your project.
MiniTool MovieMakerClick to Download100%Clean & Safe
Step 2: Import Your Photo/Video Files
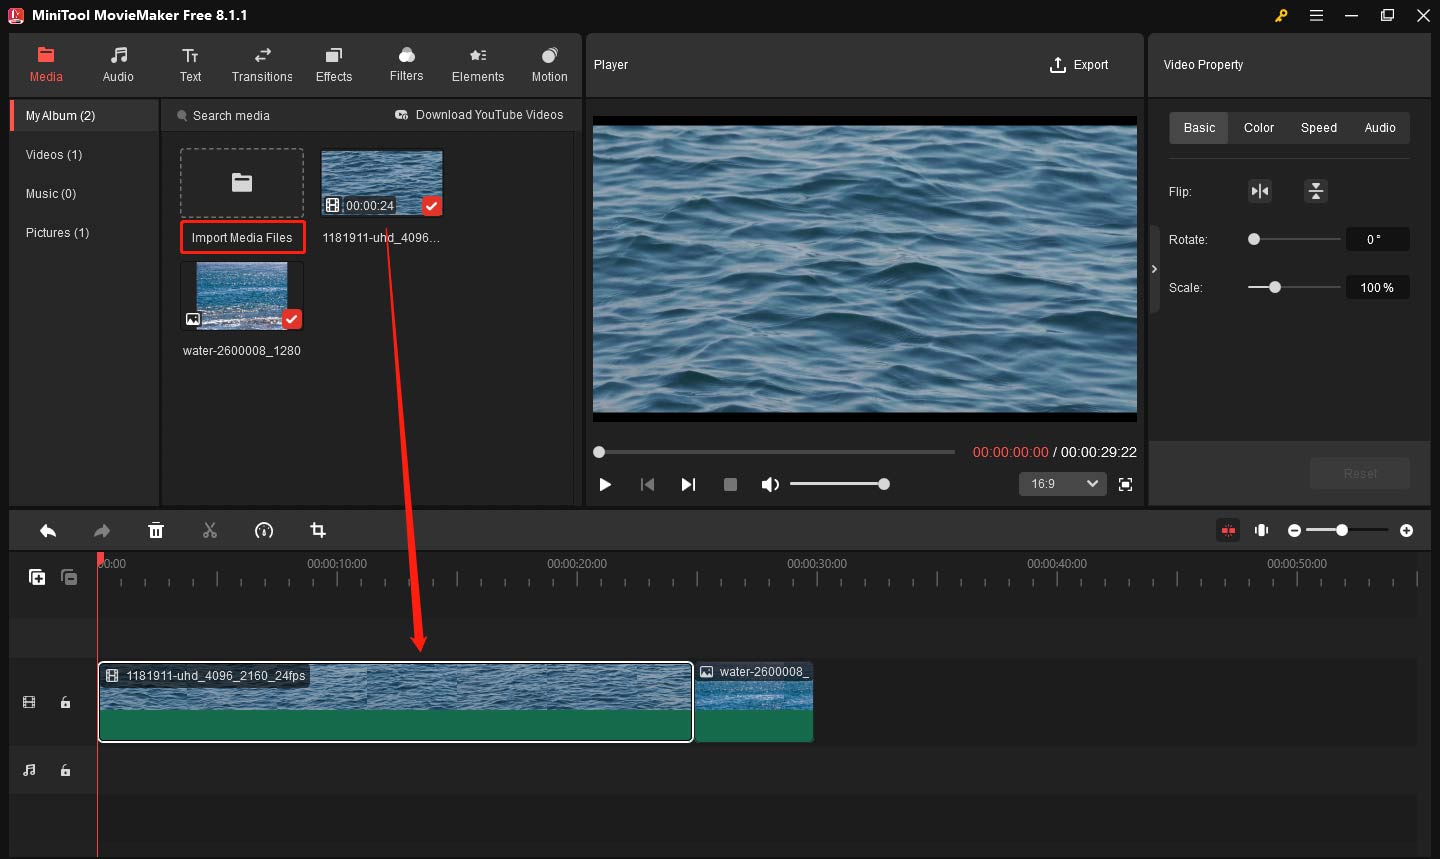
After opening this app, click on New Project to create a new one. Then, click Import Media Files to import the visuals you wish to include in your video. You can select photos, videos, or even a combination of both, depending on the visuals you want to pair with your white noise. Once your files are imported, they will appear in the media library under Media. Drag and drop your selected image or video clips onto the timeline at the bottom of the screen.
Step 3: Add Audio Files
Once your visuals are in place, it’s time to add audio to your project. There are two options for adding audio to your video:
Option 1: Import the Audio You Made
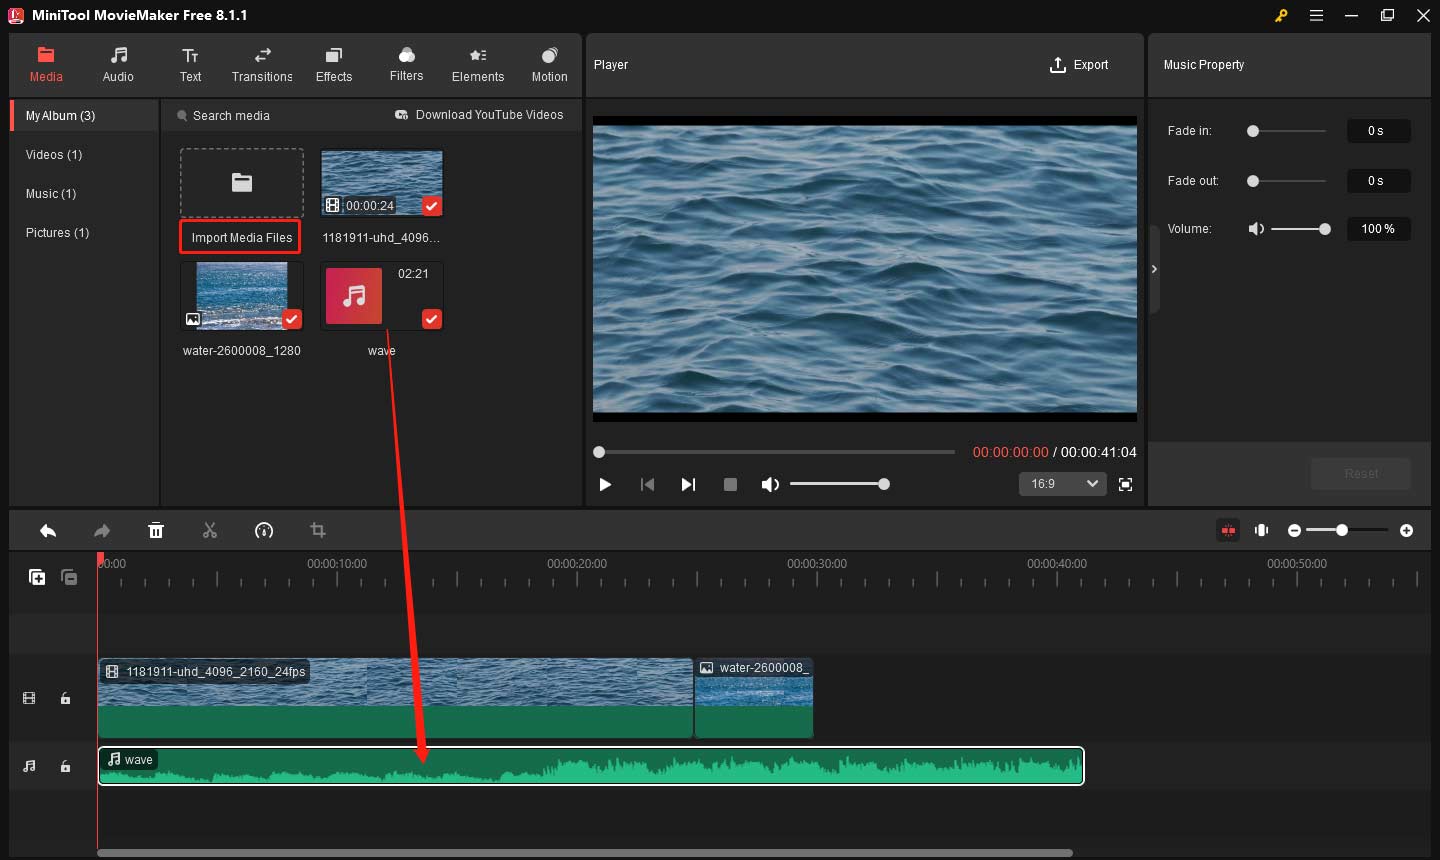
If you have already created or recorded your white noise audio file using software like Audacity, you can import this file into MiniTool MovieMaker. Click the Import Media Files button again, find the saved audio file, and drag it to the audio track on the timeline. Align the audio with the visuals to ensure that the audio and visuals play together smoothly.
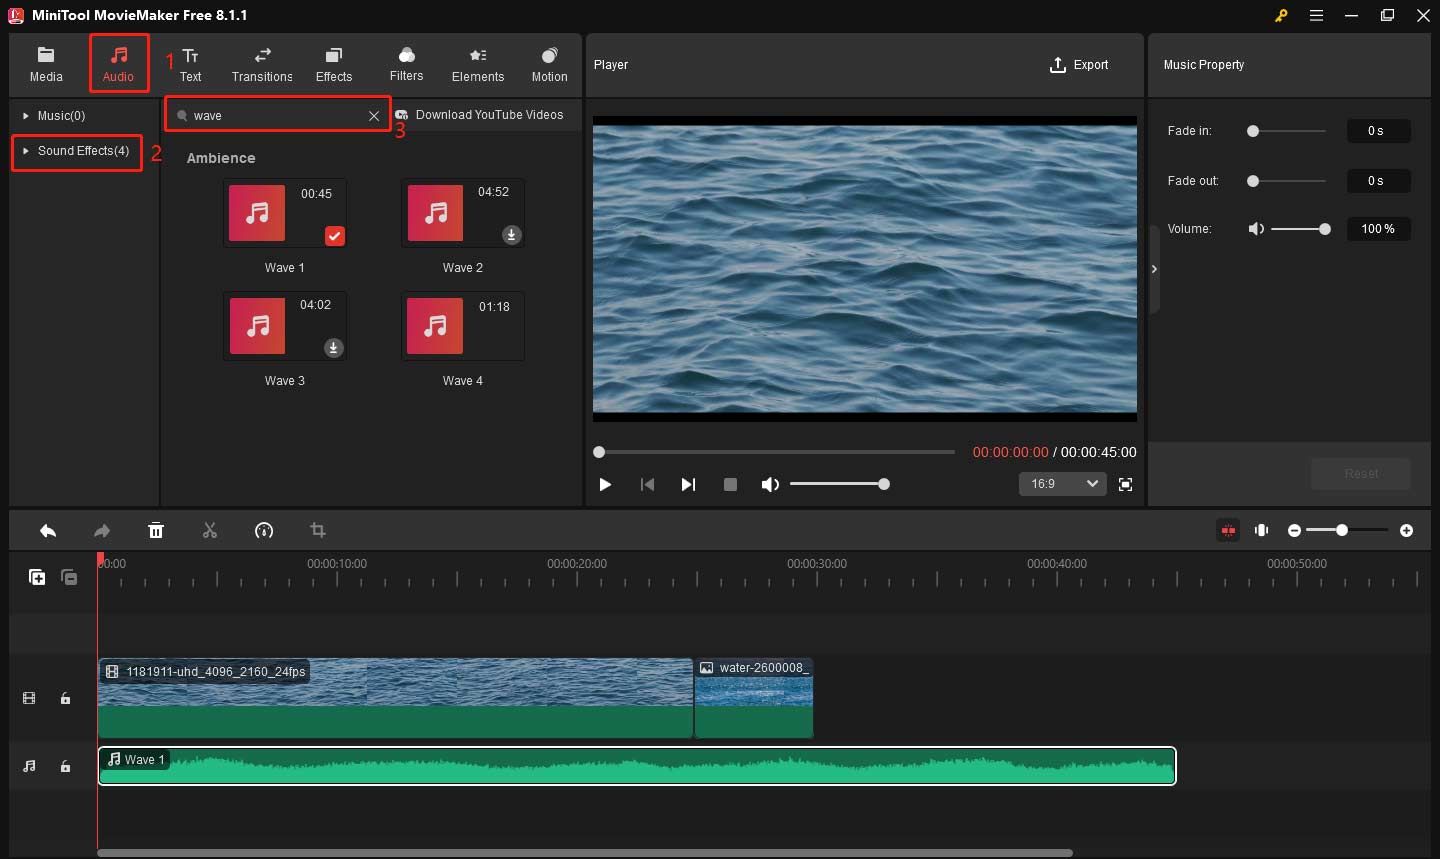
Option 2: Add Built-in Sound Effects
If you don’t have your own white noise audio file, MiniTool MovieMaker offers several built-in sound effects, such as rain, waves, or wind. To use these, go to the Audio tab and select Sound Effects on the left side bar, where you can browse through the available effects. You can also directly type relevant keywords like “wave” in the search box to get the results quickly. After finding the desired sound effect, download and drag the chosen sound effect to the audio track on the timeline.
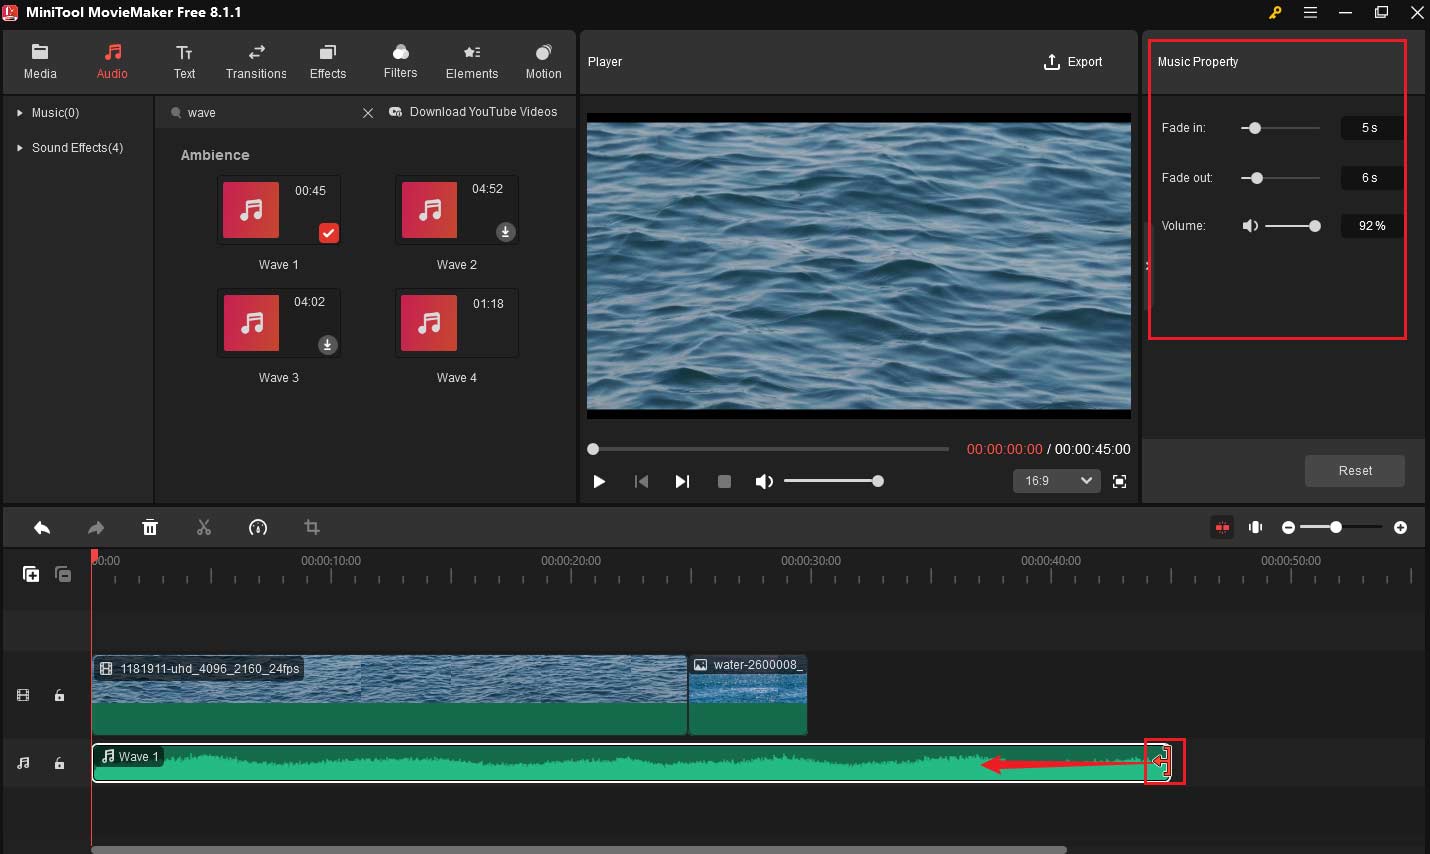
Step 4: Edit Your Audio
Now that you have added your audio, you may want to make adjustments. If the audio is too long, you can trim the audio by dragging the edges of the audio inward. To make your audio blend well with the visuals, you can modify the audio settings to suit your needs.
- Click on the audio to highlight it on the timeline.
- Go to the Music Property window.
- Drag the Volume slider to make sure it’s not too loud or too soft.
- You can also apply Fade in or Fade out effects by moving the corresponding slider, which will help the audio transition smoothly at the beginning and end of your video.
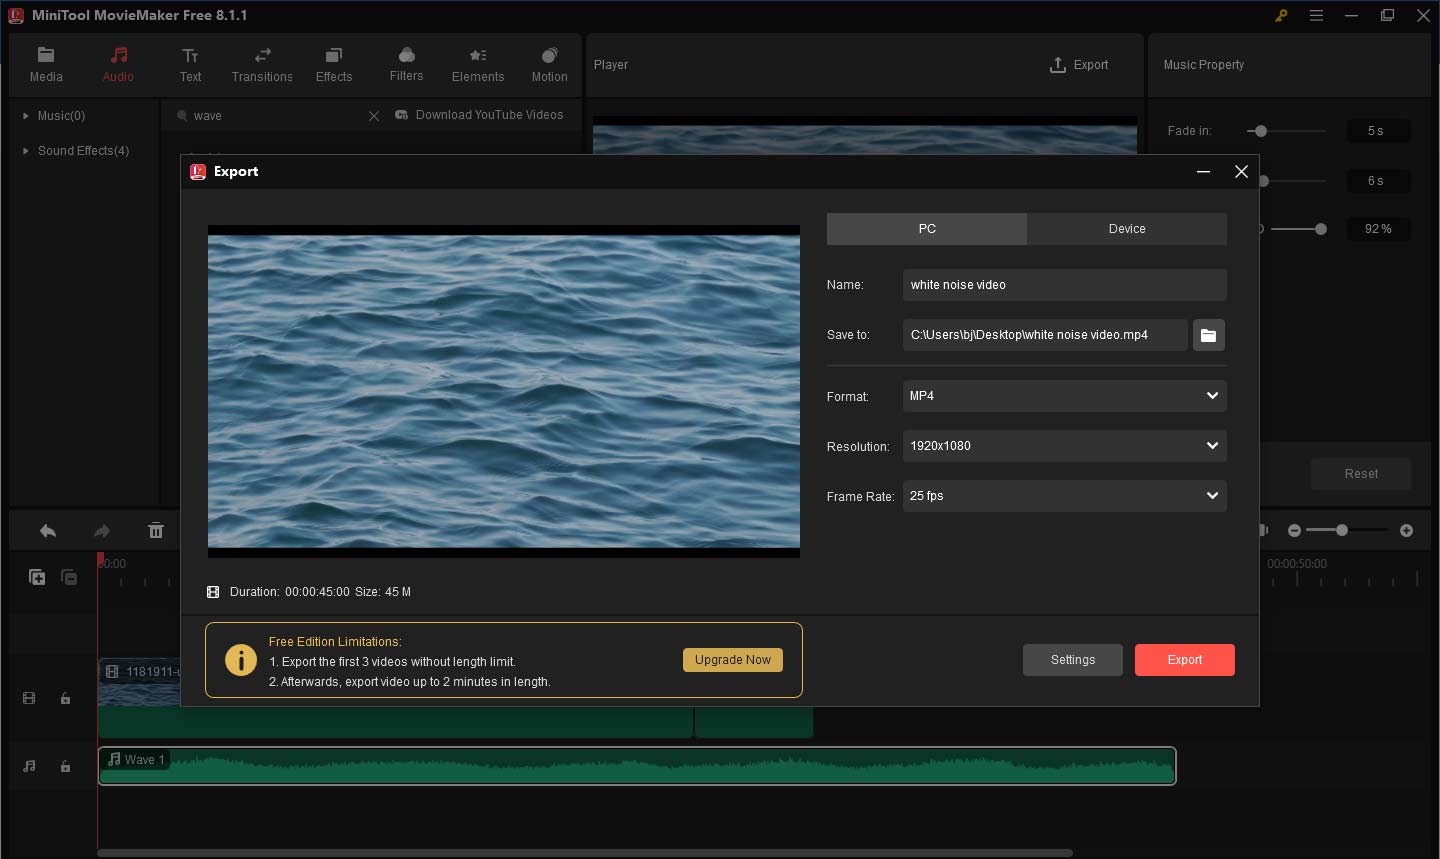
Step 5: Export Your Video
Once you’re satisfied with both the visuals and audio, it’s time to export your final video. Click the Export button located in the top-right corner of the screen. In the Export window, you can type the video name, set the video format, resolution, and select the file location. Once you’ve chosen your preferences, click Export to begin the rendering process.
MiniTool MovieMakerClick to Download100%Clean & Safe
Tips for Creating a White Noise Video
Here are some tips to help you create a high-quality white noise video:
Use High-Quality Audio
The quality of the white noise is essential for a good experience. Avoid using recordings with static or distortion. If you’re generating white noise in Audacity, make sure the settings are correct for smooth and consistent sound.
Keep Visuals Simple
White noise videos are often used for relaxation or sleep, so it’s best to keep the visuals simple and calming. Avoid using bright colors or overly complicated animations that could distract the viewer.
Make the Video Long Enough
White noise videos are usually designed to play for long periods (such as 30 minutes, 1 hour, or even longer). This allows users to let the video play as they sleep, study, or relax. Ensure your video is long enough to serve its purpose.
Test Your Video
Before publishing your video, test it on different devices (such as a phone, computer, or TV) to make sure the audio and visuals look and sound good.
Optimize for Your Platform
If you plan to upload your video to YouTube, make sure to use the recommended video settings for the platform. This usually means exporting in 1080p resolution with a 16:9 aspect ratio.
Bottom Line
In conclusion, creating your own white noise video can be a rewarding and relaxing project. Whether you’re aiming to help others sleep better, increase focus, or provide a calming atmosphere, knowing how to make a white noise video lets you share these benefits with others.
With the right tools, you can easily generate high-quality audio, pair it with soothing visuals, and then produce a video that serves a variety of purposes. So, take action to realize it. Finally, if you have some problems editing your videos with MiniTool MovieMaker, please feel free to contact us via [email protected] for help.
About The Author

Position: Columnist
Yulia has a great passion for life. She enjoys photography and travel, and is always eager to record cherished moment through her lens. This also led to her strong interest in video editing, and she kept learning multimedia-related knowledge, hoping to bring readers better advice on images, audio, video, and related topics.
User Comments :