This article from MiniTool MovieMaker (a Windows video editor) focuses on how to make a Study with Me video. It begins with a brief introduction to a Study with Me video. Then, it looks into the reasons for creating such videos. Finally, it comes to the main part: a step-by-step guide on how to make a Study with Me video for free.
Studying alone can be lonely. You’re sitting at your desk all by yourself and the only things keeping you company are your textbooks and the sound of your pen scribbling on paper. Sometimes you lose focus. Sometimes you procrastinate. But what if you could turn your study session into something fun, productive, and shareable? That’s where Study with Me videos come in.
Part 1. What Is a Study with Me Video
Before we get into the steps, let’s take a moment to look at what a Study with Me video is. If you are already familiar with the concept, you can skip right to the next part. Or, if you are in a hurry, you can go straight to Part 3 to find out how to make one.
Simply put, a Study with Me video is a type of video in which the creator shows their study sessions. All you need to do is record yourself while studying and then post the video online. This way, you can encourage others to study along with you. It’s a trend on YouTube. It’s also one of my favorites. I love the cozy vibes and the useful studying tips. It also gives a feeling of having company. Plus, making one is easier than you think—no fancy skills are needed!
Part 2. Why Make a Study with Me Video
A Study with Me Video has multiple benefits. Here I list 4.
- Self-Motivation
Making a Study with Me video is a great self-motivator. When you know you’re recording your study session, you’re more likely to stay focused and productive. It’s like having an accountability partner watching over you.
- Community Building
These videos create a sense of community among viewers. They can leave comments and share their own study tips. This interaction not only helps you but also provides support and inspiration to the viewers.
- Educational Impact
For educators or experts in certain subjects, Study with Me videos can be an excellent teaching tool. By showing study techniques, explaining complex ideas during the study session, and giving real-time examples, they can really help viewers with learning.
- Reducing Loneliness
Again, sitting alone and studying all by yourself can be really lonely. But when you open a Study with Me video while studying, you can hear the creator’s pen on paper and the soft background music. That brings a sense of company. It’s like you and the creator studying side by side.
Moreover, seeing someone else working hard towards their goals makes you want to keep going. If they can do it, so can I.
Part 3. How to Make a Study with Me Video
Here is a step-by-step guide on how to do Study with Me video.
Step 1. Planning
1. Define Your Purpose
Determine the main goal of your video. Are you trying to showcase a specific study method, share your overall study routine, or else? Having a clear purpose will guide the rest of your planning.
2. Decide What to Study
Decide what you’ll be studying in the video. It could be anything from reading a textbook and taking notes to learning a foreign language. Make sure the topic is relevant. Avoid activities that require too much screen privacy (like online exams).
3. Create a Script or Outline
While Study with Me videos are often informal, having a basic script or outline can keep you on track. Note down the key points you want to cover, such as when you’ll take breaks, what study materials you’ll use, etc.
Step 2. Set Up Your Study Place
1. Select the Right Location
Find a quiet and well-lit space for filming. Your study space doesn’t need to be fancy. A simple setup works best:/p>
- A neat desk with your study materials (books, laptop, notebooks, pens).
- A plant, a mug of tea, and a small desk lamp for cozy vibes (you don’t have to turn it on).
- Avoid busy backgrounds.
2. Choose the Right Filming Equipment
You don’t need expensive professional equipment. A smartphone with a good camera will be enough. It will be better if you have a tripod or stand to keep your phone steady. And a timer is useful too.
A mic? That depends. If you only want to show yourself studying, you probably don’t need it because you basically don’t speak in the video. If you want to tell viewers something, you can add subtitles when editing.
However, if you have to do a lot of oral explanations or you simply like talking in videos, a good microphone is a great thing to have. It can ensure that the sound quality is nice.
3. Set Up the Shot
Camera angles are really important. You should position it in a way that viewers feel like they’re sitting next to you. An over-the-shoulder view can be great for showing your desk and handwriting. To capture your facial expressions and body language, a side or front view is ideal. Try different angles to find the most engaging one. Make sure the timer is included.
Step 3. Film Your Study Session
1. Opening
I have watched a lot of Study with Me videos. The creators don’t start studying right away. They usually begin by pouring themselves a drink. It can be tea, coffee, or just plain water. Then, they choose the stationery they want to use. After that, they begin studying.
2. While Studying
When you study, be real. Don’t stress about being perfect. If you make a mistake or get stuck on a problem, don’t be afraid to show it. Viewers love authenticity.
If you want to take a break, do it. You can use this time to stretch or have a snack. This adds a realistic touch to the video and shows that studying doesn’t have to be non-stop.
3. Closing
When it’s over, simply wave your hand to say goodbye to the viewers.
Step 4. Edit Your Video with MiniTool MovieMaker
Post the video on a social media platform right away after filming? It’s not a good idea. Editing the raw footage before posting is a smart move. You don’t need to do fancy editing. Just do some basics like cutting the unnecessary parts and adding subtitles. Moreover, adding some relaxing background music to your video will make your video better. How to do that?
MiniTool MovieMaker comes to the rescue. This free video cutter offers many editing features. You can trim, crop the video, change its speed (speed it up or slow it down), and add text, transitions, filters, and music. With just a few simple clicks, you can make the raw footage inviting.
Let’s see how to make a Study with Me video for free using this video editing app for PC.
Step 1. Download and install MiniTool MovieMaker
Click the button below to download free video editor and install it on your Windows PC.
MiniTool MovieMakerClick to Download100%Clean & Safe
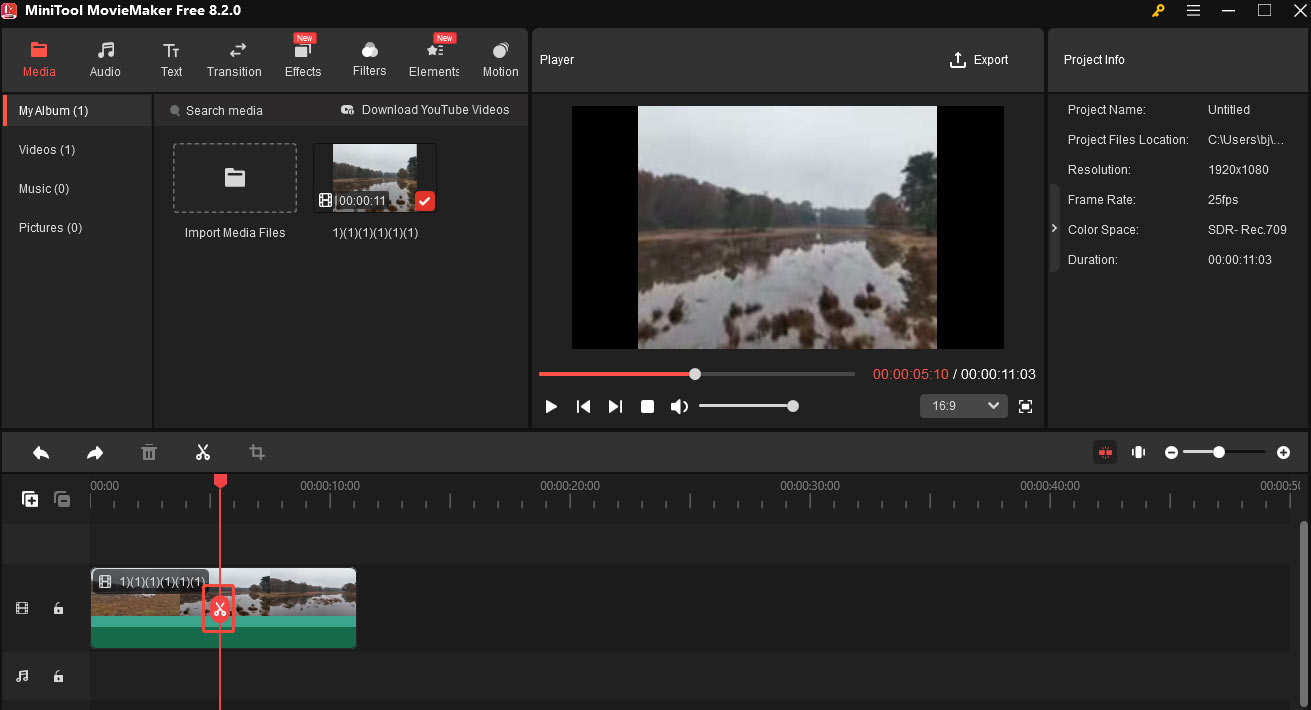
Step 2. Import Your Video
Open this program. Close the promotion window and click the Import Media Files button. In the next window, select the study video and click Open to add it to MiniTool MovieMaker. Then drag it to the timeline.
Step 3. Edit Your Video
1. Cut Out the Unnecessary Parts
- Move the playhead to the starting point of the unwanted part and click the scissors icon on the playhead
- Then move the playhead to the end point of the unwanted part and click the scissors icon on the playhead
- Right-click the unwanted part and choose Delete from the list to remove it.
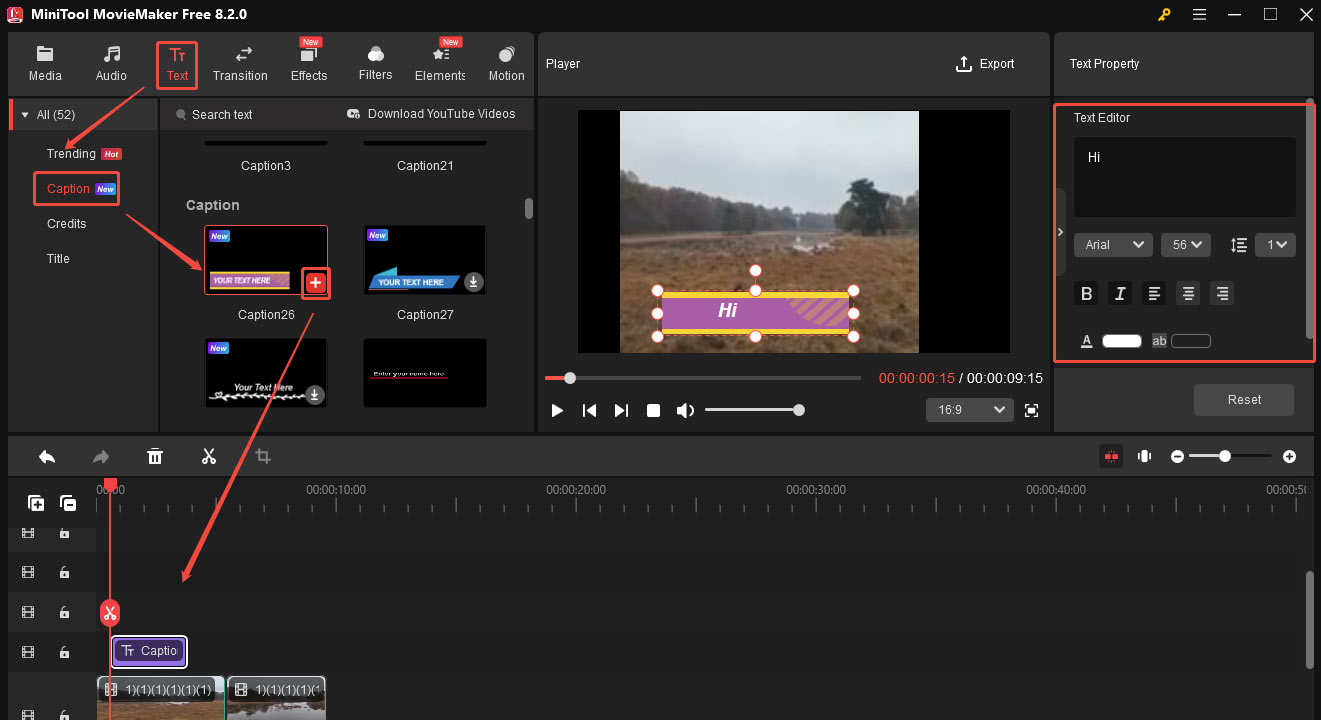
Double-click on the video to which you want to add subtitles.
- Select the clip on the timeline and drag the playhead to where you want the captions to begin.
- Go to the Text tab and click Caption from the left submenu.
- Select a style you want and click the + icon to add it to the timeline. You can drag the right edge of the text track to adjust its duration. (Click the Download button to download it first if you use the caption style for the first time.)
- Go to the Text Editor to enter your captions and edit the text font, size, color, etc.
- Adjust the position of the text in the player window.
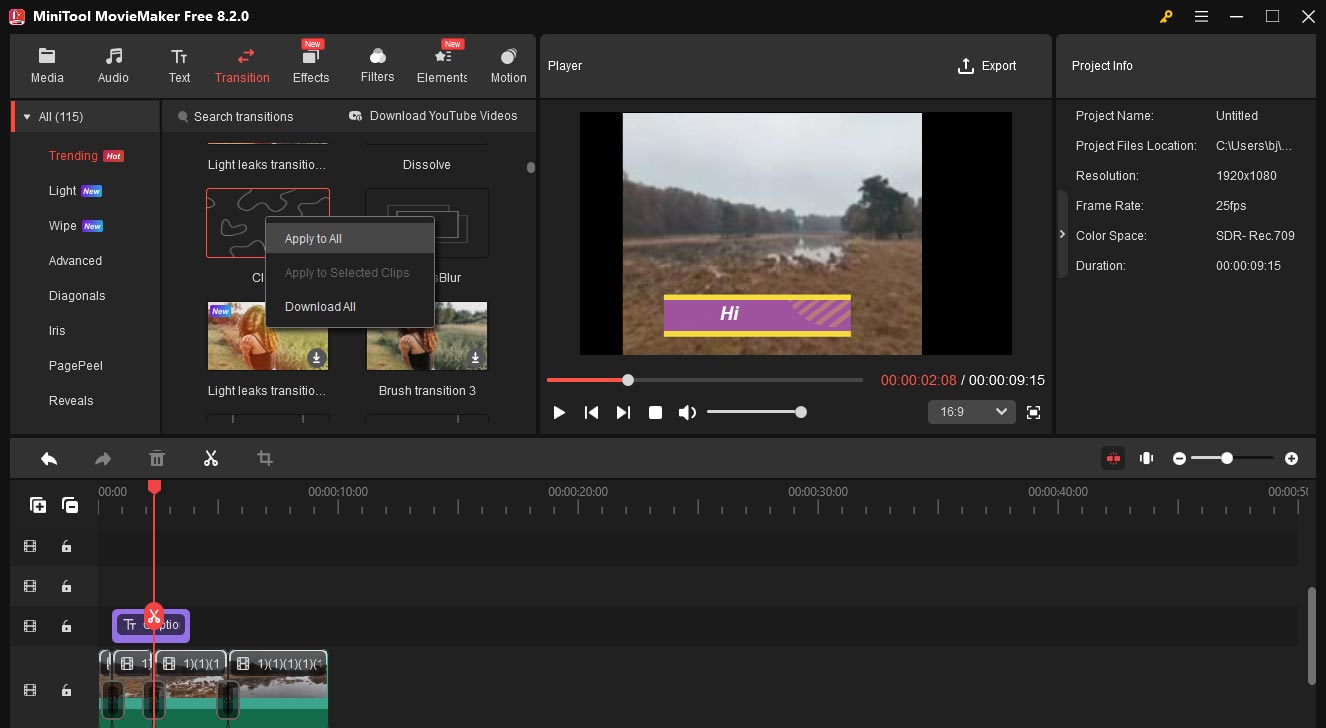
3. Add Transitions (Optional)
Some people think transitions are really important as they can make your video flow naturally. But if misused, they will strengthen the editing marks. The key for Study with Me videos is to be natural and we don’t want the viewers to have a feeling that you’ve edited it a lot. In many cases, only cutting out the useless bits works fine. If you want to add transitions, be careful. Simple and suitable ones can make the video appealing. Don’t overdo it.
- Select the clips where you want to add the transition.
- Go to Transition.
- Right-click on the desired transition and select Apply to all. Then the selected clips will have the same transition.
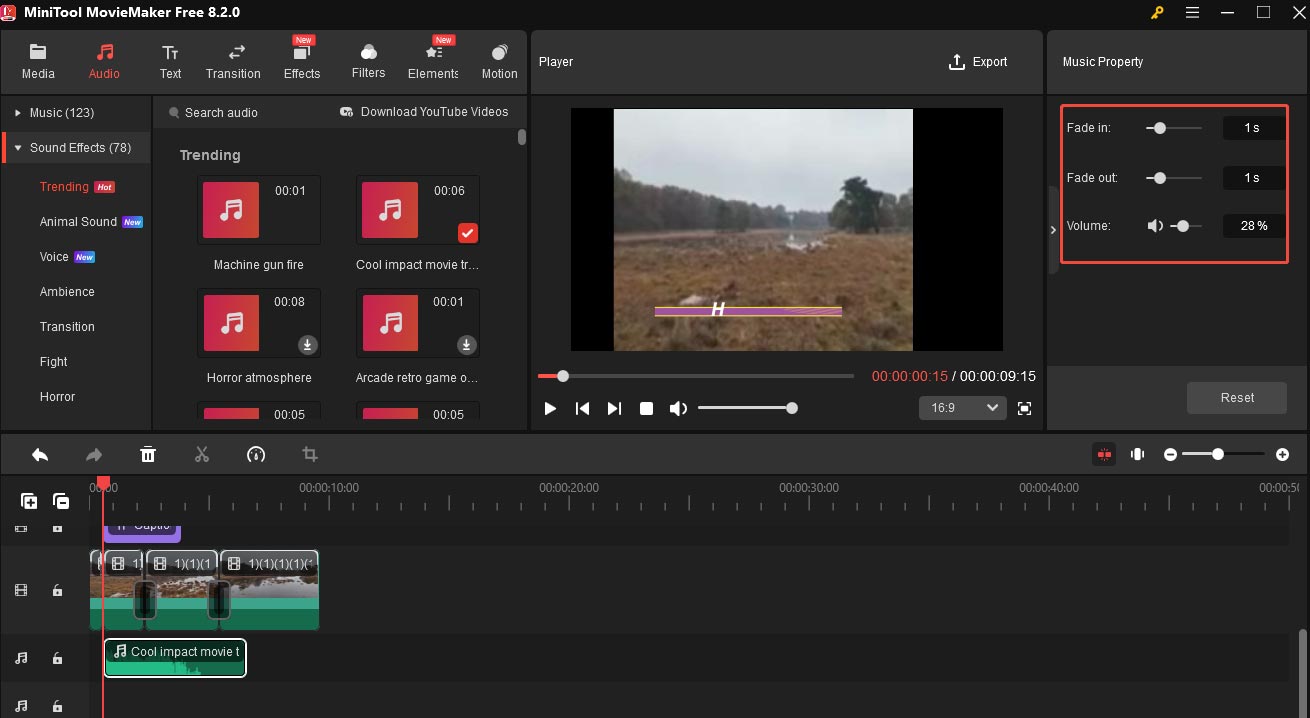
Adding background music to your video can make it more engaging. I suggest you add white noise or light music. Keep the music volume down so that the viewers can hear your pen scratching on the paper.
- Click the audio on the top menu, choose your desired music, and add it to the timeline. If you are not satisfied with the music provided by this tool, you can import your own audio and add it to the timeline.
- Go to the Music Property window. Then, apply the fade in/out effect and adjust the volume by dragging the slider or entering a number in the corresponding box.
- You can shorten the music if it is longer than the video. Just hover your mouse on the start/end point of the audio track until an arrow appears. Then move it rightward/leftward to shorten it.
Step 4. Preview and Export Video
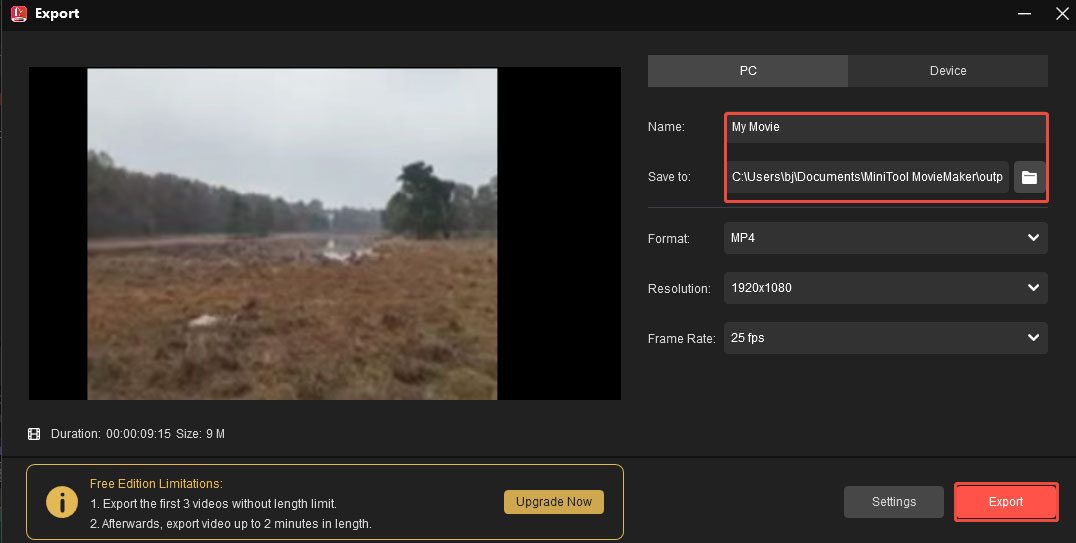
Before exporting, click the play icon to preview it. If you’re happy with everything, then export it.
- Click the Export button in the top-right corner of the screen.
- In the Export window, you can give your video a name, choose a folder to save it, and also change its format, format, resolution, etc. I suggest you stick with the default MP4 format with 1080P resolution.
- Click the red Export button.
- In the next small window, click Close to close it.
Step 5. Share Your Video
It’s time to share your video with the world. I recommend you share it on YouTube. Use relevant keywords in your video title, description, and tags. This will help your video show up in search results when people are looking for study-related content.
After sharing, respond to comments and messages from your viewers. This builds a relationship with them and encourages them to keep coming back for more content.
![How to Smooth Skin in Lightroom [Step-by-Step Guide]](https://images.minitool.com/moviemaker.minitool.com/images/uploads/2025/05/how-to-smooth-skin-in-lightroom-thumbnail.jpg)
Conclusion
Study with Me videos bring benefits to both creators and viewers. And making one is simpler than you think. So, open your camera, set up your study space, and start sharing your study journey with the world.
Finally, if you need any help while using MiniTool MovieMaker, feel free to contact us via [email protected].
User Comments :