If you want to know how to make a cooking tutorial video more attractive, you need to know what it is and why it is popular. Next, the video-making procedures, from tools preparation to video shooting and editing, are all crucial for making a cooking video. You need to combine the theory with practice and master sufficient knowledge and editing skills to apply them to your cooking tutorial video making.
What Is Cooking Tutorial Video
There are many cooking tutorial videos when you scroll through short videos on various social media platforms. It is a kind of video that records the process of making food, such as dessert, pasta, and steak… Generally speaking, the video content includes preparing ingredients, elaborating cooking methods, and showing finished meals. From shooting to editing, a lot of tools are needed, such as cameras, tripods, video trimmer…
Why Are Cooking Videos So Popular
Cooking tutorial videos are one of the most trending video types and attract more and more audience on multiple social media platforms. Users love watching and enjoying them for various individualized reasons.
Reduce Pressure
For some people, cooking is a method for reducing pressure and relaxing. They feel happy in the process of cooking for themselves or their families, friends, or lovers. It’s just like they are expressing their affection. Similarly, the audience can feel this affection by watching the cooking videos. Witnessing various raw materials transformed into delicious food that is rich in color, flavor, and taste under the skilled hands is such a relaxing experience.
Make Money
The more attractive your cooking tutorial videos are, the more “likes” and “fans” your account will obtain. As soon as the related data of your account has accumulated to a certain threshold, some brands will contact you to express their cooperation intent and their willingness to pay for the advertisement. In return, you should promote their products in your cooking videos. For example, use the kitchenware from their brands to cook and introduce their advantages.
Improve Cooking Skills
When you have no idea what to eat or how to cook a meal, viewing bloggers’ cooking tutorial videos for beginners can help you find some inspiration. You can also learn more cooking skills from these videos, such as how to marinate meat, how to control heat and time, how to pair spices with sauces…It’s believed that “practice makes perfect”. Through persistent efforts, your cooking skills must get better and better!
Broaden Social Relationships
No matter whether you are viewers or bloggers, all of you can send your opinions and share your experiences about cooking in the comment section below the tutorial video. It’s one of the purposes for the creation of the social media platforms. People establish relationships and become closer through their interests in cooking. What a wonderful fate it is!
How to Shoot a Cooking Tutorial Video
A complete cooking tutorial video consists of two parts: exquisite cooking skills and high-quality shooting. The cooking skills vary from person to person and can’t be controlled by us. However, you can improve the shooting quality by learning how to shoot a cooking video. I will detail it in two steps.
Step 1. Preparation Work
Recipe plan
In order to ensure smooth cooking procedures, you need to make a plan for the cooking recipe in advance. A detailed recipe can not only remind us of cooking steps but also be used to share with viewers.
Ingredients
It is necessary to control the video duration while shooting the video. Therefore, you should put all the necessary kitchenware and cooking ingredients, spices, and sauces in an easy-to-fetch place in advance. It’s significantly positive to avoid being flustered during the shooting process as it can affect shooting time and video quality.
Shooting tools
A common saying goes: “choosing the right tools is half the battle.” When it comes to starting shooting a cooking video, there are many pieces of equipment available in the market for us to choose from. Here are some frequently-used shooting tools you can choose to learn how to shoot a cooking tutorial video.
Camera
Although many people use smartphones to shoot videos, professional cameras can provide higher-quality image and more creative choices to guide you on how to make a cooking tutorial video. There are many types of cameras available on the market, including DSLR cameras, mirrorless cameras, and professional camcorders.
Tripod
If you want to record your video using a third-person perspective, then a tripod is definitely a good helper. It has the characteristics of stability and anti-shake. Its gear head makes it easy to finely adjust the filming angle.
Lighting
Lighting in video shooting is a crucial aspect as it directly affects the quality and visual effects of the image. In cases of insufficient light, supplementary lights can provide an extra source of illumination, ensuring that the picture is clear and bright enough.
Microphone
A good short video not only requires high visual effects but also needs good audio quality to match. Therefore, a good set of recording equipment is necessary to capture sound and ensure clear vocals.
Projector
By connecting to the camera, the projector can reflect the captured video onto the screen. Observing the scene captured on the screen can help you easily adjust your position and movements.
The above five shooting tools are commonly used to learn how to make a cooking tutorial video. Of course, there are many other assistive devices on the market. You can make a reasonable choice based on your situation. The quality of your cooking tutorial videos can be enhanced using these shooting tools appropriately.
Step 2. Video Recording
Except for recipe plan, ingredients preparation, and shooting tools, are there any shooting skills you can apply in your cooking tutorial video recording? Maybe I can give you some suggestions about how to shoot a cooking video.
Environment selection
The shooting environment needs to be open, clean, and tidy. Light-colored background surroundings and green plants can provide your video with a sense of vitality. Using the combination of natural light and supplementary lighting appropriately is good to ensure that the light is soft, even, and uniform in color temperature.
Language and background music application
The beginning part of the cooking tutorial video needs a general introduction to increase the viewers’ interest. Appropriate narration and explanation can also be added during the filming to facilitate understanding for the audience. Additionally, playing some music in the process of cooking, such as soft music, is a great choice.
Multi-camera shooting
Viewing the same food from different perspectives reveals different aspects. If you want a video to achieve your ideal state, you can use multi-camera shooting methods during filming. It can also ensure the richness of the video content.
Complete cooking process
To facilitate later video editing and audience understanding, the entire process of cooking should be captured as completely as possible. From ingredients presentation to finished plating, the whole process can enhance the audience’s sense of participation.
Good mood
Making delicious food is a healing process. Although there may be “setbacks” during the cooking process and results may not meet expectations, you should maintain a positive attitude. This way, you can better face and adapt to the filming shots, presenting a more natural visual effect.
All the above video recording skills can give you more inspiration on how to shoot a cooking tutorial video.
How to Make a Cooking Tutorial Video More Attractive
A complete food tutorial video is not enough to attract the audience on various social media platforms. You need to understand how to make a cooking tutorial video more eye-catching. This part depends on our editing skills. You need to create rich visual and audio effects for the video by using a convenient editing software. Therefore, it’s MiniTool MovieMaker’s turn to come into play.
MiniTool MovieMakerClick to Download100%Clean & Safe
MiniTool MovieMaker
MiniTool MovieMaker is a powerful Windows video maker for anyone to pursue an effective and convenient editing experience, even if you are a novice without any editing experience. It is an ultimate tool for you to choose from. This free video editor is equipped with elementary and comprehensive features: rich templates of text, captions, and credits; trending video filters, effects, motions; novel animated elements and vivid audio effects…
Moreover, MiniTool MovieMaker makes it possible to achieve multi-track editing. You can edit video, photos, and audio files independently. MiniTool MovieMaker significantly expands your editing and creation potential. Moreover, its batch processing function can also save the time spent on waiting, which greatly enhances the editing efficiency.
More advantages of MiniTool MovieMaker:
- Popular aspect ratios
- Video speed adjustment
- Good video cutter
- Play video backward
- Edit the contrast, saturation, and brightness of the videos
- Easily flip video
- Allow importing videos in various formats
- Split/trim audio
Optimal Skills About Cooking Tutorial Video Editing
Now, it’s time to explore how to make a cooking tutorial video more attractive in the MiniTool MovieMaker. Here are some steps and options you can follow.
Step 1. Install the MiniTool MovieMaker
Click the button below to download and install the software on your PC.
MiniTool MovieMakerClick to Download100%Clean & Safe
Step 2. Import your video.
Launch the software and click the Import Media Files tab to upload the video of the cooking process you previously shot from your file explorer. Then drag it on the timeline.

Step 3. Edit your footage.
Option 1. Add Tasty-style Filters
The color style of a cooking tutorial video can directly affect the audience’s evaluation of food. The quickest and most convenient way to change the color style is to add appropriate tasty-style filters.
Choose the Filters tab and click the filter you desire, then click the + icon to add the filter to your cooking tutorial video.

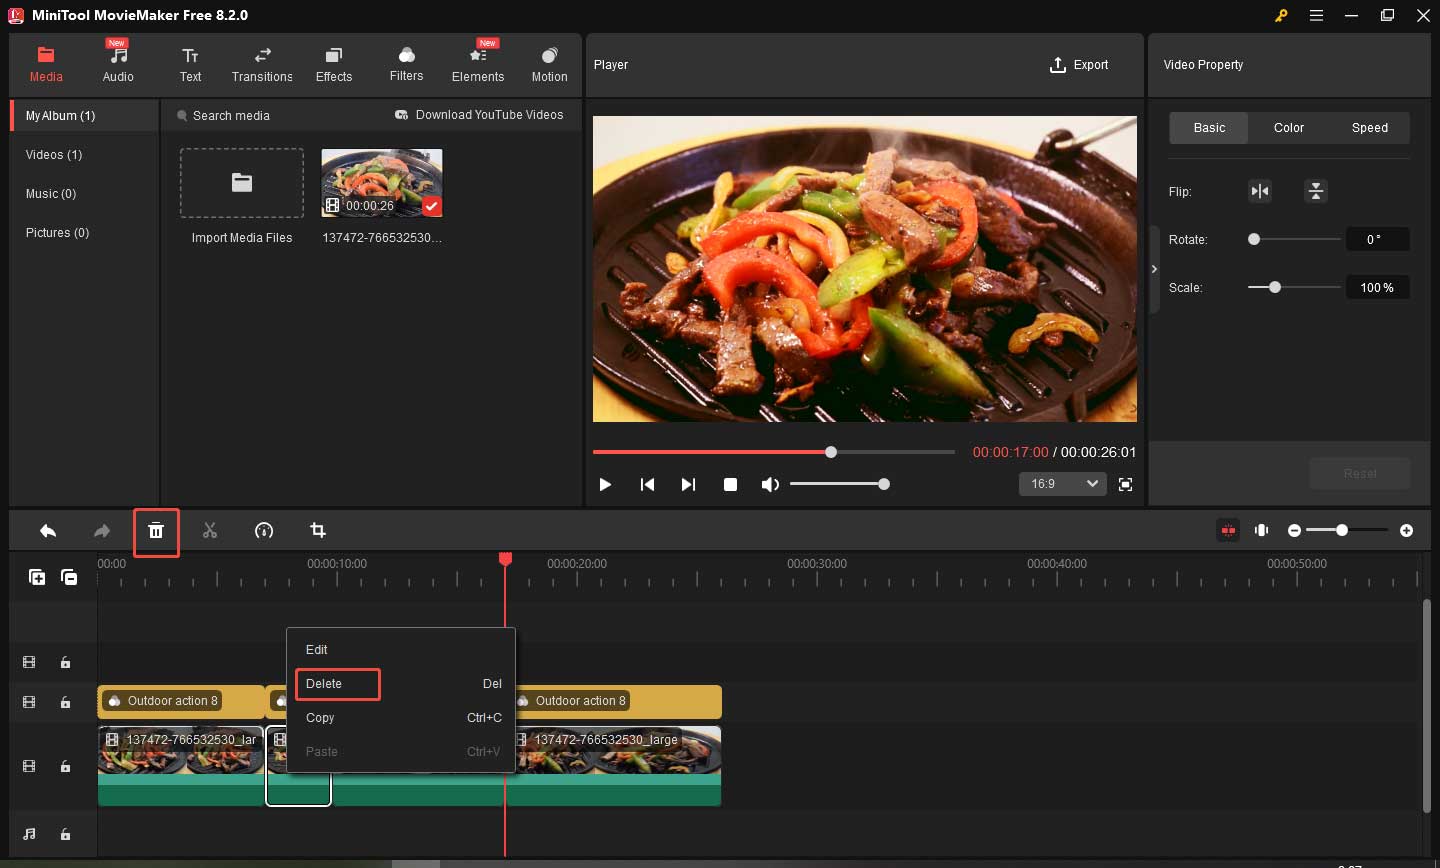
Option 2. Cut the Video
On the one hand, some social media platforms have limits on the duration of uploaded videos and exceed these limits can lead video upload failures.
On the other hand, during the video recording process, it is inevitable to have some unnecessary shots, such as preparation work at the beginning of the shoot, waiting times during cooking, or blank shots at inappropriate times, which can affect the viewer’s experience.
Therefore, you need to first split the video into some pieces of slips by using this free video cutter. Then delete the excess clips and unnecessary shots to make the video short and clear.
1. Split the video.
Drag the playhead on the timeline and locate it on the position you want to split, then click the Split icon either on the playhead or the menu bar.

2. Delete the video.
Choose the video you want to delete and right-click your mouse, then tap Delete.
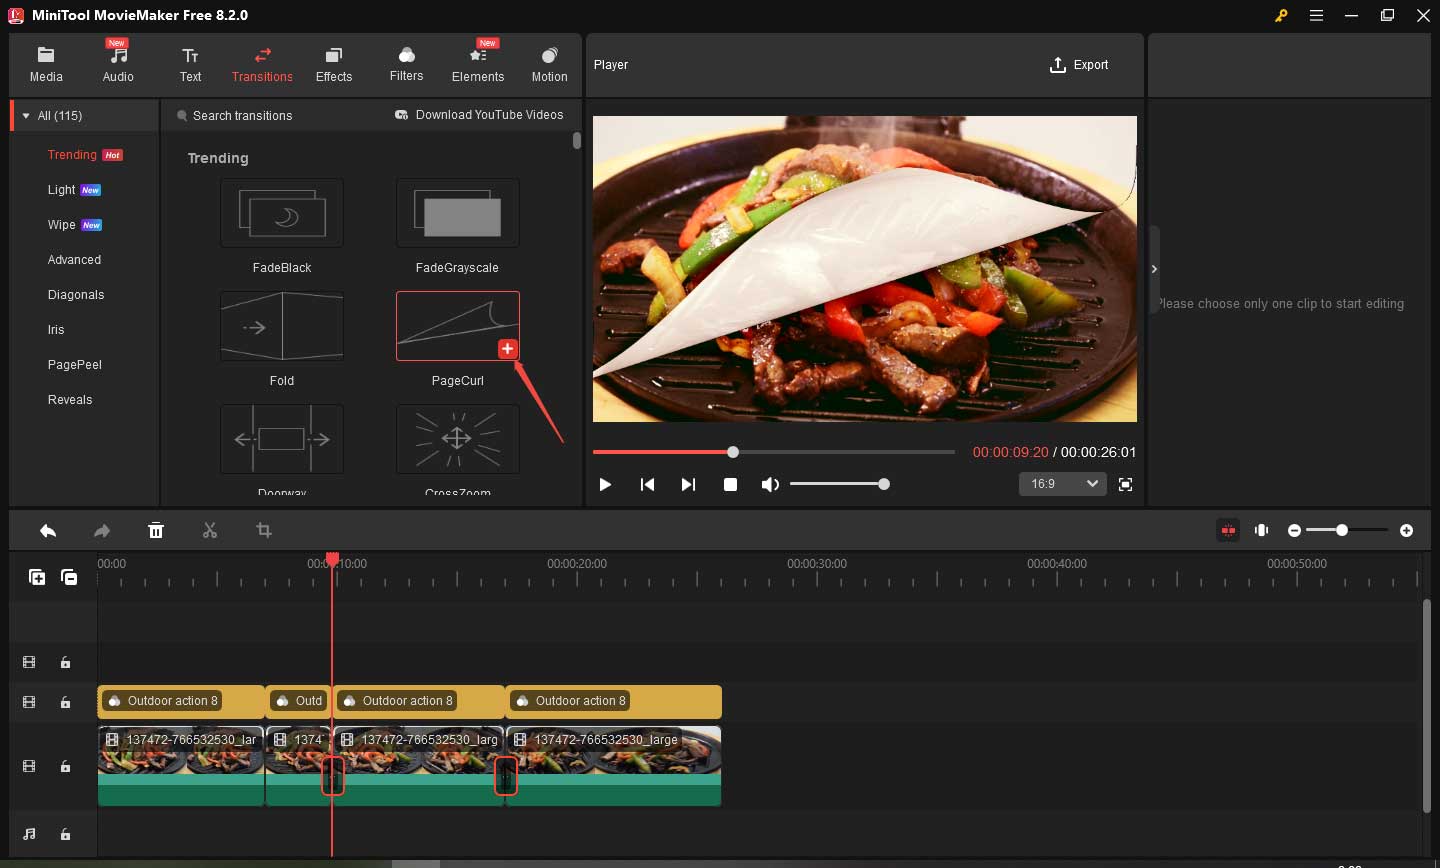
Option 3. Add Interesting Transitions
Cutting the video can cause a negative effect on the coherence and continuity of the video to some extent. At this point, you can add various transitions to cleverly connect the video clips and make the visual effects of the video more interesting and attractive.
Select the target clip, open the Transitions section and choose the transition you desire, then click the + icon to apply it between the two video clips.
Option 4. Customize Text
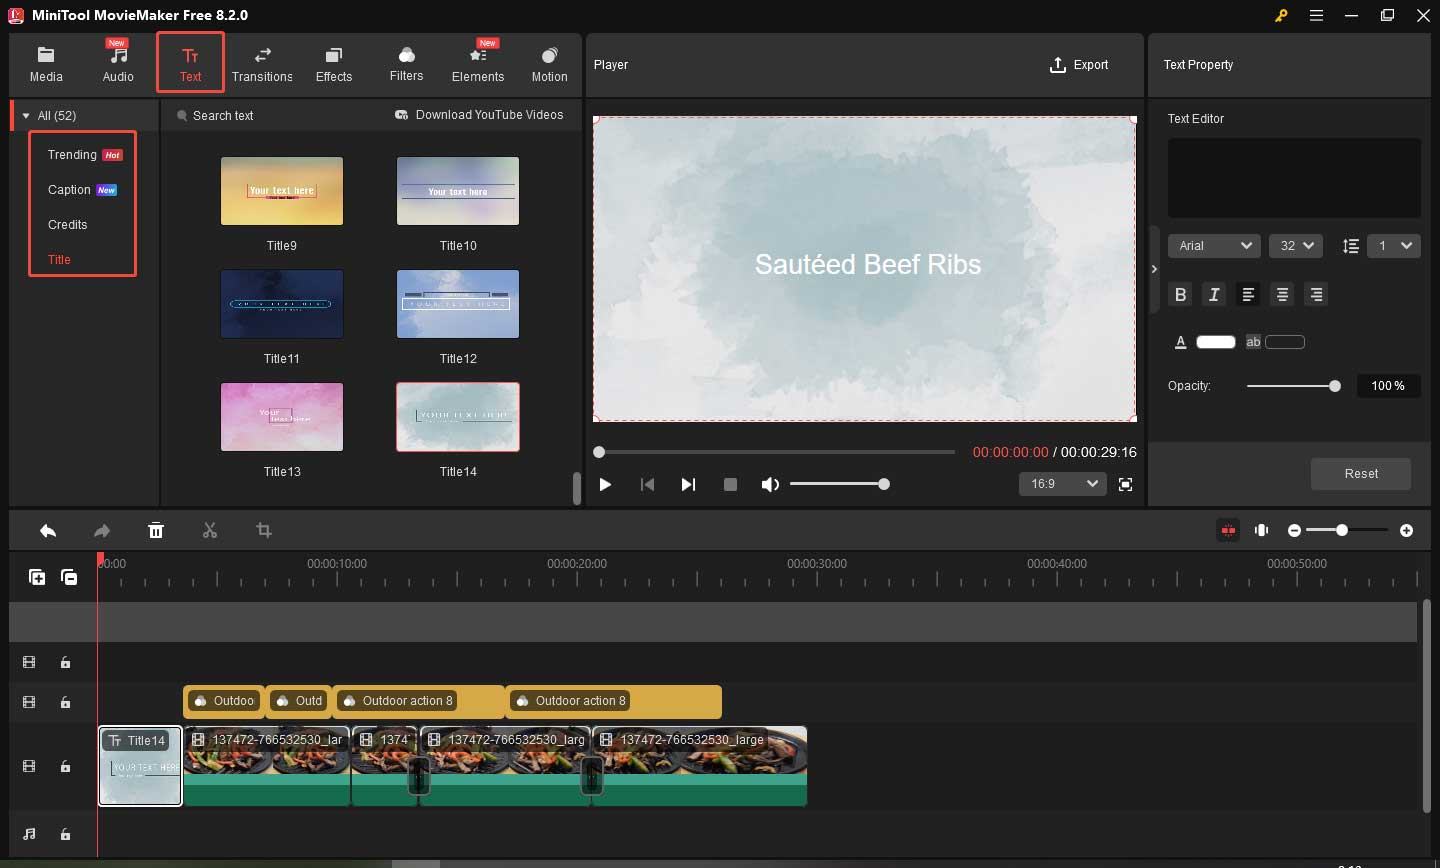
Adding different types of text to videos can help the audience understand the cooking procedures. You can customize the text contents according to your needs.
In the title part, you can enter the name of your cooking food to draw the audience’s attention.
In the caption part, maybe you can put some cooking notes.
In the credits, you can express thanks to the audience and ask for “likes” and “follows”. In addition, to put the recipe in the credits section can also arouse the audience’s interest of taking a screenshot.
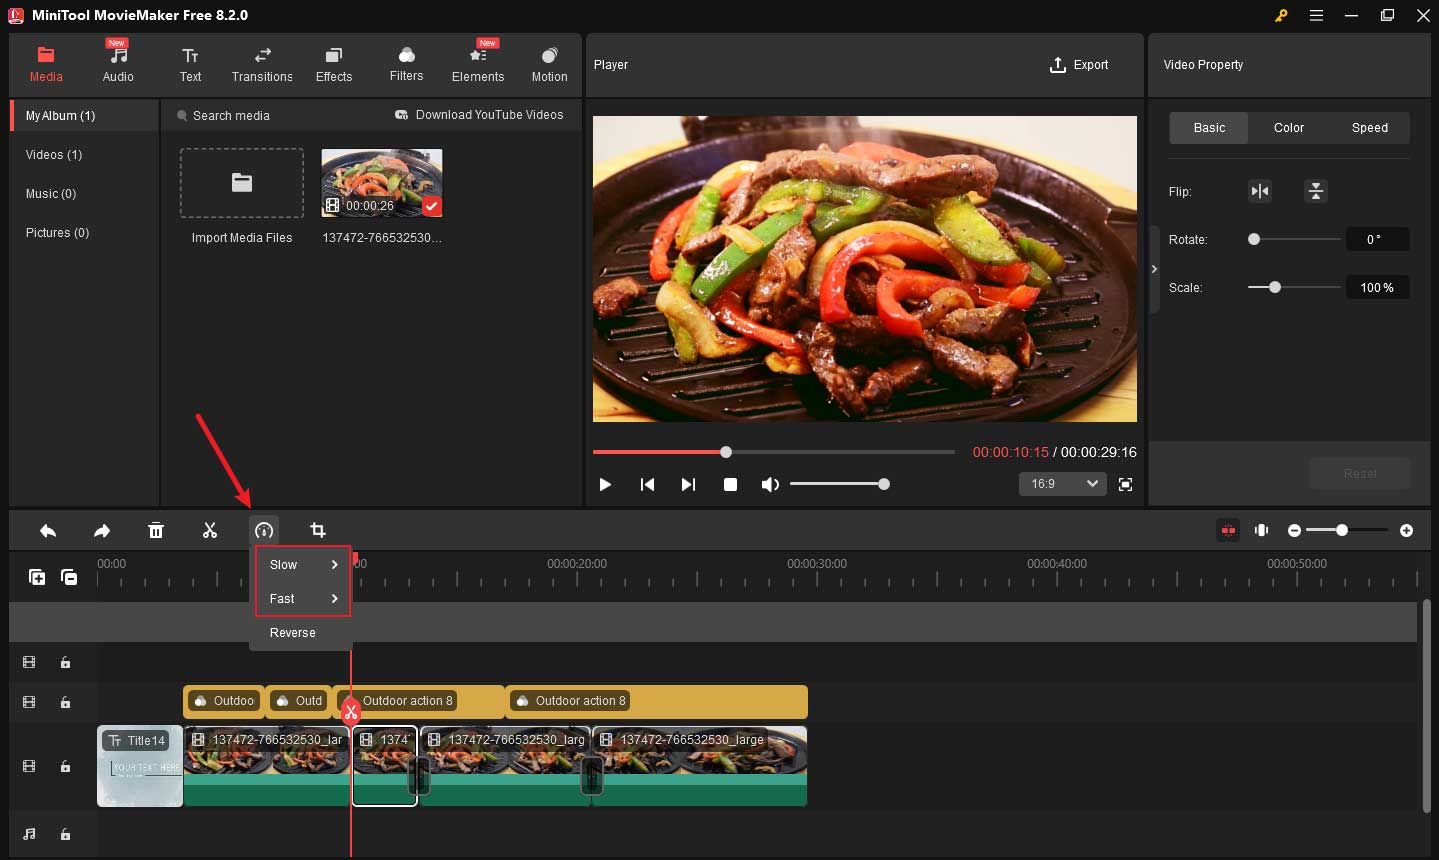
Option 5. Video Speed Adjustment
Adjusting video speed allows us to handle the cooking process according to different situations appropriately. For close-up shots of food, you can slow it down so that the audience can see the details more clearly. Conversely, for repetitive clips like chopping, you can speed them up to avoid making the audience feel bored.
Choose the video clip you want to adjust and click the Speed icon. Here you can choose the speed of Slow: 0.5X, 0.25X, 0.1X, 0.05X, 0.01X,or the speed of Fast: 2X, 4X, 8X, 20X, 50X.
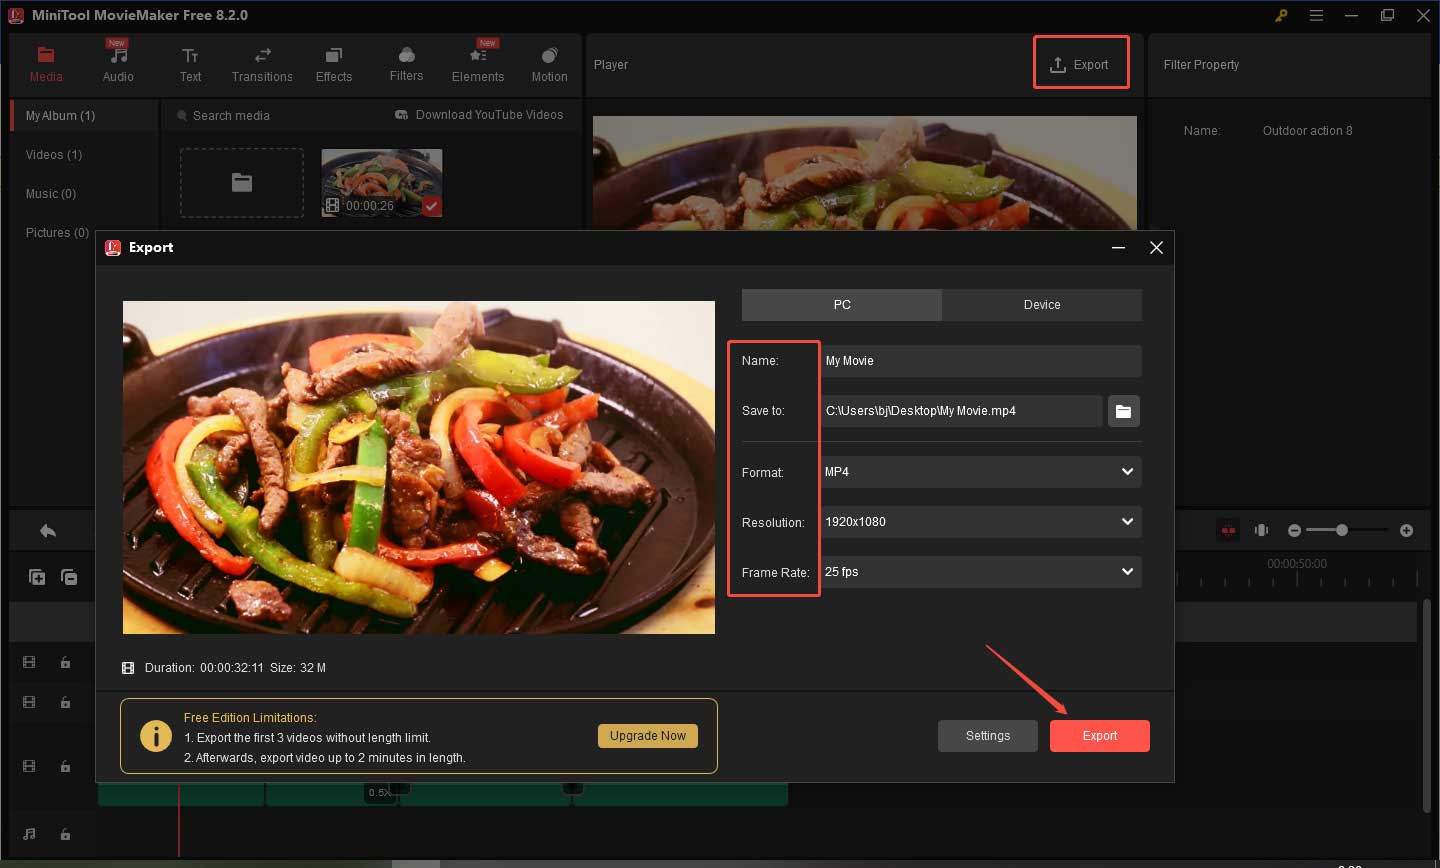
Step 4. Export the edited video.
Click the Export option in the upper right to open the Export window. After these video parameters have been set, press the Export button to save the video.
Bottom Line
This post advises in detail about how to shoot a cooking tutorial video and how to make a cooking tutorial video for beginners, from preparation work, video filming, to editing skills. In a word, making a cooking video is an interesting way to share your happy life and cooking experience. Maybe you have already realized that it’s not difficult to make it by following the above steps and suggestions.
Finally, just feel free to contact us via [email protected] if you want to learn more about MiniTool MovieMaker.
User Comments :