VLC is a useful multimedia player that is available for Windows, Mac, and Linux. It can also help you to add subtitles to a video when playing it or permanently. How to add subtitles in VLC? This MiniTool MovieMaker post will give you detailed guidance to add subtitles to VLC.
You can use VLC to play your favorite TV shows, movies, and other videos. In addition to playing media, VLC can also convert videos and audio, add subtitles to a video, rotate a video, and others. To help you have a better viewing experience or understand the video content well, it is a good idea to add subtitles to a video. How to add subtitles to VLC? Keep reading the following content and you’ll find the solution.
How to Add Subtitles in VLC While Watching Video
Can VLC add subtitles to a video when playing in VLC? Of course! You can add subtitles to VLC when watching it. You can follow the below detailed steps:
Step 1. Download and install VLC on your computer and prepare the subtitles file for your video.
Step 2. Open VLC, click the Media tab and select the Open File… option. Next, choose the video that you want to play and add subtitles with VLC, and click Open.
Step 3. Click the Subtitle tab on the top menu bar, select the Add Subtitle File… option, choose the subtitle file you just prepared, and click Open. Then, you can see that VLC will play the video with subtitles.
Sometimes, you may want to add subtitles to a video permanently using VLC. Just keep reading the following parts.
How to Add Subtitles in VLC Permanently on Windows
If you are a Windows user, just refer to the below detailed steps:
Step 1. Open VLC on your Windows PC, click the Media tab, and select the Stream… option to access the Open Media window.
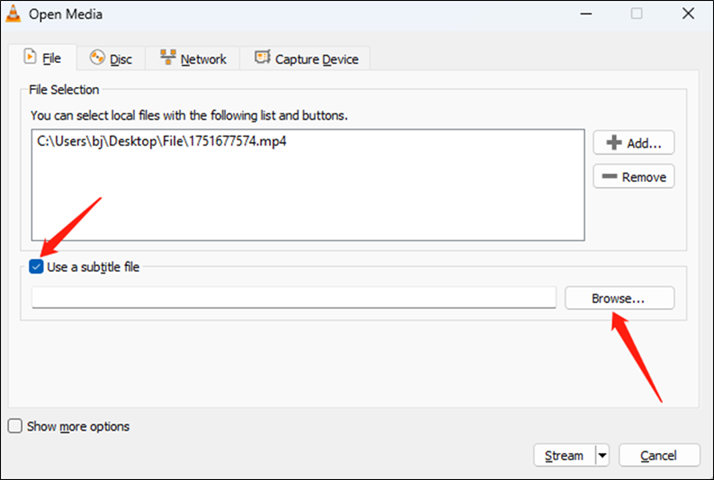
Step 2. Click on + Add to import the video you need to add subtitles, tick the Use a subtitle file checkbox, and click Browse to choose the subtitle file you need. Then click on Stream and Next.
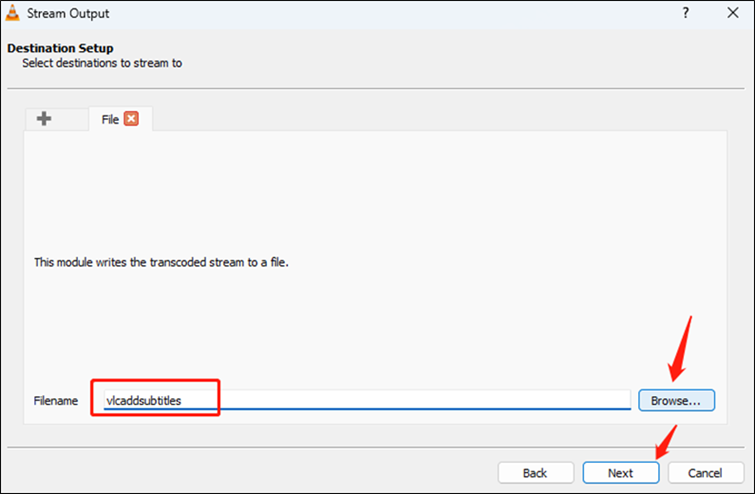
Step 3. In the Destination Setup window, select File and click on Add. In the next window, you can name your video, click Browse to choose its saving path, and click Next.
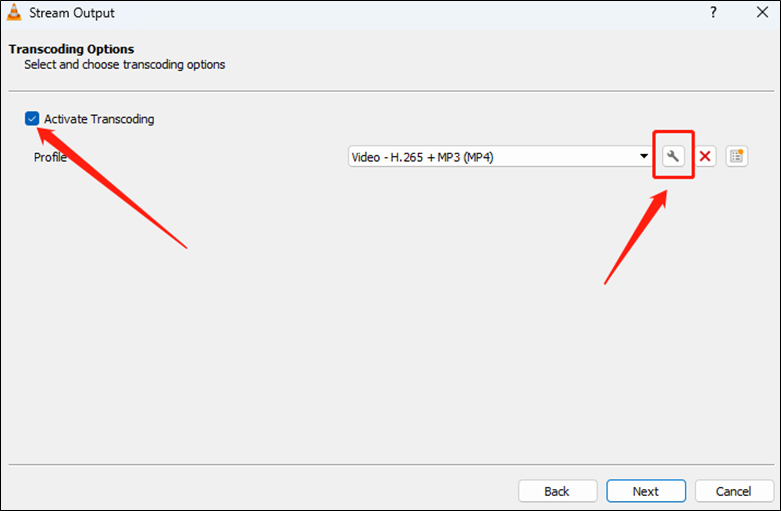
Step 4. Tick the Activate Transcoding checkbox and click the Edit selected profile icon.
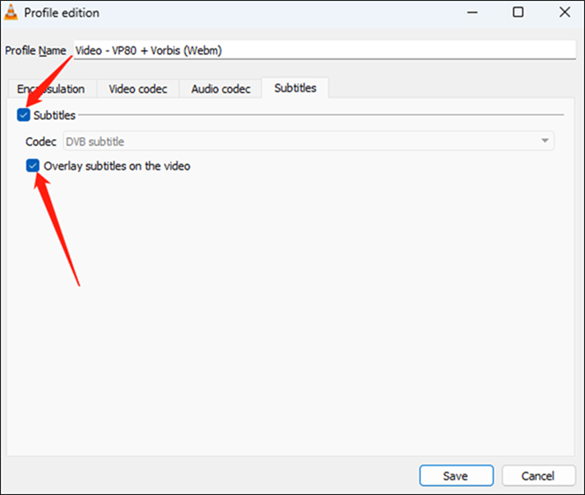
Step 5. Click the Subtitles tab and then tick the Subtitles checkbox and the Overlay subtitles on the video checkbox. Next, click on Save and Next.
Step 6. Finally, click on the Stream button.
How to Add Subtitles in VLC Permanently on Mac
Since the interface of the VLC Mac version is different from the Windows version, you need to refer to the below steps to add subtitles in VLC on Mac.
Step 1. Run VLC on your Mac, click the File tab, select the Advanced Open File… option, and click the Browse button to choose the video you want to add subtitles.
Step 2. Tick the Add Subtitle File checkbox, click on Choose, and then click Browse to select the SRT file you need.
Step 3. Tick the Stream Outputs checkbox and click on Settings.
Step 4. In the Streaming and Transcoding Options window, name the video, click Browse to choose the output folder, and click on Save.
Step 5. Open the Encapsulation method list and select the MPEG 4. In the Transcoding options section, tick the Video and Audio checkbox. Then click on OK and Open. Later, you can turn on the subtitles by opening the Subtitles menu and choosing Subtitle Track.
A Good Way to Add Subtitles Manually
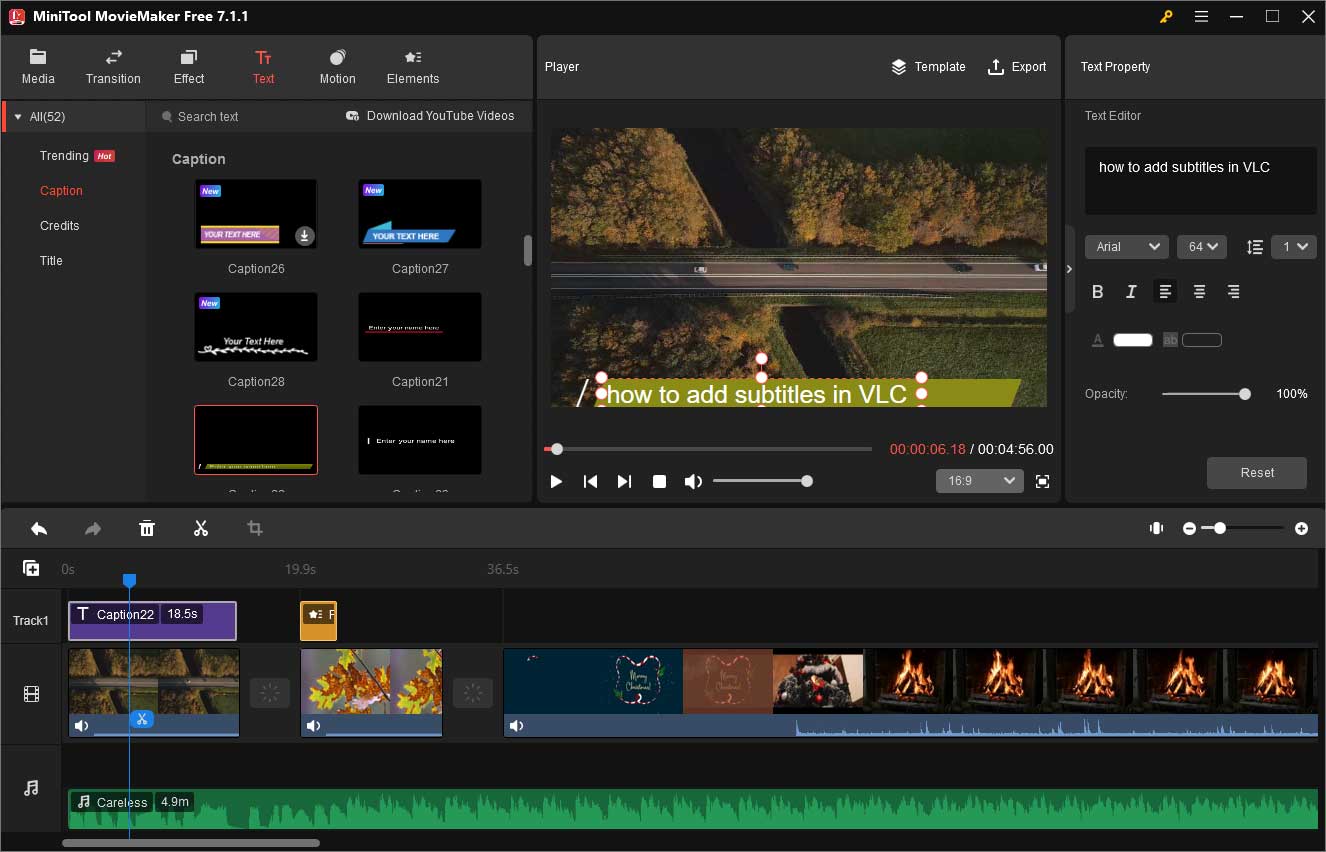
VLC enables you to add subtitles by adding an SRT file. If you want to add subtitles manually, you can try MiniTool MovieMaker. It provides you with various text styles for captions, titles, and ending credits. Moreover, it has a variety of useful editing features that enable you to trim, split, rotate, reverse, crop a video, make color corrections, fade music, add music to a video, add transitions, change video speed, and more. There are many features waiting for you to explore!
MiniTool MovieMakerClick to Download100%Clean & Safe
Final Words
You can refer to the above steps to add subtitles to VLC on Windows and Mac. Hopefully, this post is helpful to you!


![How to Fix VLC Subtitles Not Showing/Working [Solved]](https://images.minitool.com/moviemaker.minitool.com/images/uploads/2023/06/vlc-subtitles-not-showing-thumbnail.jpg)
![How to Make a Picture Move Easily [PC/Online/Phone]](https://images.minitool.com/moviemaker.minitool.com/images/uploads/2023/12/how-to-make-a-picture-move-thumbnail.jpg)
User Comments :