Removing watermarks from graduation photos has become a popular desire for those who would like to showcase or cherish their memorable moments without the distraction of watermarks.
Watermarks, often added by the photographers or organizations responsible for taking and distributing the pictures, are used to protect their copyright and ensure proper attribution.
While it is critical to respect copyright laws and obtain appropriate authorization, individuals may look for a graduation photo watermark remover for their personal use.
Here, you will learn how to remove watermark from graduation photos using Photopea and PhotoDirector.
How to Remove Watermark from Graduation Picture with Photopea?
Removing watermarks or deleting stickers from graduation pictures or any other photo online without appropriate authorization may violate copyright laws or terms of use. However, assume that you have the necessary rights or permissions to alter the picture. In this case, you can follow the following general steps to try to remove the watermark with the help of Photopea’s clone tool.
Photopea is a multifunctional and powerful online photo editor that offers a comprehensive range of features similar to professional applications like Photoshop. Accessible via a web browser, Photopea enables users to edit and manipulate photos easily, providing tools for graphic design, retouching, and compositing.
Thanks to its intuitive interface and compatibility with a variety of file formats, Photopea acts as a handy and accessible choice for beginners and experienced users looking to remove watermark from graduation picture online.
Step 1: Go to the Photopea website with your web browser. Click Open From Computer to upload your graduation photo. Or, just drag and drop the picture into the Photopea workspace.
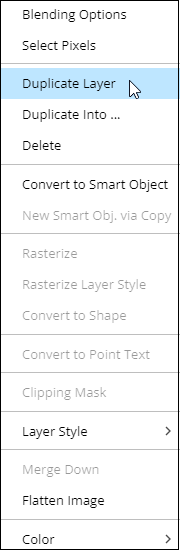
Step 2: In the Layers panel (typically found on the right side of the interface), right-click on the background layer and select Duplicate Layer.
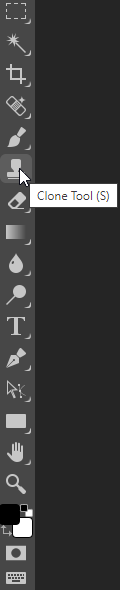
Step 3: Then, select Clone Tool (looks like a stamp icon) from the left toolbar. Press S on the keyboard to activate it if you cannot find it. Modify its settings: In the upper area, you’ll see the tool’s settings. Adjust the brush size based on the area you wish to clone. You can change the size with the slider or manually type the size you wish.
Step 4: Hold Alt (or Option on Mac) and click a nearby area closely matching the background or texture you would like to cover the watermark with. This will sample the area for cloning. Release Alt and then click and drag the Clone Tool over the watermark to cover it with cloned pixels. To make the cloned area look natural, ensure it blends smoothly with the surrounding pixels.
![How to Remove Emojis from Pictures [Phone/ Online/PC]](https://images.minitool.com/moviemaker.minitool.com/images/uploads/2023/06/how-to-remove-emojis-from-pictures-thumbnail.jpg)
How to Remove Watermark from Graduation Picture with PhotoDirector?
PhotoDirector is usually considered to be one of the most professional and powerful photo editors for desktop users. It may be more complex compared to other applications, but its capabilities are unrivaled. Novices may require time to learn and watch tutorials in order to become proficient in the use of PhotoDirector. You will find that no other software can match its versatility and functionality once you understand its concepts and techniques.
There are multiple watermark removal ways available in PhotoDirector. One widely used method is using the “Clone Stamp Tool”. The tool lets you clone a specific area of the picture and use it to seamlessly cover the watermark.
Step 1: Run PhotoDirector on your PC. Select File in the top menu and then Open to import the graduation photo containing the watermark. Or, drag and drop the picture right into the PhotoDirector workspace.
Step 2: Layers panel (often on the right side of the interface), right-click on the image layer and choose Duplicate Layer. This step will make sure that you have a backup of the original picture.
Step 3: Find the retouching or removal tool from the toolbar, typically represented by an icon that resembles a bandage or a brush. To activate the tool, click it.
Step 4: Modify the brush size, opacity, and hardness based on the size and complexity of the watermark. These settings are typically located in the options bar or the tool properties panel.
Step 5: Use the retouch or removal tool to carefully brush over the watermark. When you paint over the watermark, this tool will analyze the surrounding pixels and try to remove it seamlessly.

MiniTool MovieMakerClick to Download100%Clean & Safe
Conclusion
These are the steps we described on how to remove watermark from graduation pictures using Photopea and PhotoDirector. Try one of these ways now to remove the watermark from your personal graduation photos.
User Comments :