In this post from the MiniTool’s Windows movie maker, we will give you some basic information before using the OBS LUT and how to use the LUT in the OBS step by step.
What Is LUT in OBS?
Let’s first understand what the OBS LUT is before we get into how to use it in OBS.
OBS is the acronym for Open Broadcaster Software. In this context, a LUT, standing for Look-Up Table, is a file that can be used to add a color grade or color filter to a source, such as a video file or webcam. In essence, it is a series of pre-defined color corrections that can be used in a video or picture to accomplish a particular style or appearance. More simply put:
- A LUT is like a color filter for the video. It allows users to change the colors in the stream to make the appearance more stylish or cinematic.
- It works by mapping a set of colors to another set of colors. This means it can adjust the video’s saturation, brightness, and contrast.
5 Methods for Using the OBS LUT
The methods of using LUT for OBS are as follows:
- Finding LUT files. You can discover and download LUT files from the Internet, and then use them to the OBS sources. Or you can use video editing software such as DaVinci Resolve to create your own.
- Browsing for LUT files. Click on Browse and locate the LUT files that you have downloaded or created.
- Adding LUT filters. Right-click on the source you would like to add the LUT to and head to Filters in OBS.
- Using the Apply LUT filter. To add a new filter, click on the + button. Then, select Apply LUT.
- Changing the strength. You can change the LUT filter’s strength with the Amount slider from the filter settings.

How to Use LUT in OBS? Step-by-Step Guide
Take the following actions to create your own LUT in OBS Studio:
Step 1: Start by downloading the LUT of your choice. If it’s just a single LUT, it will most likely be downloaded as a .cube file that you can drop into your OBS filters folder. It is recommended that you save your LUT in the OBS LUTs folder because this is the place where OBS will open it by default. If you download a ZIP file that includes a large number of LUTs, unzip the file into your OBS filters folder. Yours will be in the same place as OBS.
Step 2: Next, drag the LUT or unzip the LUT bundle into the folder. These LUTs are now ready to be used in OBS Studio.
Step 3: Launch OBS Studio. Right-click the webcam source to select Filters.
Step 4: Access Effect Filters. After that, click on + in the lower left corner, select Apply LUT, and then name the LUT in the Filters panel.
Step 5: Choose the LUT you would like to apply to the webcam with the Browse button.
Step 6: Then, you can adjust the quantity slider to pick how powerful you desire the LUT to be.
Step 7: You have just completed installing a LUT on the webcam. You can drastically alter the tone of the stream by using the appropriate LUT.

Bonus Tip: Another Good Option to Add LUT to Video on Windows
Besides OBS, MiniTool MovieMaker is also a good solution for the addition of a LUT to a video file. See the simple steps below:
MiniTool MovieMakerClick to Download100%Clean & Safe
- Download, install, and run MiniTool MovieMaker on your Windows computer.
- Close the promotion window to access its editing interface.
- Click Import Media Files to import the video that you wish to apply a LUT on.
- Drag and drop the imported video onto the video track in the timeline area.
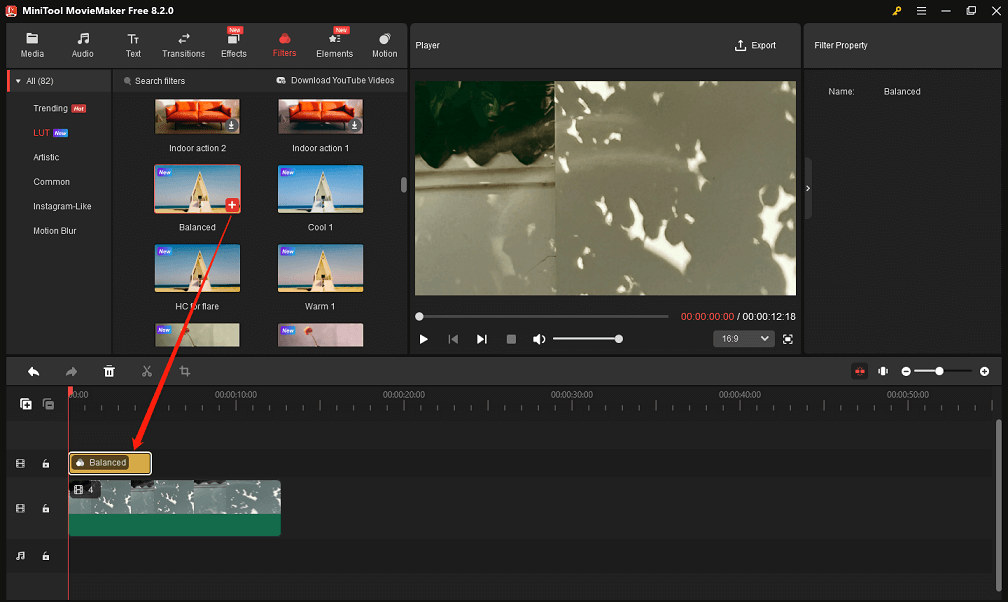
- Keep the video highlighted on the video track. Go to the Filters tab in the top menu, select the LUT subtab on the left side, and find the LUT you wish to use by scrolling down. Click the Download icon on it to get it. Next, click the + icon to add it to the highlighted video on the video track.
- When you are happy with what you’ve done, click Export to modify the output parameters and save the finished video to your device.
Conclusion
The above is the basic knowledge and detailed usage instructions about OBS LUT. Hope this post helps you out!
User Comments :