LUTs can simplify the video editing workflow. In this post from the MiniTool's free movie maker, we will mainly show you how to use Kdenlive LUTs on the footage.
LUTs (or lookup tables) are part of the workflow of a lot of editors. When utilized properly, they can be the difference between a single keystroke and an hour of work, serving as a convenient shortcut. It’s a simple process to apply a LUT to the footage in Kdenlive. However, there are additional options that editors may not know about.
About LUTs
A LUT is a pre-configured set of values that you can apply to footage either before starting the color-correcting process or afterward as a final step in this process.
A good LUT comes in tons of different forms and can be used to convert the footage from one color space to another easily. Or you can use it to significantly change the style of the footage in one step.
Which LUT Formats Kdenlive Supports
Kdenlive supports LUTS created in 4 distinct formats:
- .3dl (After Effects)
- .dat (DaVinci Resolve)
- .m3d (Pandora)
- .cube (Iridas)
These formats are typically created in other video editing applications and then exported for use by other editors. Applying the LUT in Kdenlive is precisely the same in every case, no matter what the format is.

How to Use LUTs in Kdenlive
A LUT can be used on one clip, a whole track, or all of the video tracks in the project (known as a master). If you think of the editing tracks as layers, the master track would be at the bottom, followed by the track LUT, and lastly, the LUT used on a single clip.
For instance, an editor could utilize a master LUT to convert the whole project from the camera’s default color space to a more widely used Rec709. Then they could use a different LUT, maybe a more stylized color grade, to one track, or even to one clip to further improve the project.
Kdenlive ships with built-in LUTs. Here is a step-by-step guide to applying Kdenlive LUTs:
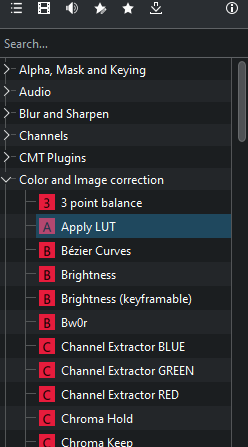
1. In the Effects tab, navigate to Color Correction > Apply LUT.
2. Depending on where and how you would like to apply the LUT itself, click on the effect and drag it to one of three different targets on the editing screen.
- To apply the LUT to one clip, drag it to the clip itself in the timeline.
- To apply the LUT to one track, drag it to the left side of the track you would like to use. If an effect has been applied to the specific track, the magic wand icon will light up.
- To apply the LUT to the whole project, drag it to the label marked Master in the upper-left corner of the timeline, then release it.
3. Click on the Effect/Composition Stack tab. Select the area in which you applied the LUT above. This opens the effect editor, where you can select the LUT you would like to use from a drop-down list.
4. You can choose one of three interpolation ways below the drop-down list: Nearest, Trilinear, or Tetrahedral. This affects the applied LUT’s quality and smoothness. However, there is a performance penalty when playing the clip in the editor.
Bonus Tip: How to Add 3D LUTs in MiniTool MovieMaker
MiniTool MovieMaker is a free and excellent video editor that gives you the ability to quickly and easily add a 3D LUT to the clip. You can do this by taking the following steps:
Step 1: On your computer, download and install MiniTool MovieMaker.
MiniTool MovieMakerClick to Download100%Clean & Safe
Step 2: Open this application. Close the promotion window to access the main user interface.
Step 3: Click Import Media Files to import your footage so you can apply the 3D LUT to it.
Step 4: Drag and drop the imported footage onto the timeline below.
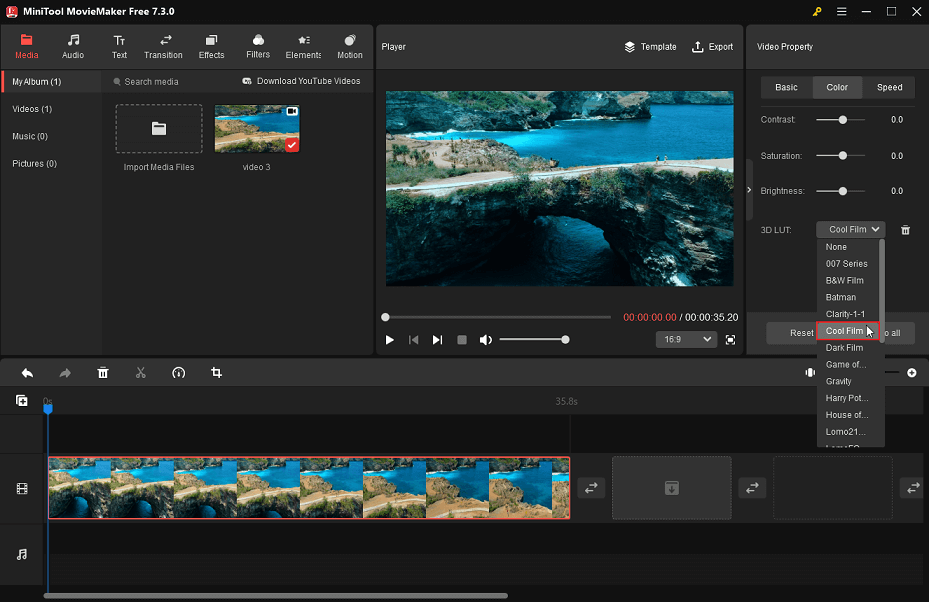
Step 5: Leave the clip highlighted in the timeline. Go to Video Property and click the Color tab. You will see the 3D LUT option here. Expand its drop-down list to choose the effect you want.
Step 6: Once done, click Export to make some output settings for your footage, then save it to your computer.
Conclusion
You now know how to apply Kdenlive LUTs to your footage after reading this post. Besides, if you wish to add a 3D LUT to the footage in a simple manner, we recommend MiniTool MovieMaker.
User Comments :