In this post from the MiniTool's Windows movie maker, we will tell you some important guidelines before you use LUTs and how to use LUTs in After Effects step by step.
After Effects
As a videographer, you should ensure that everything that comes out of your hands is perfect, so you may need to understand how to add LUTs in After Effects.
LUTs are just Look-Up Tables and they aim to assist you in creating those fantastic effects, incorporating them into your footage, and of course, making your own style.
In this guide, you’ll learn how to use LUTs in After Effects and look at how impressive your results can be. Don’t forget: Adjust your camera settings to get the best results!
Crucial Guidelines Before You Use LUTs
- Make sure the white balance is correct when you use LUTs. This will drastically alter the look of the LUT.
- Make sure the exposure is correct when you use LUTs. You can use a histogram as an aid in camera/editing software.
- When you use LUTs, your footage may require small modifications for optimal results, like saturation, contrast, exposure, and more according to your preference.
- Shooting conditions like weather, lighting, locations, etc. can change which can dramatically affect a LUTs appearance. In different scenarios, certain LUTs will perform better. It’s a good idea to experiment with the LUTs to see which ones work best for your scenes and style.
How to Use LUTs in After Effects
Now let’s move on to learn how to use LUTs in After Effects and start using them immediately.
Step 1. Download the LUT and Unzip It
The first thing you should do is download some really cool LUTs and unzip them. You must select something that matches perfectly with your project.
Step 2. Find the Effects & Presets Tab
By default, your workspace should contain the Effects & Presets tab.
If you cannot locate it, just go to Window and select the Effects & Presets option. Also, you can press Ctrl+5 on the keyboard.
Step 3. Search for Lumetri Color
In the Effects & Presets panel, search for the Lumetri Color effect. Drag Lumetri Color onto the clip if you wish to apply the LUT. You can add Lumetri Color to an adjustment layer as well, which you can put above the footage in the timeline. This will apply all the effects on the adjustment layer to all the clips underneath it.
Step 4. Apply the LUT
To apply the effects, drag and drop them onto the clip or adjustment layer in the timeline. Next, to apply the LUT, head to the Creative tab and locate the Load LUT drop-down menu. This is the place where you can browse through your LUTs to add them.
Bonus Tip: Another Great Way to Apply a LUT to One Clip on Windows
In addition to After Effects, MiniTool MovieMaker is also a good choice for applying LUTs to your footage. You can refer to the following simple steps:
Step 1: Download, install, and open MiniTool MovieMaker on your Windows PC.
MiniTool MovieMakerClick to Download100%Clean & Safe
Step 2: Close the promotion window for access to its main user interface.
Step 3: Under Media, click Import Media Files to import the video to which you want to add a LUT.
Step 4: Drag and drop the imported video onto the video track in the timeline below.
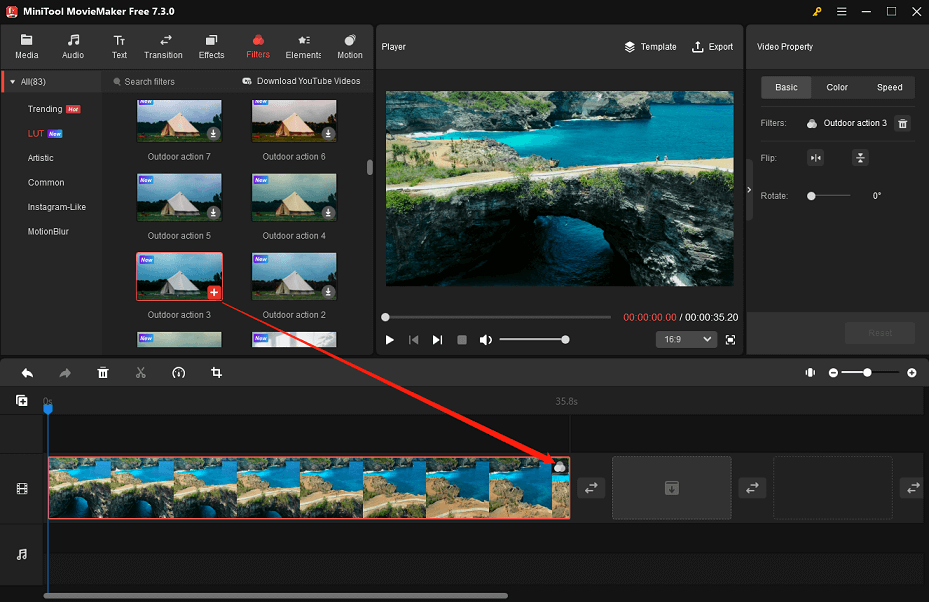
Step 5: Keep the video on the video track selected. Go to the Filters tab at the top. Select the LUT sub-tab on the left. Scroll down to find the LUT you want to use. Click the download icon on it to get it and then the + icon to add it to the selected clip on the timeline.

Step 6: Go to the Video Property at the top right. From there, you can improve your clip by doing the following:
- In the Basic tab, click Flip Horizontal or Flip Vertical to flip the clip to the corresponding direction. Additionally, you can move the Rotate slider to rotate the clip.
- In the Color tab, you can move the Contrast/Saturation/Brightness slider to change the color of the clip. Plus, you can expand the 3D LUT drop-down menu to apply a 3D LUT you prefer to the clip.
- …
Step 7: When you are satisfied with the edits you have made, click Export to make some output settings and save the final video to your Windows PC.
Conclusion
If you’re just getting started with videography, the guide above on how to use LUTs in After Effects may be helpful to you.


User Comments :