How to export a transparent video in After Effects? This post from the free video editor - MiniTool MovieMaker will provide you with a step-by-step guide.
After Effects is a professional video post-production application for motion graphics and visual effects. Sometimes, you may want to export a video with a transparent so you can layer it into your other projects. How to export a transparent video in After Effects? Let’s get started.
How to Export a Transparent Video in After Effects
Here is a step-by-step guide on how to export transparent background video in After Effects.
Step 1. Once your editing is done, click the File menu on the top toolbar and select Export > Add to Render Queue from the drop-down list.
Step 2. Once in the Render Queue, make sure the Render Settings are set to Best Settings.
Step 3. To render a video with a transparent background, do one of the following:
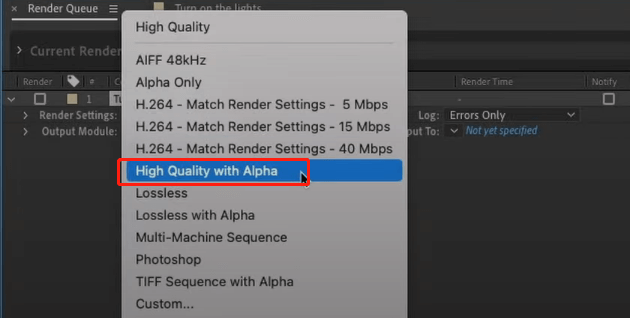
Option 1: Click the Output Module drop-down menu and choose High Quality with Alpha, which will render you a MOV file.

As you can see from the screenshot above, you can now export H.264 (MP4) files directly from After Effects without the need for Media Encoder, which is the latest update to After Effects. To do this, make sure you are using the latest version of After Effects.
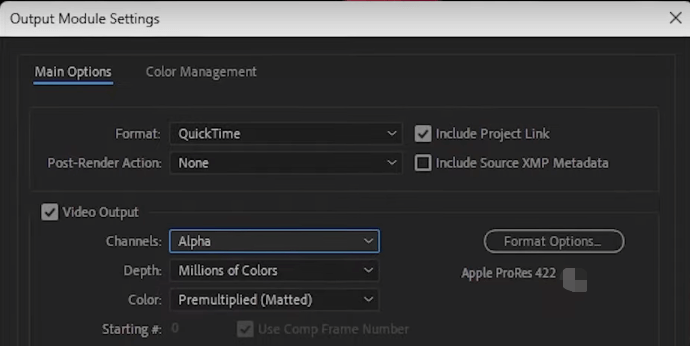
Option 2: Click the High Quality option next to Output Module to open the Output Module Settings window. The default format is QuickTime, just keep it.
Next, go to the Video Output section, expand the Channels drop-down arrow, and select RGB + Alpha on Windows devices instead of RGB.
Mac users may choose Alpha, then click Format Options on the left to open the QuickTime Options window. Then, expand the Video Codec option, choose Apple ProRes 4444, and click OK. After that, click the Channels option again in the Output Module Settings window, choose RGB + Alpha, and click OK.

Step 4. Select the folder to save your video and click Render below the video player to start rendering.
In this way, you will get a MOV video file with a transparent background. If you want to convert it to other file formats, such as VP8 or VP9 encoded WebM files (alpha channel is also supported), you can use a professional video converter like MiniTool Video Converter or a video editor like MiniTool MovieMaker.
MiniTool Video Converter is a free video converter without watermark and file size limits, supporting a wide range of video file types and allowing you to convert between any popular video formats.
MiniTool Video ConverterClick to Download100%Clean & Safe
MiniTool MovieMaker is an easy-to-use and feature-rich video editor without watermark. You can also use this application to convert MOV to WebM.
MiniTool MovieMakerClick to Download100%Clean & Safe
You may also like:


User Comments :