Are you looking for ways to add creativity to your text? You can try bending text in your design. This article from MiniTool MovieMaker (one of the best free video editing software) will introduce how to curve text in Canva to meet your needs.
Adding curved text to your designs can make them more dynamic and eye-catching. Whether you’re creating a logo, a poster, or a social media graphic, curved text is a great way to enhance your design and give it a professional feeling. Canva is also a curved text generator and I will walk you through the easy process of curving text in Canva, helping you enhance your designs with just a few clicks. Whether a beginner or an experienced designer, you’ll quickly learn how to curve text in Canva.
MiniTool MovieMakerClick to Download100%Clean & Safe
How to Curve Text in Canva Using the Curve Effect
Using the curve effect in Canva is an easy way to create curved text. It makes it easy to align your text along circular or curved paths, helping you create more vivid designs. Next, we’ll show you in detail how to apply the curve effect in Canva to make your text eye-catching.
Step 1: Go to the official Canva website, and log into your account. Once logged in, click the Start designing button to create a project.
Step 2: On the left toolbar, click on the Text tab. You can choose a text style from the available templates or click Add a heading, Add a subheading, or Add a little bit of body text to insert your text.
Step 3: Click the text box on the canvas and enter your text content.
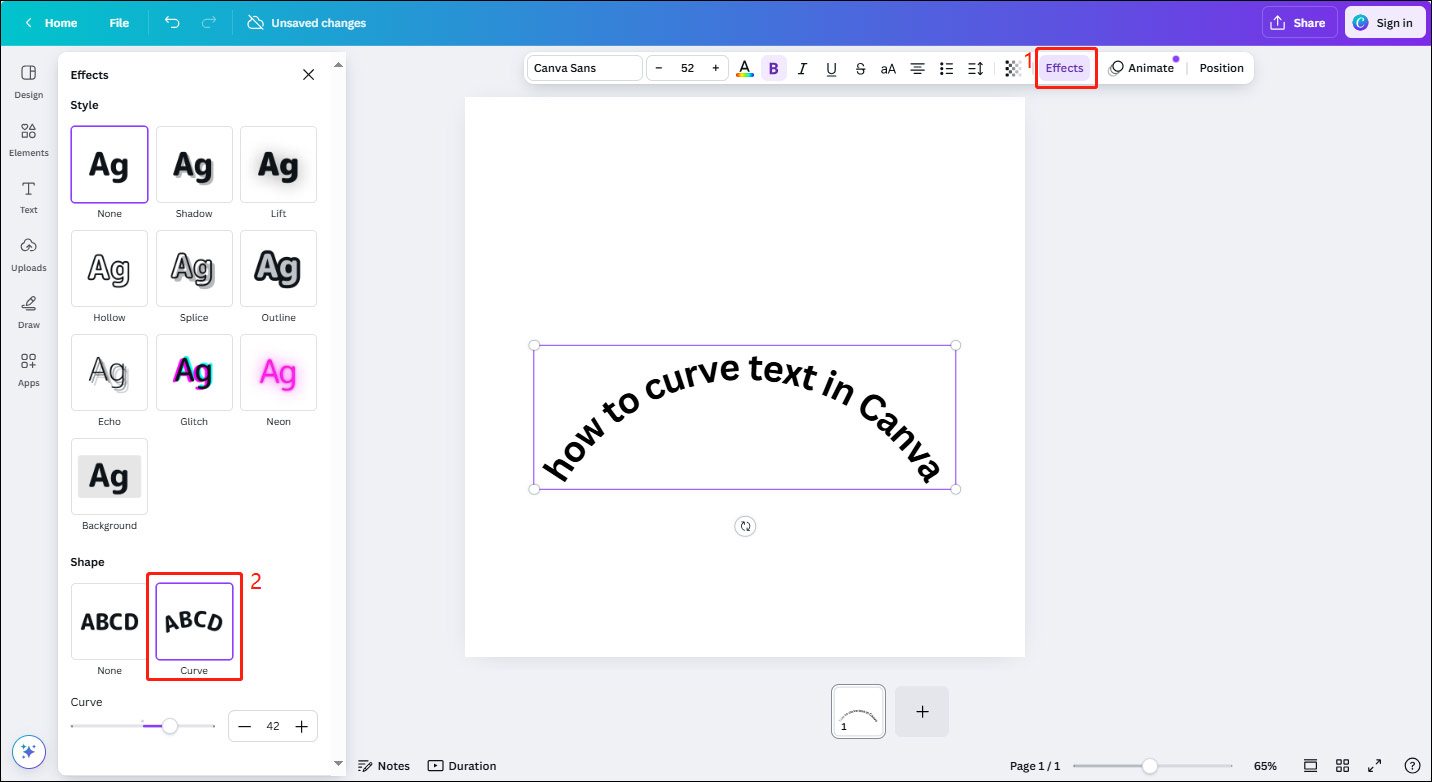
Step 4: You can see a toolbar at the top of the screen. With your text selected, locate and click the Effects button in the toolbar. In the Effects panel, scroll down and find the Curve option. Click the Curve button and your text will automatically transform into a curved shape.

Step 5: Once the curve effect is applied, a slider labeled Curve will appear on the panel. Drag the slider left or right to adjust the curvature.
Step 6: When you’re satisfied with your curved text and design, go to Share > Download to save your design.
How to Curve Text in Canva Using the TypeCraft Tool
If you want more control and customization with your text, Canva’s TypeCraft Tool offers a powerful option for curving text to fit your design needs. This tool allows you to adjust the curvature, spacing, and style of your text more precisely than a simple curve effect, making the design more unique and personalized. Therefore, it is for users who want more freedom in their creations.
Next, I will show you how to use the TypeCraft tool in Canva to bend text and help you create personalized designs.
Step 1: As in the previous step, add text to your design. Select your text box, and click the TypeCraft button in the toolbar.
Step 2: In the TypeCraft editor window, you’ll see various preset shapes and curve options. Click a preset option to apply it instantly to your text.
Step 3: If you’d like to create a custom curve, you can manually adjust the shape. Use the control points that appear on your text to manipulate the curve’s direction, angle, and intensity. Click and drag these control points to adjust the curve to your preference.
Step 4: After adjusting the curve, you can further fine-tune your design by changing font styles, sizes, and colors in the top toolbar.
Step 5: Once you’re satisfied with the curved text, click Share > Download to save your work.
You can also read: how to curve text in Photoshop.
Bottom Line
Overall, Canva provides a powerful curving tool that allows you to easily add creativity and personality to your designs. I’m sure you’ve learned how to curve text in Canva. With flexible adjustments and careful design, your text will be more attractive and fit better into the overall work. I’m looking forward to your wonderful work.


User Comments :