How to Change Aspect Ratio in Final Cut Pro
Final Cut Pro is a powerful video editing tool developed by Apple Inc. It offers multiple features that allow you to modify your video clips, including the ability to change their aspect ratio. Changing the aspect ratio can be particularly helpful if you need to adapt the screen size or shape to fit different social media platforms such as Instagram, TikTok, Snapchat, YouTube, and others.
Here is a step-by-step guide on how to change the aspect ratio in Final Cut Pro:
Step 1. Download and install Final Cut Pro on your device, and launch it.
Step 2. Start a new project in Final Cut Pro and name it.
Step 3. Click the Import Media option to upload the desired video and drag it to the timeline.
Step 4. Select the Modify button located on the right corner of the Property window.
Step 5. This will bring up a settings panel where you can customize project settings. Once open, select Custom from the video dropdown menu.
Step 6. Input the values that correspond to the aspect ratio you want. For instance, if you want an aspect ratio of 16:9, you would input 1920 for the width and 1080 for the height.
Step 7. Once you’ve entered the desired values, hit the OK button to save your changes. Your video will now have the new aspect ratio.
An Alternative Way to Change the Video Aspect Ratio
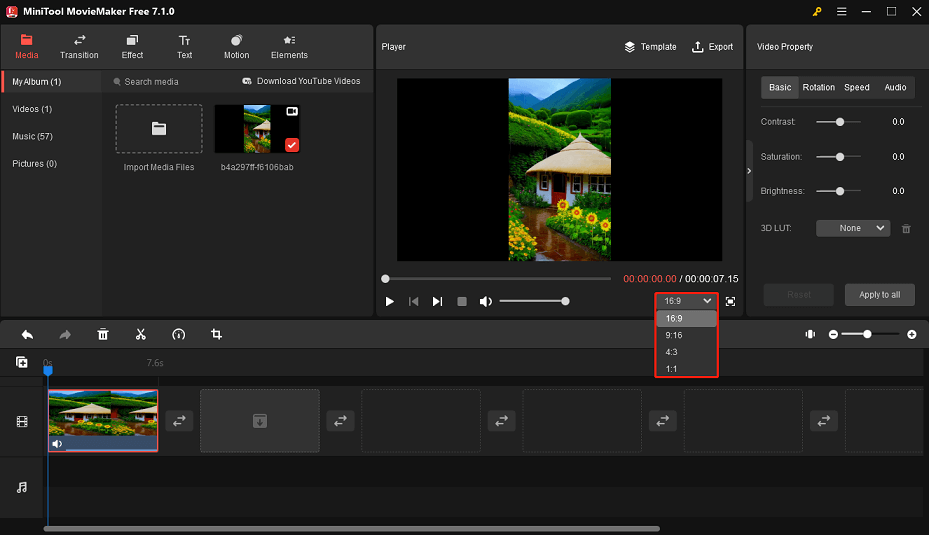
If you’re someone who wants to change the video aspect ratio on your Windows computer but doesn’t have any video editing skills, I would highly recommend using MiniTool MovieMaker. With its versatile video editing tools, you can easily change the aspect ratio to suit your needs. MiniTool MovieMaker offers 4 options for aspect ratio – 16:9, 9:16, 4:3, and 1:1.
Apart from changing the aspect ratio, this video editor also lets you split, crop, trim, speed up/slow down, rotate videos, add text and music, as well as apply transitions and filters to videos, etc. Follow these steps to change the video aspect ratio with MiniTool MovieMaker:
Step 1. Download MiniTool MovieMaker by clicking the download button below and install it on your PC.
MiniTool MovieMakerClick to Download100%Clean & Safe
Step 2. Once installed, open the video editor and import your video by clicking the Import Media Files button.
Step 3. Drag and drop the imported video onto the timeline below and select it.
Step 4. In the Player window, expand the aspect ratio drop-down list and select the one you’d like to change.
Step 5. After changing the aspect ratio, make other edits to your videos such as adding background music, applying 3D LUT effects, adjusting video speed, and more.
Step 6. Once you’re done editing, click on the Export option to save the video to your computer. Here, you can also customize the video format, resolution, quality, bit rate, frame rate, etc.

Bottom Line
Changing the aspect ratio of your video in Final Cut Pro is a simple process that can significantly enhance the viewing experience. If you’re wondering how to change the aspect ratio in Final Cut Pro, the steps outlined in this post will help you. Additionally, we’ve introduced you to another popular tool, MiniTool MovieMaker, which can help you change the video aspect ratio more effectively.
User Comments :