Resizing an image on a Mac is a simple process that can be done using the built-in applications. This MiniTool MovieMaker post will offer a step-by-step guide on how to resize an image on Mac without losing quality.
How to Resize an Image on Mac
If you want to change the size of an image on your Mac, you don’t need to download any third-party app. You can use the built-in Preview app or the Photos app to resize your images quickly and easily. Next, let’s take a look at how to resize an image on a Mac using both apps.
Resize an Image on Mac Using Preview
Preview is a versatile app that lets you view and edit images and PDFs on your Mac. You can use Preview to resize any standard image file format, such as JPEG, PNG, TIFF, etc. Here’s how to resize an image on a Mac without losing quality using Preview:
Step 1. Locate the image file you’d like to resize on your Mac, right-click the file, and select Open With from the context menu.
Step 2. Choose Preview from the list of applications.
Step 3. Click on the Tools menu at the top of the screen and select Adjust Size from the drop-down menu.
Step 4. In the Adjust Size dialog, you can change the width and height of your image. You can input your desired dimensions directly into these fields.
Step 5. Once you’re happy with your changes, click OK.
Step 6. To save the changes, click on File in the menu bar and then Save.
Resize an Image on Mac Using Photos
Photos is another app that comes pre-installed on your Mac, which you can use to manage, edit, and resize your videos and photos. If you want to learn how to resize an image on Mac using Photos, here are the steps you should follow:
Step 1. Open Photos and select your images.
Step 2. Click on File in the menu bar, choose Export, and select Export 1 Photo.
Step 3. Under Size, you can choose the Full Size, Large, Medium, or Small presets.
Step 4. You can also change the size of your image by clicking Custom under Size and entering a new value for width or height in pixels.
Step 5. Once you are happy with the new size and quality of your image, click Export to save it to a location of your choice.
Bonus – How to Resize an Image on Windows
If you want to resize your images on Windows, MiniTool MovieMaker is the first recommended option here. It’s a free yet powerful Windows video maker that can help you create and enhance your images and videos.
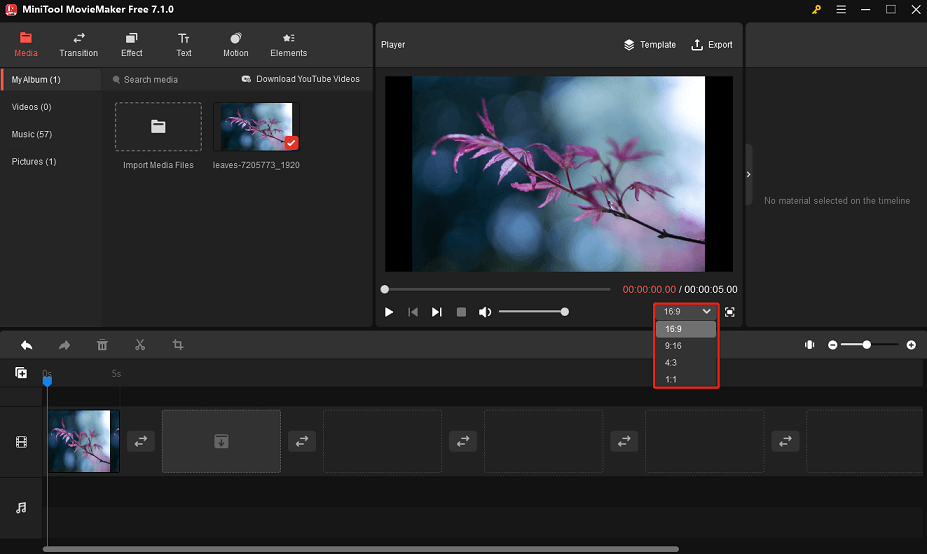
MiniTool MovieMaker offers four aspect ratio options: 1:1, 4:3, 9:16, and 16:9. With it, you can easily resize images and videos to fit different social media platforms. In addition, it allows you to combine these resized images into an amazing video. Follow the steps below to resize an image on Windows with MiniTool MovieMaker:
Step 1. Download and install MiniTool MovieMaker on your Windows PC.
MiniTool MovieMakerClick to Download100%Clean & Safe
Step 2. Launch this video editor and click Import Media Files to transfer your photos to this program.
Step 3. Click on + in the lower right corner of the imported photo or drag and drop it to the timeline.
Step 4. To resize the image, expand the aspect ratio drop-down in the Player window and select your desired option.

Step 5. Click on Export to save the resized image to your Windows.
Conclusion
Are you wondering how to resize an image on Mac? It’s actually quite simple and convenient to do using apps like Preview and Photos. Hope this guide has helped teach you how to do it. Moreover, if you’re using Windows, you can try using MiniTool MovieMaker to resize your images.


User Comments :