This post explains how to convert square video to vertical with MiniTool MovieMaker and CapCut. Follow the steps below to effortlessly repurpose your square content for maximum impact on Instagram and TikTok.
You might have shot an amazing square video on a trip and want to publish it as a Reel or on TikTok, or YouTube Shorts. As we all know, they are vertical content-oriented platforms that prefer videos with a 9:16 aspect ratio.
In this post, I’ll give clear instructions on how to convert square video to vertical for any skill level.
How to Convert Square Video to Vertical on MiniTool MovieMaker
MiniTool MovieMaker is an easy-to-use and feature-rich video editor, providing all the essential editing tools and trendy effects to help you create high-quality videos. For instance, it enables you to trim, split, rotate, crop, and flip videos, change the aspect ratio, adjust the playback speed, add background music, apply filters, add transitions, and more.
Best of all, MiniTool MovieMaker has an intuitive interface, making it easy to use, even for beginners. Plus, it doesn’t include a watermark on the exported video.
Here’s how to make a square video vertical using MiniTool MovieMaker.
Step 1: Download and Install
Click the button below to download and install the square video to vertical converter on your computer.
MiniTool MovieMakerClick to Download100%Clean & Safe
Step 2: Import Your Square Video
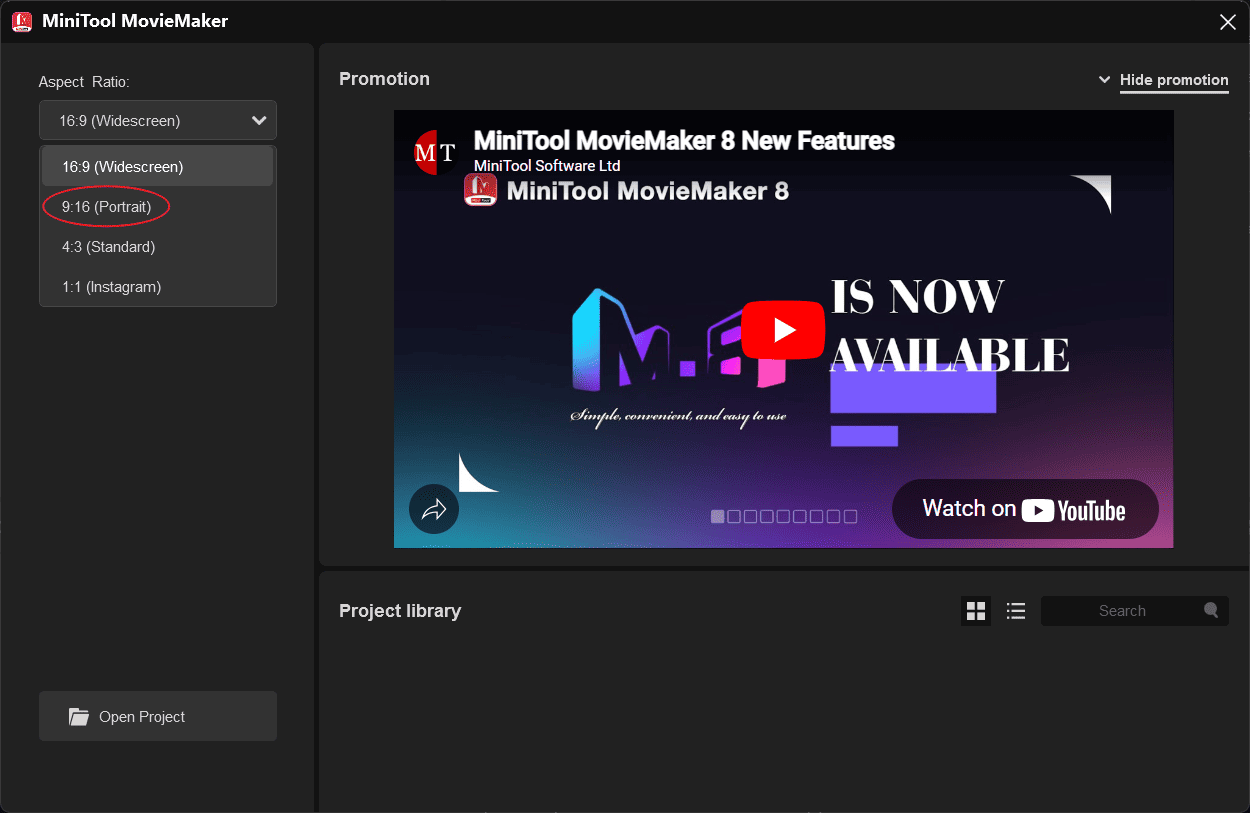
When you launch the software, a pop-up window appears and lets you set the aspect ratio for your project. To make a vertical video, expand the Aspect Ratio dropdown list and select 9:16 (Portrait). Don’t worry if you forget to change your settings.
Click the New Project button to access the main interface. Then, click the Import Media Files button to upload your video.
Step 3: Convert the Square Video to a Vertical Format
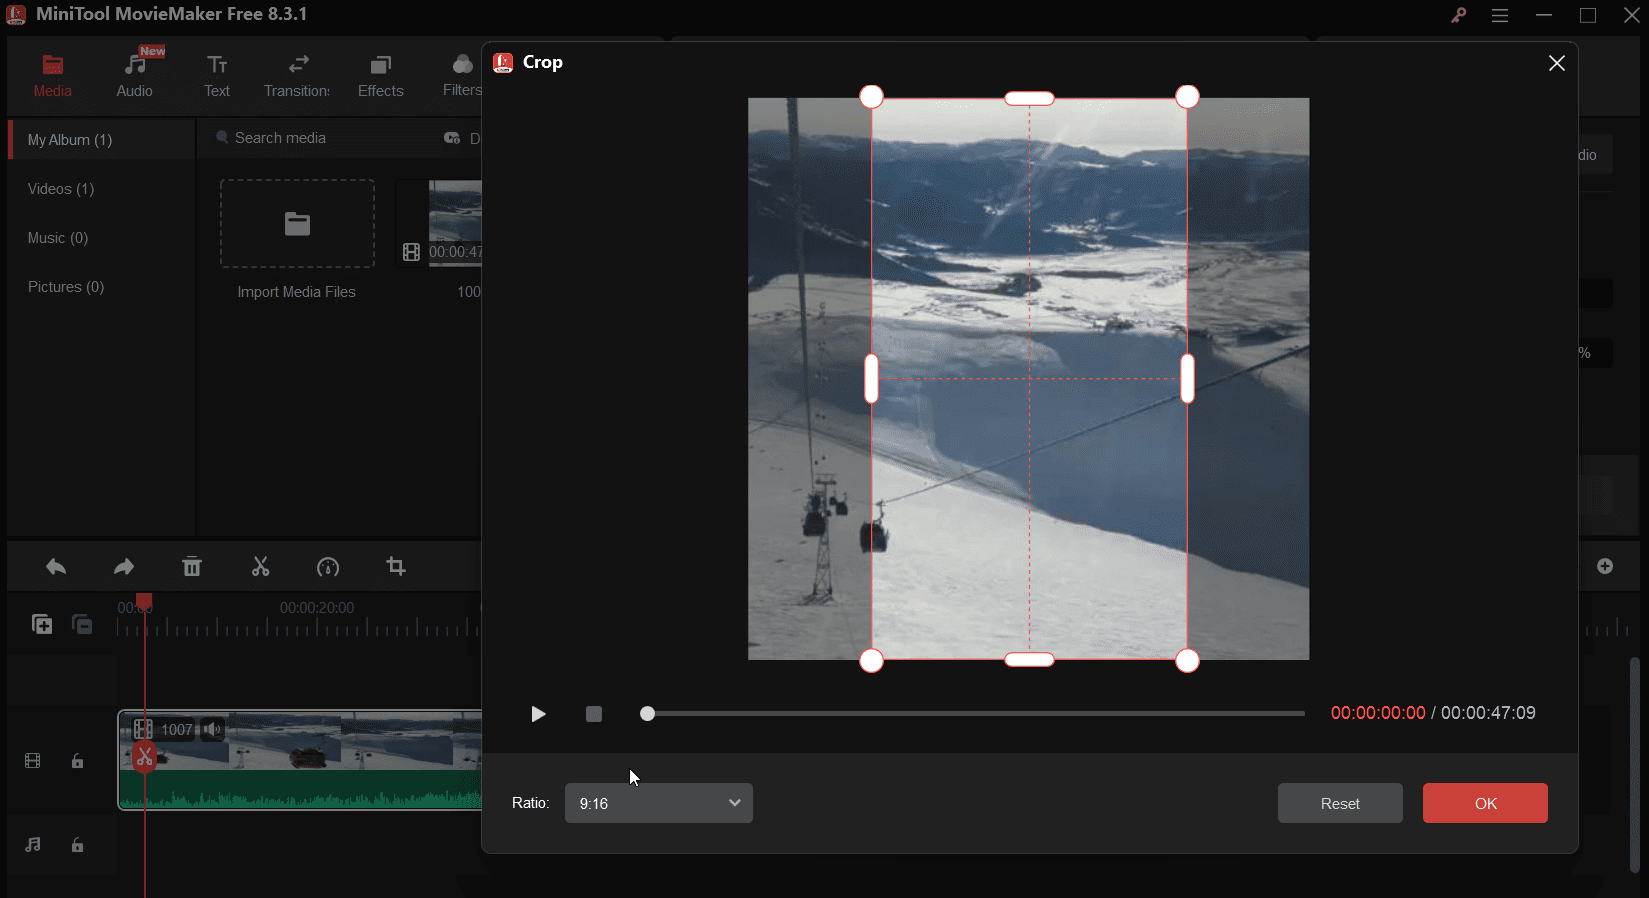
Drag and drop the video to the timeline, and ensure the Ratio is set to 9:16. Then, black bars will appear on the top and bottom due to the mismatched aspect ratio.

To remove the black edges, crop the video using the same aspect ratio. However, this will result in some loss of detail.
Click the Crop icon on the timeline toolbar, set Ratio to 9:16, drag the red rectangle to choose the area you want to keep, and click OK to apply changes.
Step 4: Export the Vertical Video
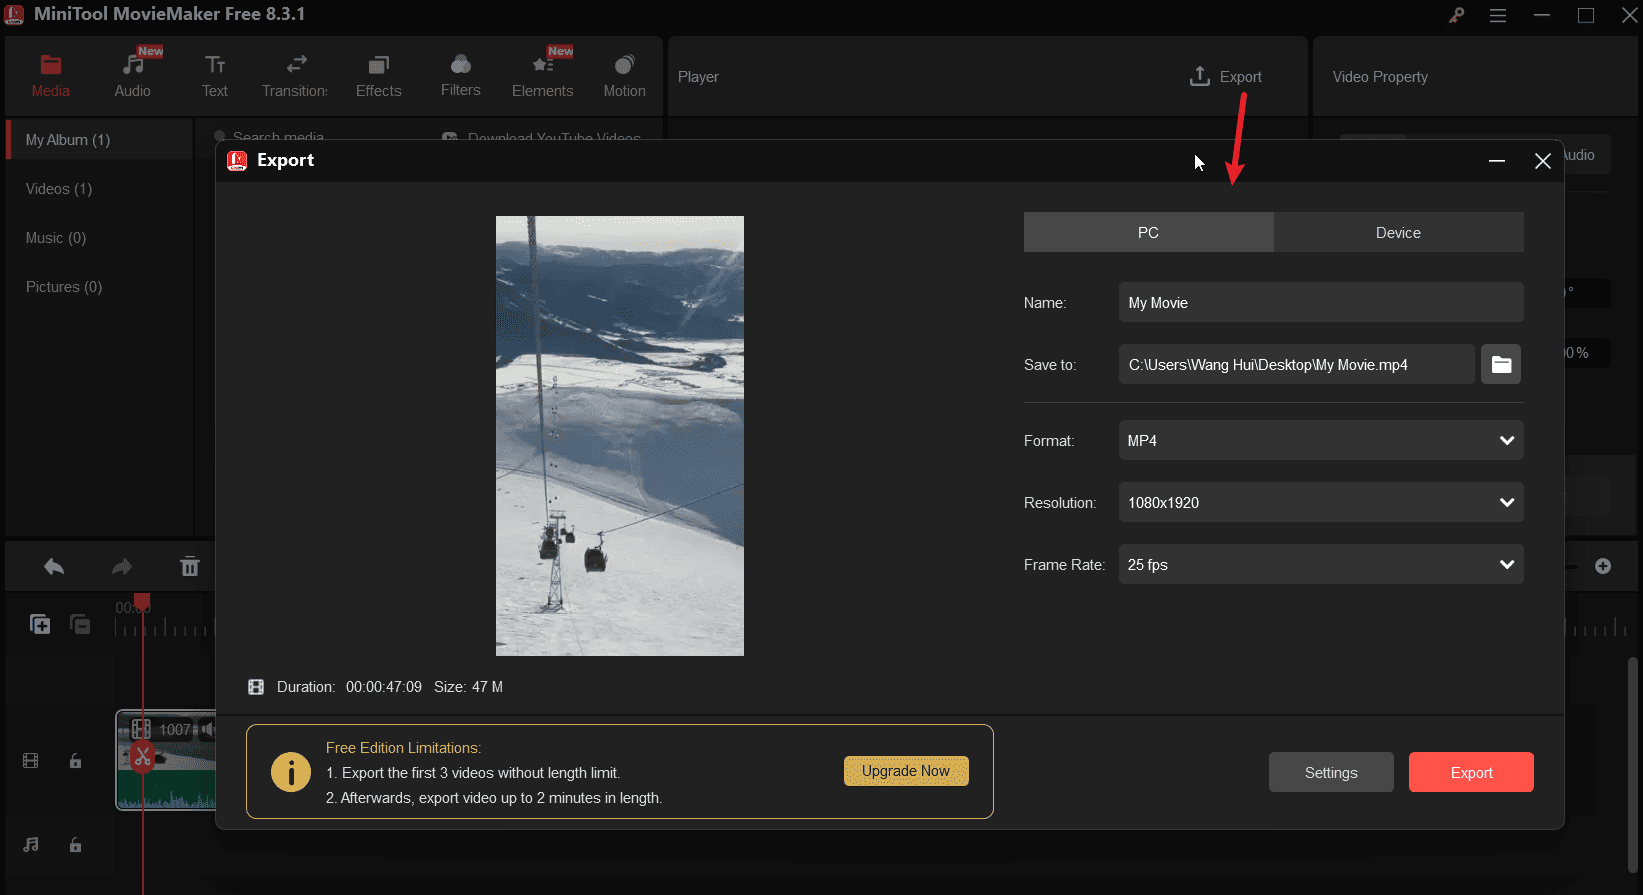
Click the Export button in the top right corner. Then, configure the output settings, such as the save path, video format, resolution, frame rate, etc. Finally, click the Export button again to start rendering the video.
How to Convert Square Video to Vertical on CapCut
CapCut is one of the best video makers for social media, featuring powerful editing tools and a rich variety of effects to create high-quality videos. This application also provides pre-designed templates for quick creation.
Here’s how to convert square video to vertical using CapCut.
Step 1: Get the Video Editor on Your PC
Go to the CapCut website or the Microsoft Store to download and install the application on your PC.
Step 2: Upload Your Square Video
Launch the software and click the Create project button at the top of the home page to enter the main interface. Click the Import button to open your video and add it to the timeline.
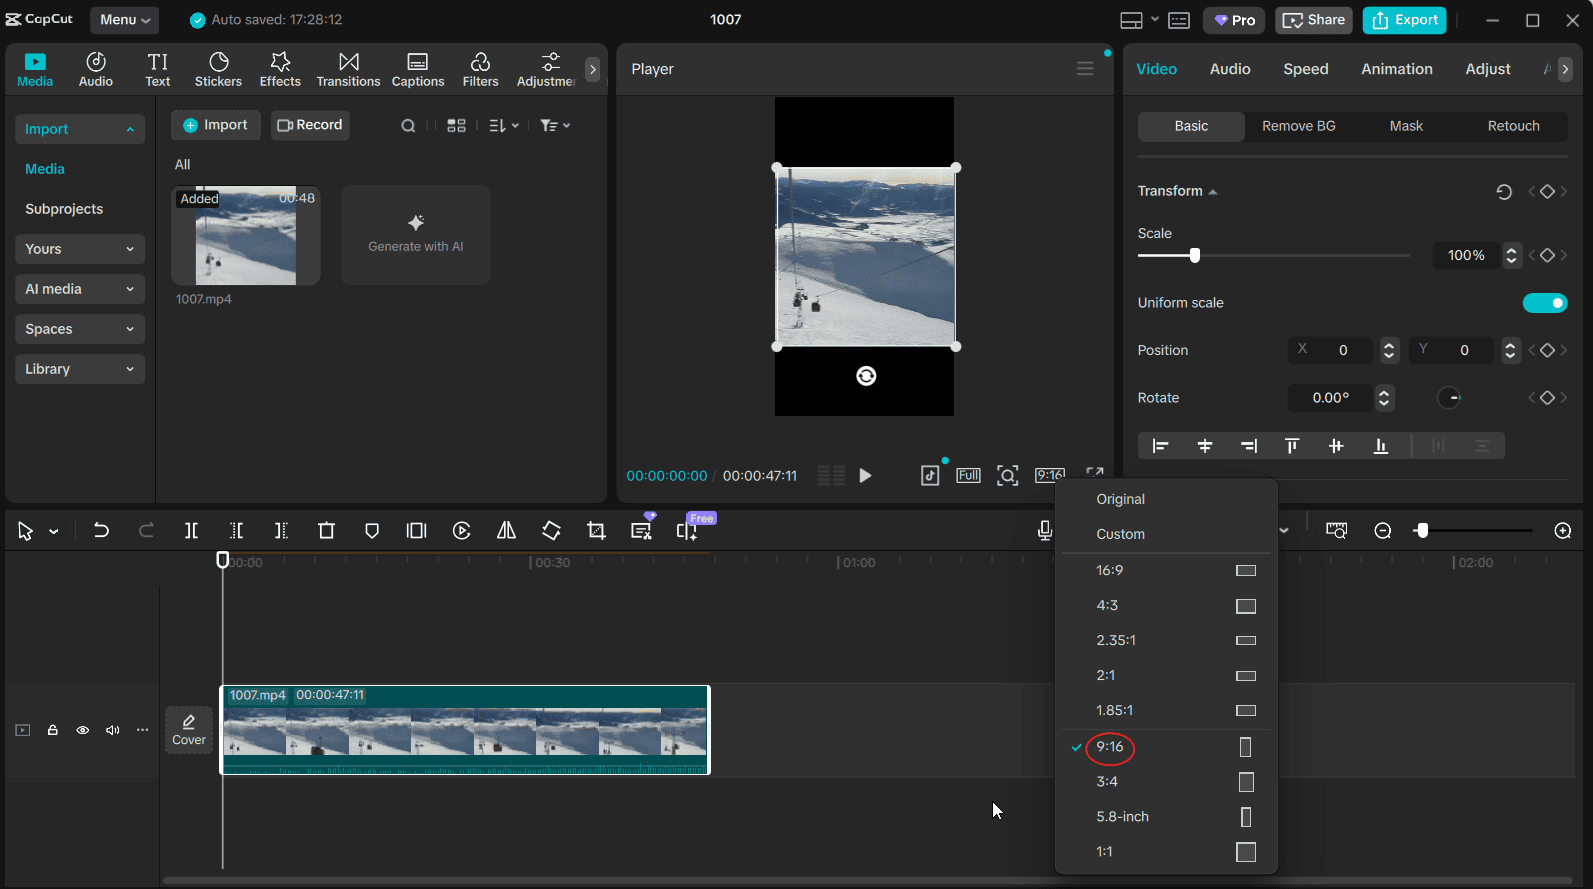
Step 3: Turn the Square Video into a Vertical Format
Click the Ratio menu below the player window and choose 9:16 from the dropdown list.
Step 4: Eliminate Black Bars
Then, you’ll see a black area on the top and bottom of your video. You can crop the clip to remove black bars or add a background without losing details.
To add a background, scroll down to the Canvas tab at the bottom of the Video tab. Click the inverted triangle icon and select a background type: Blur, Color, or Pattern.
- Blur: Choose a blurred background from the available presets.
- Color: Add a solid color background.
- Pattern: Choose an image and set it as the background.

Step 5: Export the Vertical Video
Click the Export button in the upper right corner and select the resolution, bitrate, codec, format, and frame rate. Click Export again to start exporting your video.
Conclusion
It’s easy to convert square video to vertical with the right tools. You can now follow the steps above to transform your square video into a vertical format, making your content reach new audiences.
About The Author

Position: Columnist
Cora is a tech writer specializing in digital media workflows, with over six years of hands-on experience in video post-production, media transcoding, and screen capture. Her writing is always clear and practical. Cora also produces in-depth software reviews for users across skill levels to help them find the right tool and enjoy video editing.
User Comments :