How to Add Captions to Videos on LinkedIn
Good news! LinkedIn has a built-in tool that not only allows you to add captions by uploading SRT files but also helps you add captions automatically. How to its built-in tool to add captions? In this part, we will provide you with detailed steps. Now, let’s get started!
Step 1. Sign into your LinkedIn account on the website or the LinkedIn app.
Step 2. On the Home page, you can see there are 3 options (Media, Event, and Write article). To upload your video, you should choose the Media option, select the video from your device, and click Open.

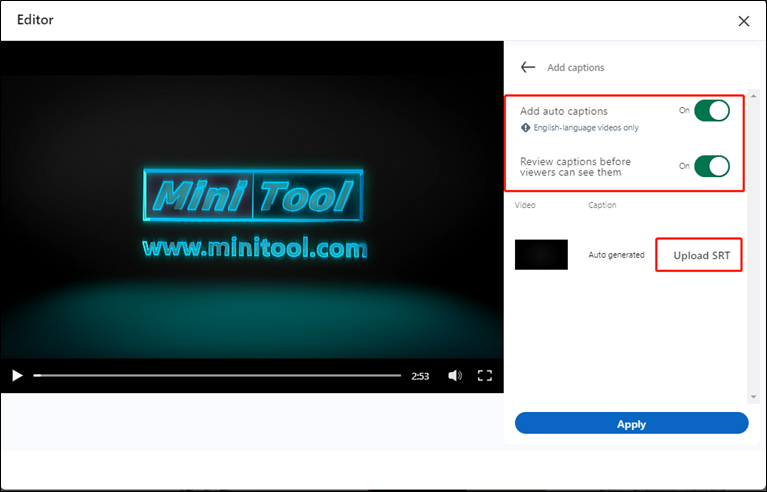
Step 3. Click the Captions icon and there are two options for you.
- Add Captions Automatically: Just toggle on the Add auto captions option to add captions as soon as they’re generated. If you don’t want to add auto-captions, you can toggle it off. Furthermore, you can turn on the Review captions before viewers can see them option to preview captions before they’re published. One thing you need to pay attention to is that LinkedIn only supports adding-auto-captions in English-language videos.
- Add Captions via Uploading SRT File: Click on Upload SRT to import your SRT file. If you import a false file, click Remove SRT.

Step 4. Click the Apply button and click Next. Finally, click Post to publish your LinkedIn video.
Step 5. After the video is published, there will be a banner below your posted video. Here are two different banners and you can see one of them.
- Auto captions have been added to your video: You can not only watch the video with captions but also click the Edit icon to edit them.
- Auto captions are ready for review: You need to click Review to check the captions and click Approve to add them to your video if you’re satisfied with them.
Add Captions to LinkedIn Video Before Uploading
Viewers can turn off captions when they watch a video. Also, it is not convenient to add captions on LinkedIn. You can choose to add captions or subtitles to your LinkedIn video before uploading with a third-party tool.
MiniTool MovieMaker is a free video editor without watermarks. It is an excellent LinkedIn video maker and editor that can help you create and edit LinkedIn videos with its various useful editing features. For instance, it can rotate videos, add music to videos, make color corrections, turn GIFs into a video, add sound effects, fade music or video, and more.
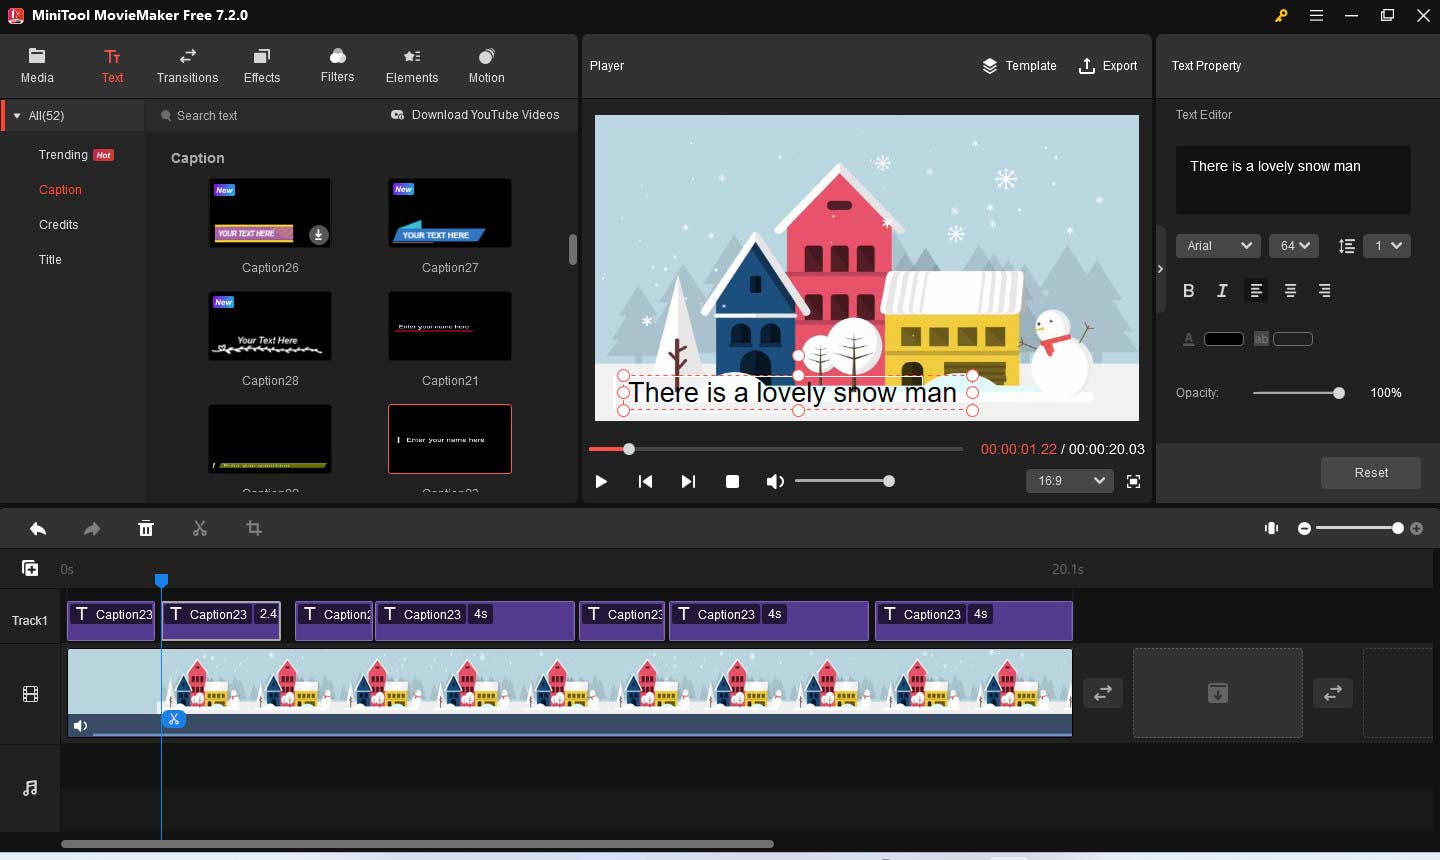
Moreover, you can use MiniTool MovieMaker to add captions or subtitles to LinkedIn video manually. There are many caption templates and you can find a desired one. Here are detailed steps:
Step 1. Download and install MiniTool MovieMaker and then run it.
MiniTool MovieMakerClick to Download100%Clean & Safe
Step 2. Click New Project to enter its main editing interface, click the Import Media Files area to upload your video for LinkedIn, and directly drag and drop it onto the timeline.
Step 3. Click the Text tab, choose the Captions option from the left side, choose a template you prefer, and click the Plus icon to add it to the video.
Step 4. In the Text Property section, you can enter the text you want to convey and adjust the text font, color, and others. What’s more, you can shorten or lengthen the captions’ duration on the timeline.

Step 5. Make other edits. Once you are satisfied with the video, you can click the Export option in the Player section to open the Export window. Here, you can name the video, choose its video format, adjust video resolution, and others. Finally, click the Export button.
Bottom Line
How to add captions to LinkedIn video? You can follow the above methods and have a try!


![How to Add Captions to YouTube Shorts [Detailed Guide]](https://images.minitool.com/moviemaker.minitool.com/images/uploads/2024/03/how-to-add-captions-to-youtube-shorts-thumbnail.jpg)

User Comments :