If you want to create a cinematic glow effect for your videos, you’ve come to the right place. This post will elaborate on how to add a glow effect to video using three of the best video editing software applications, including Premiere Pro, CapCut, and VN Video Editor.
Adding a glow effect to video is an effective and simple method to create atmosphere, enhance the visual experience, capture your audience’s attention, and convey emotion. So, how to add a glow effect to video? This tutorial provides you with 3 ways.
How to Add a Glow Effect in Premiere Pro
Premiere Pro is a professional video editing application with comprehensive features. If you just start learning how to use this industry-leading video editor, follow the steps below to create a glow effect.
Here’s how to add a glow effect to video in Premiere Pro:
Step 1. Launch Premiere Pro and add your video to the timeline (It should be at the track one.).
Step 2. Duplicate this clip by holding down the Alt key on your keyboard, clicking and dragging layer track one to layer track two. Then, disable the visibility of the layer track one by clicking on an eye-like icon.
Step 3. Go to Effects, search “luma key, and drag the Luma Key effect to the duplicated video on track two. Return to Effects, search “gaussian blur”, and add the Gaussian Blur effect to the duplicated video.
Step 4. Go to Effects Controls and decrease the value of Threshold (like 20%) under Luma Key to eliminate the dark areas and preserve as much of the bright parts of the video as possible. Next, increase the value of Blurriness under Gaussian Blur to 200 and set the Blend Mode as Screen.
Step 5. Enable the visibility of layer track one and the cinematic glow effect appears immediately. To get a better glow, you can slightly lower the opacity of the second track under Effect Controls.
Step 6. Preview and export the video.
How to Add a Glow Effect in CapCut
CapCut has become the favorite video editor of many content creators due to its simple operation and powerful features. Some users also want to know how to add a glow effect in CapCut. If you’re one of them, here’s a quick glow effect tutorial for you.
Step 1. Open the CapCut desktop app on your PC and click the + Create project button on the top to enter the app’s main interface.
Step 2. Click + Import to open your video and add it to the timeline.
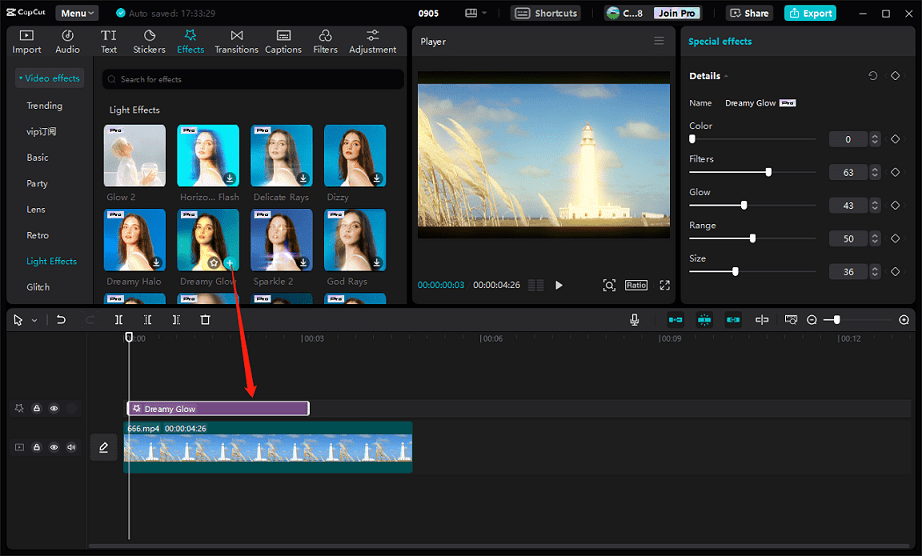
Step 3. Go to Effects on the top menu bar, select Light Effects on the left sidebar, and you’ll see the Glow 2 and Dreamy Glow effects. Download an effect and click the + icon to apply it to the video on the timeline.

Next, under special effects on the right side, you can adjust the dreamy effect by changing its filters, color, glow, range, and size.
Step 4. If you’re happy with the result, click Export to render the video.
However, the glow effects are Pro features in CapCut, you have to join Pro to export the glow effect videos. Many effects of CapCut require a Pro subscription, if you want a video editor with free video effects and filters, try MiniTool MovieMaker, all of whose editing features are available for free.
MiniTool MovieMakerClick to Download100%Clean & Safe
How to Add a Glow Effect in VN Video Editor
If you want to create a dreamy glow effect video on your smartphone, VN Video Editor is a great option.
Step 1. Open VN Video Editor and import your video.
Step 2. Select the video and click Duplicate to copy it. The copied video will be automatically at the end of the first one.
Step 3. Click the first video, click Blur on the bottom toolbar, and drag the Blur slider to the right until 100 is displayed.
Step 4. Then, select the second video, choose Forward at the bottom, and drag it above the first one. Make sure both clips completely overlap and click Fill.
Step 5. Tap Filter, select the Polaroid, select the P2 effect, and decrease the Intensity to around 69. Switch to Adjust, set the exposure to -25, contrast to -100, brightness to +2, vintage to +25, temperature to +10, and save these changes.
Step 6. Go to Blending at the bottom and select the Hard Light option.
Step 7. Export your cinematic glow effect video or continue editing it.
Conclusion
This article details how to add a glow effect to your videos using 3 methods. Select the right tool based on your needs and start your creation immediately.


User Comments :