Converting image to video is the most convenient way to share oceans of photos during your holiday trip on social media or make a surprise on special days. This article will provide various methods with you to create video from photo. If you are looking for a free and easy-to-use slideshow maker, MiniTool MovieMaker is your ultimate solution.
Turning a series of images into one video montage can both distinguish yourself and protect the copyright of your valuable pictures on public social media. Besides, this slideshow from photos can also serve as a celebration that brings happy memory into people. The following content would take you through the different methods to create video from photos on multiple platforms.
Image to Video on Windows
For Windows users, there are many picture video makers for your options to convert image to video. Below are the most recommended video makers that can easily accomplish your need of turning image to video.
Solution 1 MiniTool MovieMaker
MiniTool MovieMaker is committed to providing brilliant video-editing functions for Windows users to create video from photos. Released by MiniTool, MiniTool Moviemaker is well received since it is beginner-friendly in the video editing field. Apart from the ability to make video from pictures, you can add music to your video, apply the transition to make it stitch smoothly, etc.
Besides, its intuitive interface and user-friendly characteristic make it easy to convert image to video. With MiniTool MovieMaker, you won’t be troubled at all by frequently pop-up ads, bundled software, and the notification of upgrading to paid pro.
How to make a video from images using MiniTool MovieMaker? Here’s a detailed guide to help you.
Step 1. Download MiniTool MovieMaker, and install it by following the guide of installation.
MiniTool MovieMakerClick to Download100%Clean & Safe
Step 2. Click the Import Media Files button to select the images you will use. Then drag them onto the timeline one by one in your desired order.
Step 3. Trim the image. Since the duration of every image was set as 5 seconds on default, you can trim the images to adjust their duration. Put your arrow at the double edge of the image, and drag and drop it backward or forward by holding your left mouse.
Step 4. Add transitions and apply effects. Click the Transition tab to choose the one you want to use to connect two images naturally. Then tap on the Effect tab to apply proper effects.
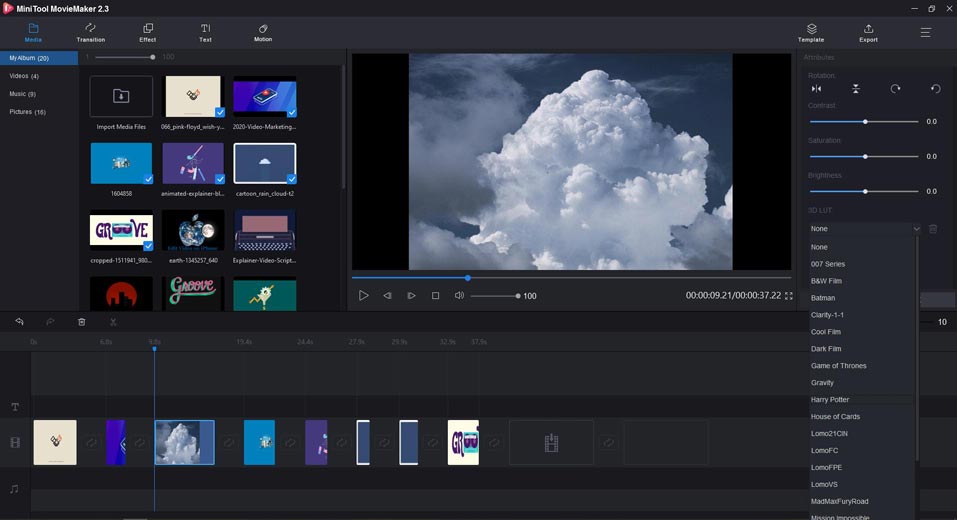
Step 5. Edit the image. Double-click the image you would edit to open up the editing window. There are many attributes for you to adjust color, rotate the image, and apply 3D LUT.
Step 6. Add music to the video.
- Choose the Music tab to click the Import Media Files button, and then upload your wanted music file or choose the ready music file.
- Trim the audio to match the video. Click the audio file in the timeline, and drag the edge of the audio to shorten or extend the length of audio.
Step 7. When you have finished an awesome video made from images, click the Export button, and select the relevant video format and saving address to save it on your computer.
Look at these amazing features of MiniTool MovieMaker:
- Free available and easy-to-use.
- Easily make a video from images without watermark.
- Support any image format to import, like JPG, PNG, GIF, etc.
- Allow you to add text, caption, subtitle to your picture video with a wide range of fonts.
- Support adding music to video.
- Allow you to rotate, reverse, split, trim video.
- Provides many kinds of transitions, effects, and motions with users to edit video professionally.
- Supports color correction to brighten the video and offers optional 3D LUT effects to create a sense of Hollywood style.
- Supports exporting in major video formats.
Solution 2 Microsoft Photos
If you don’t want to download other third-party software, the built-in Photos app on Windows 10 is an ideal choice. Compared with other specialized video editing software, Photos seems not professional enough, but it can meet your basic needs such as making a simple video from pictures.
Next, let’s see how to convert image to video with Photos on Windows 10.
Step 1. Find the Photos app from the Start menu, and launch it.
Step 2. On its main page, click the New Video button to select New video project to establish the picture video.
Step 3. Click the +Add button to upload the pictures into the Project library, and drag them onto the Storyboard.
Step 4. Edit every image. There is a toolbar at the top of the Storyboard. You can add text, set the duration, apply motion or 3D effects, and add filters to the video. Besides, if there is a problem with the image orientation, you can rotate it to get the right orientation. And you can customize your background music for the video.
Step 5. When finishing, click the Finish video to export to your computer.
Features
- Built-in app on Windows, and easily available.
- Manage all pictures on the computer and can work with OneDrive to stream your media files.
- Can help you create and edit a video, like trim, rotate the video freely.
- Provide the optional video resolution when exporting.
- Provide a wide range of filters and 3D effects.
Image to video on Mac
If you are on the Mac OS platform, Apple’s built-in software could be a good choice. Only designed for Apple users, QuickTime Player, and the free video editor – iMovie can both make a video from photos.
Solution 1 QuickTime Player
As a built-in player in Mac, QuickTime Player can both play multimedia files and do some simple video editing. It’s convenient for Apple users to make a video from images with QuickTime Player directly. Below are the detailed steps.
Step 1. Launch the QuickTime Player on Mac, and choose File > Open Image Sequence.
Step 2. Select the image sequence folder in the Finder to upload it into the timeline.
Note: You should include all images you want in a file. And rename them in order so that QuickTime Player can arrange them automatically.
Step 3. Choose any of the following options in the pop-up menu: Resolution, Frame Rate (the number of frames displayed per second), etc.
Step 4. Click OK to save in Mac.
Features
- Free available on Mac.
- Allow you to make common video edits, like trim, rearrange, split, and rotate.
- Supports screen recording on Mac.
- Allow you to create a simple video from photos.
- Can play multimedia files, including video and audio files.
Solution 2 iMovie
If you are Mac’s user and you want to create a nice slideshow to share with your friends, iMovie is suitable for you as it is a basic and free video editor, without downloading other apps. Moreover, when you finish the video slideshow, you can stream this awesome video to other Apple devices.
Thus iMovie is the best solution for Mac users since it is a specialized video editor that provides many professional features. Here’s a step-by-step tutorial on how to convert image to video for Mac.
Step 1. Open the iMovie and click the Project button to start a new movie.
Step 2. Import your images to the Library and play them in the viewer to see whether they are in your desired order.
Step 3. Edit photos and videos. In the video editing window, there are many options available for you, like effects, filters, transitions, audio settings, motions, etc. that can be used to enhance the video, and you can also adjust the duration of images.
Step 4. Export your slideshow video. Make sure the quality, name, the format of the video, and then save on Mac. If you have an iCloud account, put it in the Theater and it will be automatically synced.
Features
- The built-in app in the Apple devices, and free.
- Provide a user-friendly interface and many custom elements.
- Offer many excellent video editing features to help beginners edit video, such as many optional effects, filters, fonts, etc.
- Allow users to easily share with family and friends through AirDrop and iCloud.
Image to Video Online
Online slideshow makers make it easy to create video from pictures since it is available for all platforms including mobile phone and don’t require installation. What’s more, most online tools are free for users though it may require you to sign in. Below are 2 recommended solutions online.
Solution 1 Kawping
Kawping is a web-based video editor that requires no downloads and is 100% free to use. The most important feature is that Kawping is very friendly to beginners because it provides many preset elements for video editing. Let’s see how to convert image to video with Kawping.
Step 1. Upload the image sequence to the studio.
Step 2. Rearrange and edit the image layer.
- Adjust the aspect ratio of images according to different social media platforms you would share on.
- Add some effects and background music to make the video more attractive.
- Set the duration of images and preview the whole video.
Step 3. Click the Publish button to get your video.
Features
- Have an easy-to-use interface and access to any device with ease.
- Provide many useful tools to help make video edits.
- Support importing in various video and audio formats.
- No requiring sign-up.
Solution 2 Imagetovideo
With Imagetovideo, you can create a video with images and music effortlessly. Furthermore, you don’t need to log in to use it, and it can work in any device. But it should be noted that it set the limit to the number of images you upload – 30 images max.
The next part is about the tutorial and the introduction to its other notable features.
Step 1. Click the Upload Your Image button to select the image you would use.
Step 2. Reorder them by dragging their position.
Step 3. Add a logo to make your video attached to the stylish watermark.
Step 4. Upload the audio file to add background music.
Step 4. After finishing editing, click Create the Video Now to get your video.
Features
- Access it anytime and
- Provide other video editing features, like make a video collage, convert text to video, etc.
- Offers some special effects, such as water effect and 3D transition effect.
- Support adding your logo in the video.
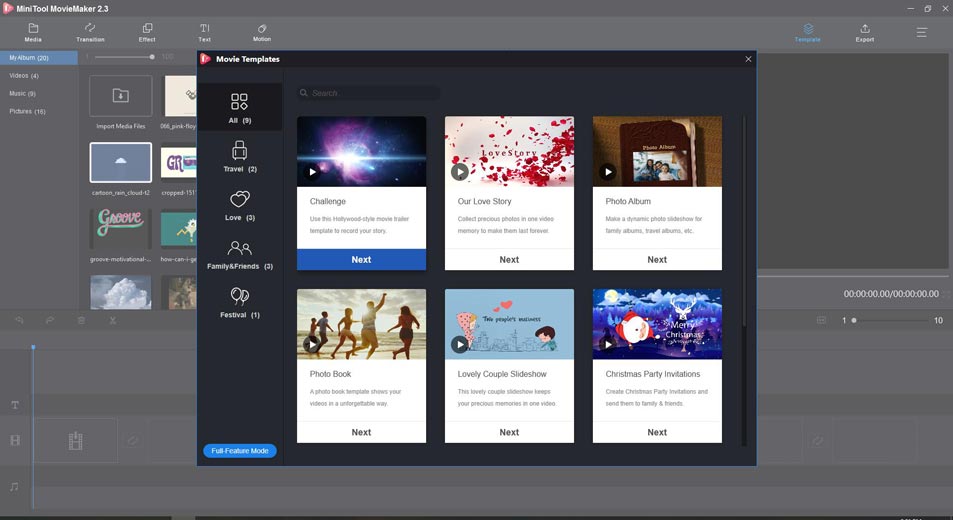
#Bonus Tip – Movie Templates in MiniTool MovieMaker
If you want to make a video easily, you are lucky to find the brilliant shortcut MiniTool MovieMaker provides – Movie Templates. Based on the different situations, the templates have been categorized clearly to serve your different purposes. There are four general categories for your option: Travel, Love, Family & Friends, and Festival.
Using movie templates of MiniTool MovieMaker is the easiest way to create video from pictures. You just need to upload your images and edit the essential text, and the rest thing has been ready for you already. Let’s see how to make use of it.
Step 1. Click the Template button in MiniTool MovieMaker to pop up the Movie Template window.
Step 2. Choose one template and click Next to upload all images you need.
Step 3. Drag them in your wanted order, and then edit the text or click Replace Music to change music.
Step 4. Finally, click the Export button to get a fascinating video with ease.
Conclusion
Have you gotten the easiest way to make video from pictures? The above recommendation would let you know that making an eye-catching video is no longer difficult. Hope you can make good use of these useful tools.
If you have any questions or suggestions when you use the above-recommended tools, please feel free to contact us via [email protected] or leave your comments in the below section.
Image to Video FAQ
- Launch the MiniTool MovieMaker.
- Click the Import Media File button to select the image you need.
- Arrange them in a certain order and edit the image.
- Click the Export button to get the video.
- Click the Template button in MiniTool MovieMaker to choose one theme, and then upload all pictures.
- Reorder pictures, edit text and click Replace Music to upload your wanted music.
- Click Export to complete it.
- Enter the website of Kawping.
- Upload the pictures in order, and add background music.
- Set the duration and size of the video.
- Click Publish and share it with friends.
- Launch iMovie to start a new project.
- Import images to the library, and edit them.
- Upload the audio file, and adjust its length.
- When finishing, save your new picture video.
User Comments :