What should we do when a photo looks too dark? Don’t worry. It’s pretty easy to solve such a problem, and all you need to do is to brighten the image with a professional image brightener.
How to Brighten an Image in Photos
Developed by Microsoft, Photos is a built-in tool for viewing, sorting, and editing images and videos included with Windows 10. It is the most recommended image brightener if you want to brighten an image without any installations.
Steps on how to brighten an image in Photos:
Step 1. Type in Photos in the Windows search box.
Step 2. Select and open the image that you want to brighten under the Collection tab.
Step 3. Choose the Edit & Create option from the top toolbar and then click Edit.
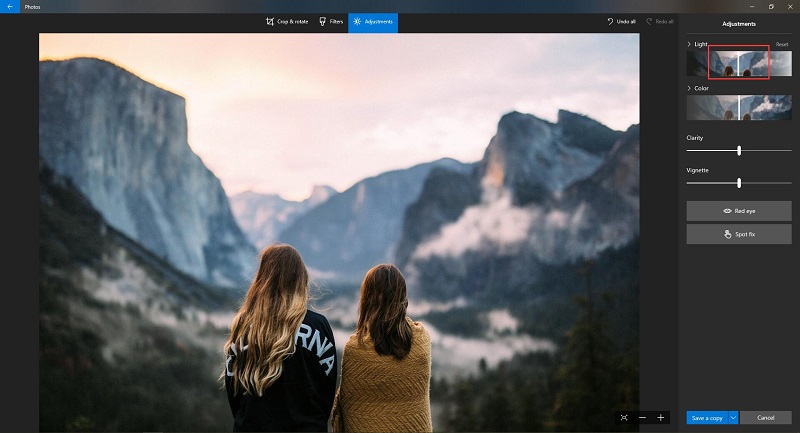
Step 4. Click the Adjustments button on the top.
Step 5. Drag the white playhead to the right side to brighten the image.
Step 6. When you’re satisfied with the result, click the blue Save a copy button. Or you can click the down arrow to select Save.
Related article: Top 10 Best Photo Viewers for Windows 10
How to Brighten an Image in Photoshop
Created in 1988, Adobe Photoshop is a professional photo editing and graphic design editor developed and published by Adobe Inc. for Windows and macOS. The task of brightening an image can be easily done with this image editor.
Steps on how to brighten an image in Photoshop:
Step 1. Run Photoshop on your computer and enter its main interface.
Step 2. Click File > Open to import the image that you plan to brighten.
Step 3. Press Control + J on your keyboard to duplicate the background layer.
Step 4. Go to Image > Adjustments > Brightness/Contrast, and then a new window will pop up.
Step 5. Now, you can adjust the brightness of the image by dragging the playhead to the right or entering the value directly in the box.
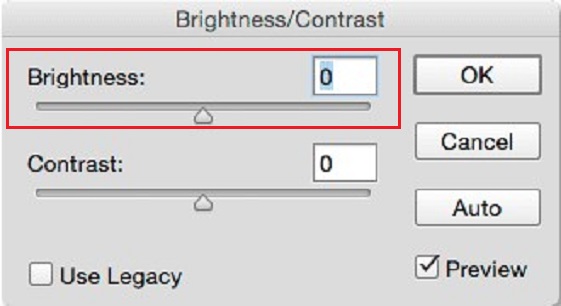
Step 6. Press the OK button to save the change.
Related article: Solved – Smart Object Is Not Directly Editable
Bonus – How to Brighten a Video
MiniTool MovieMaker is a 100% free video editor without watermarks, ads, viruses, and bundles. It has a simple and intuitive user interface and supports various video formats. Therefore, if you want to brighten a video, it should be your first choice.
MiniTool MovieMakerClick to Download100%Clean & Safe
Steps on how to brighten a video in MiniTool MovieMaker:
Step 1. Free download, install and launch MiniTool MovieMaker on your PC.
Step 2. Select Full-Feature Mode to enter its main interface.
Step 3. Tap on Import Media Files to import your video, and then click + to add it to the timeline.
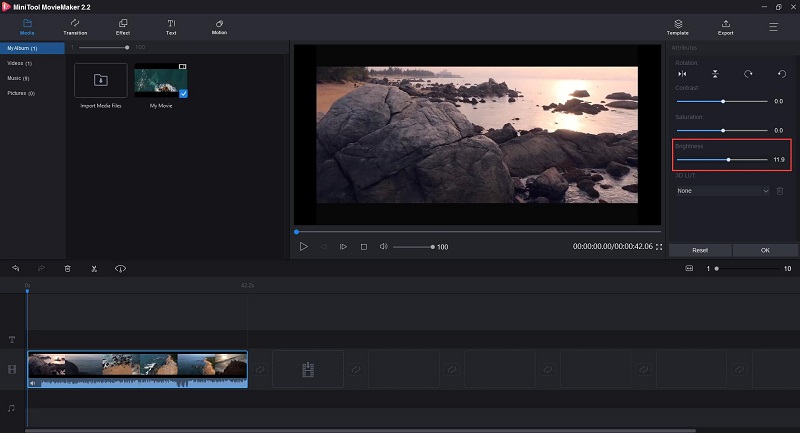
Step 4. Double click the target video on the timeline and the video editing window will pop up.
Step 5. To brighten the video, just left-click the indicator under Brightness and move it to the right.
Step 6. Hit the Export button to enter the export window, where you can give a name, choose the output format, specify the store destination, and select the resolution for the video. Then, click the Export button again.
Recommend post: How to Do Color Correction in Your Videos
Conclusion
Have you mastered how to brighten an image or a video after reading this post? If you have any questions or suggestions about it, please let us know via [email protected] or share them in the comments section below.
User Comments :