This post from MiniTool MovieMaker (a free Windows movie maker) will discuss the Bluesky video size limit and give effective ways to optimize your video for this platform.
In the ever-changing world of social media, Bluesky has emerged as a promising platform where users can share short posts containing text, images, and videos, and it has also been considered one of the best alternatives to Twitter (X).
More and more people flock to Bluesky to share their thoughts. One common question is about the Bluesky video file size limit. In this blog post, we’ll dive into everything you need to know about Bluesky’s video file size restrictions and offer simple methods to compress video for Bluesky.
What Is the Bluesky Video Size Limit
Bluesk allows you to upload one video per post. If the video is less than 60 seconds long, the video size should not exceed 50MB. Otherwise, you would be notified with an error message saying “The selected video is larger than 50MB”.
People also ask how long videos can be on Bluesky. Currently, this platform supports 3-minute videos. In other words, you can now upload a video up to 3 minutes per post.
How about the file size limit? Although the new file size cap is not listed, it should be larger than 50MB and less than 100MB, as I successfully uploaded several videos that are between 1-3 minutes in length and under 100MB.
What video format does Bluesky support? Currently, this platform supports MP4, M4V, MPG, MPEG, MOV, and WebM video files.
![How to Send a Large Video Through Email [Ultimate Guide in 2026]](https://images.minitool.com/moviemaker.minitool.com/images/uploads/2023/03/how-to-send-a-large-video-through-email-thumbnail.jpg)
Effective Tips to Bypass Bluesky Video File Size Limit
If you want to share videos on Bluesky without running into file size issues, here are some tips to help you bypass the Bluesky video size limit.
1. Trim unnecessary footage: Keep your video short. Remove unnecessary parts or long intros/outros to reduce the video file size.
2. Downscale the resolution: High-resolution videos (like 4K) usually produce large file sizes. Consider lowering the resolution to 1080p or 720p, which is still high-quality but much smaller in size.
3. Compress your video: Use a video compressor to reduce the file size without significantly compromising quality, such as MiniTool Video Converter.
4. Choose the right video format: Generally speaking, MP4 files with H.264 encoding tend to offer a good balance between quality and file size.
5. Reduce the video bitrate: Lowering the bitrate can significantly reduce file size. However, be careful not to lower the bitrate too much, as this can cause a noticeable drop in video quality.

How to Compress Video for Bluesky
After learning these useful tips and tricks, let’s see how to compress video for Bluesky.
Method 1: MiniTool MovieMaker
MiniTool MovieMaker is an easy-to-use video editor without watermark that provides various editing tools and effects. It enables you to crop, rotate, split, and trim video files, adjust the video speed, add text, apply filters, decorate your footage with stickers and frames, change the video aspect ratio, and more.
Therefore, you can use this application to optimize videos and create high-quality content for Bluesky. Here’s how to compress video for Bluesky with MiniTool MovieMaker.
Step 1. Get the Video Editor on Your PC
Click the button below to download the free video editor and install it on your computer.
MiniTool MovieMakerClick to Download100%Clean & Safe
Step 2. Upload your video
After getting into the main interface, click the Import Media Files button to upload your video and add it to the timeline.
Step 3. Trim the video
To trim a video, hover your mouse over the beginning or end of the video until the Trim icon appears, then drag the icon inwards.
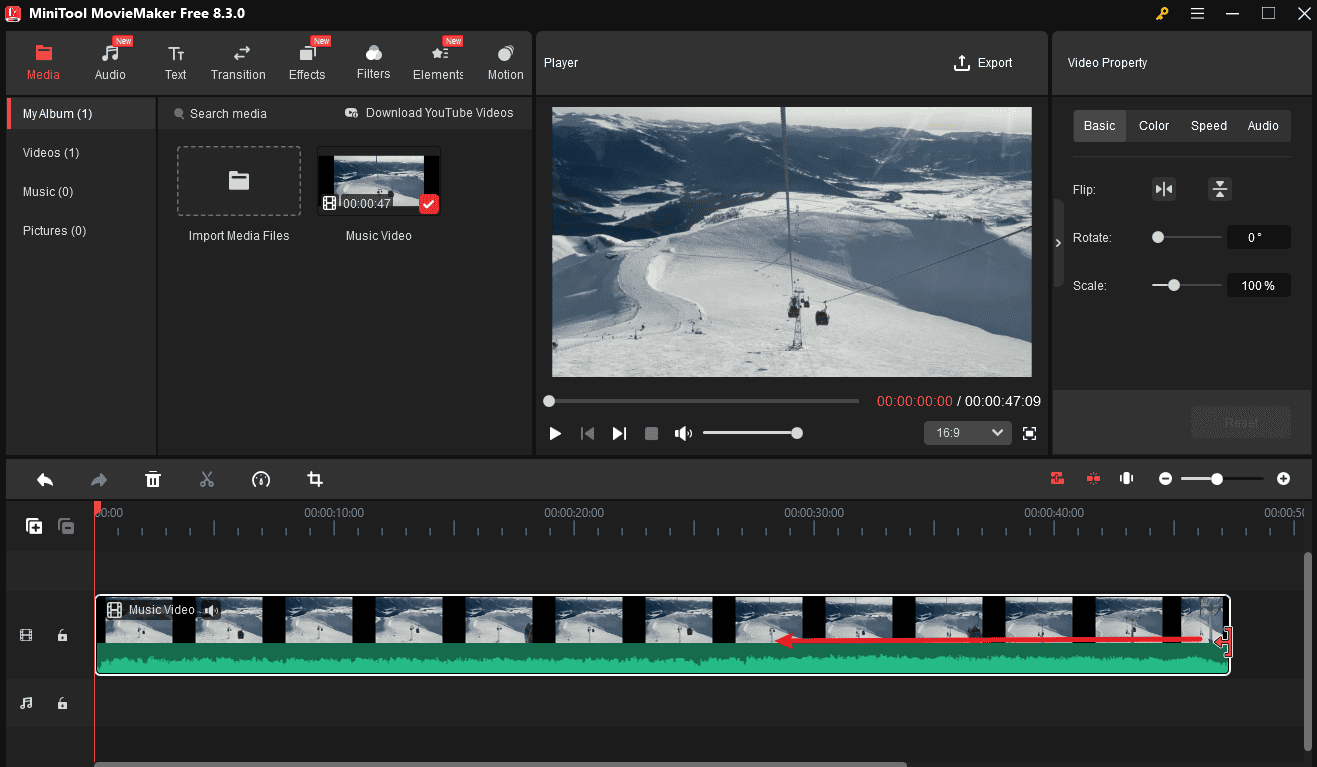
Additionally, you can shorten the video by speeding it up. Select the clip on the timeline and click the Speed icon. Then, choose Fast and choose a suitable speed.
Step 4. Open the Export window
Click the Export button in the upper right corner to open the Export window.
Step 5. Adjust output settings
On the Export window, adjust the video parameters as needed. Set the Format to MP4 and select a resolution (1920×1080 or 1280×720). Click Settings, set Quality to Better or Good, adjust the Bit Rate, and click OK to save changes.
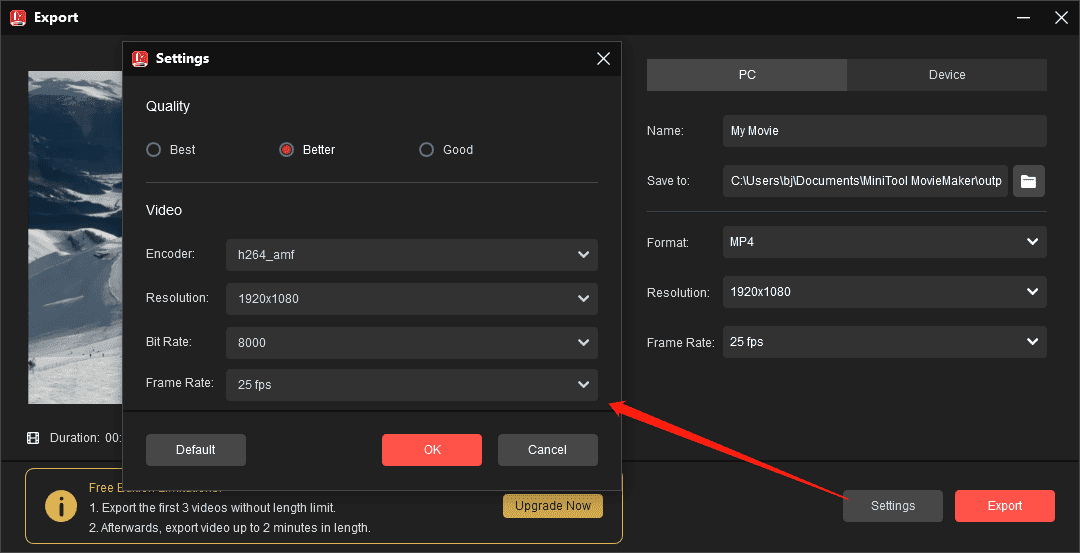
Then, check the estimated file size. If you’re happy with the result, click the Export button to export the video.
Method 2: MiniTool Video Converter
MiniTool Video Converter is a free video converter and compressor with no watermark. It supports a wide range of video formats. Generally speaking, this application offers two options to help you avoid the Bluesky video file size limit.
Option 1: Compress Video for Bluesky with the Built-in Compression Tool
MiniTool Video Converter can serve as a free video compressor with no watermark to reduce your video file size effortlessly. It can process up to 5 files simultaneously and shrink videos of any length or size without limitations.
What’s more, MiniTool Video Converter allows you to preview a 10-second sample of the compressed video to check the video quality before finalizing.
Step 1. Download the video compressor
Click the button below to download MiniTool Video Converter to your computer. Follow the installation steps to complete the setup.
MiniTool Video ConverterClick to Download100%Clean & Safe
Step 2. Access the video compression tool
After launching the software, go to the Compress Video tab on the left sidebar to open the built-in video compressor.

Step 3. Upload your video
Click the Add Files button at the top to import the video you want to compress for Bluesky.
Step 4. Adjust compression settings
Click the Settings icon to enable the Compression Settings window. Then, you can:
- Modify the compression level: By default, the video will be compressed to 70% of its original size. You can move the slider to the left for further size reduction.
- Select the output format: Open the Format dropdown list and choose MP4.
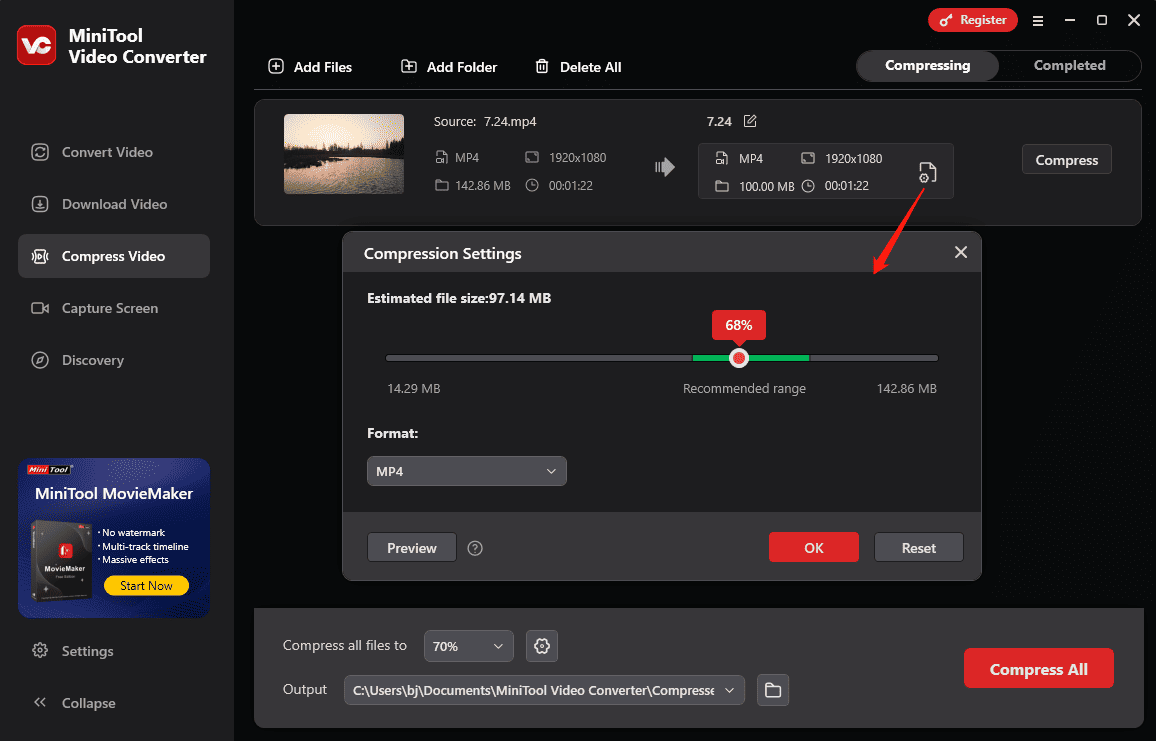
Step 5. Preview the compressed video
Click the Preview button to load a 10-second sample of the final result. Play the video to check the quality. If you’re satisfied, click OK to continue.
Step 6. Start compression
Click the Compress button to start the compression task. Once finished, the video will appear under the Completed tab, where you can play or locate it on your computer.
Option 2: Reduce the Video File Size by Adjusting Encoding Settings
As a free video converter, MiniTool Video Converter also lets you change the video encoder, frame rate, bitrate, and resolution. These settings together determine the size of the video file.
Therefore, you can adjust these parameters to reduce the video file size for Bluesky.
Step 1. Install the video compressor for Bluesky
Download the video compressor for Bluesky on your PC by clicking the button below.
MiniTool Video ConverterClick to Download100%Clean & Safe
Step 2. Add your video
Launch the software after installation, and click the Add or Drag files here to start conversion area to open your video.
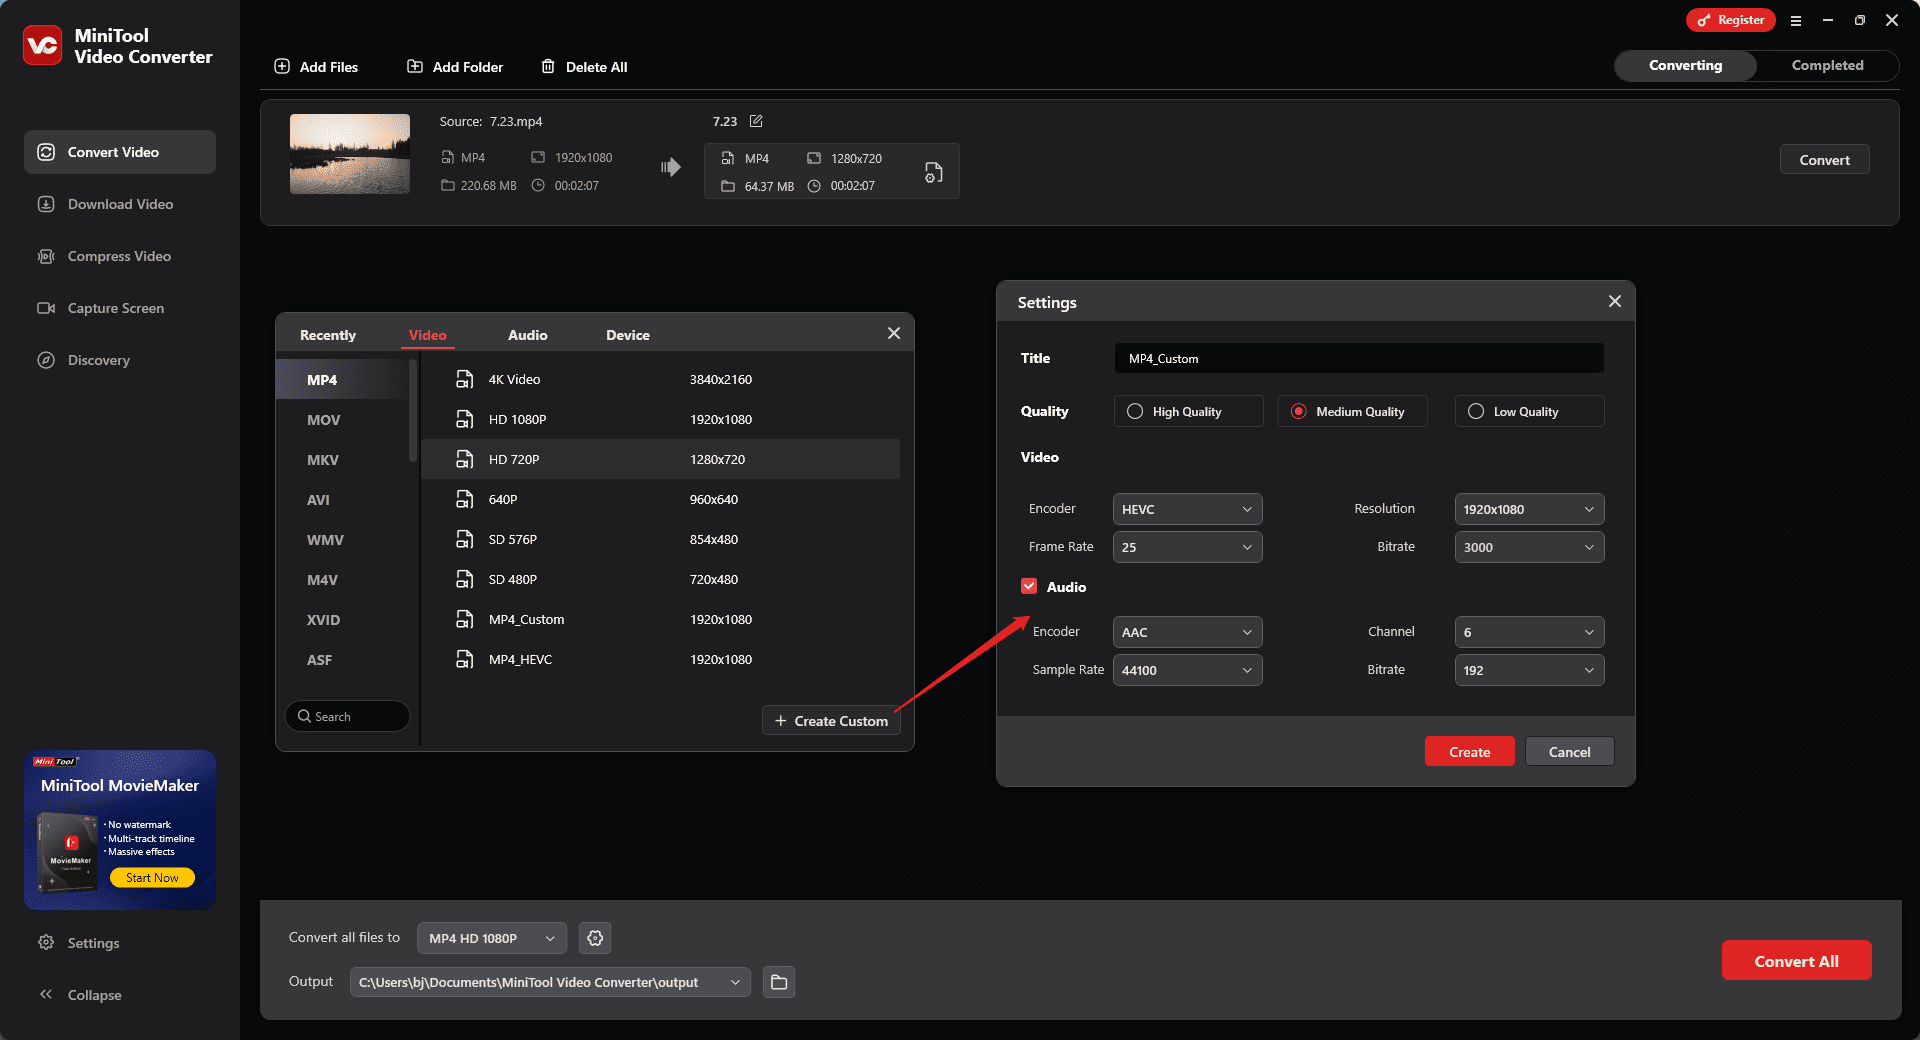
Step 3. Choose an output format
Click the Settings icon on the right, go to the Video tab, and click MP4 on the left sidebar. Select a low-resolution profile and check the estimated file size in the Target box.
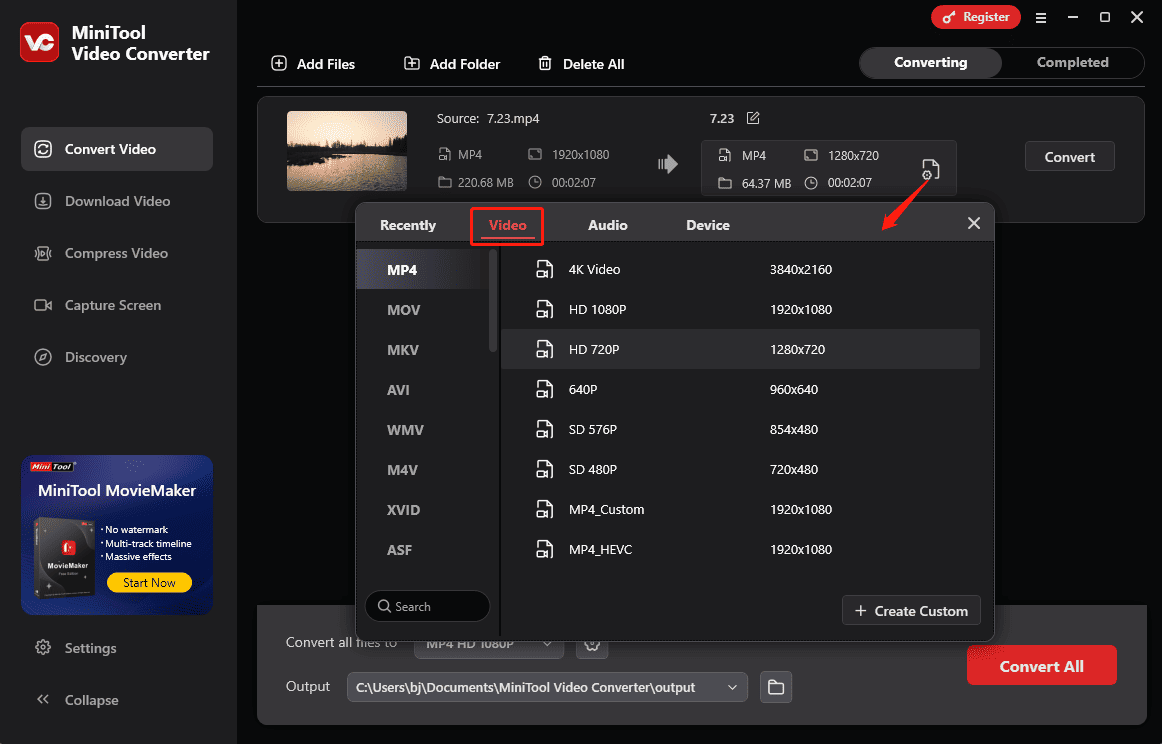
If you want to create a custom MP4 format, click + Create Custom. On the Settings window, set Encoder to H264, select the desired video resolution, frame rate, and bitrate, and click Create.
Step 4. Start the conversion
Select the custom MP4 format and set it as the output format. Then, click the Convert button to start the compression task.
![How to Make a Video Look Like VHS [A Beginner’s Guide]](https://images.minitool.com/moviemaker.minitool.com/images/uploads/2025/02/how-to-make-a-video-look-like-vhs-thumbnail.jpg)
Conclusion
Bluesky video size limit depends on the video length. If the video is less than 1 minute long, it should not exceed 50MB; if the video is longer than 1 minute and less than 3 minutes, it should not be larger than 100MB.
If your video does not meet the Bluesky upload requirements, follow the steps above to compress and optimize your footage. Whether you are a regular user or a content creator, these tips will help you effectively manage your uploads to enhance your sharing experience.
Finally, if you have problems using MiniTool MovieMaker or Video Converter, please contact us via [email protected] for help.
About The Author

Position: Columnist
Cora is a tech writer specializing in digital media workflows, with over six years of hands-on experience in video post-production, media transcoding, and screen capture. Her writing is always clear and practical. Cora also produces in-depth software reviews for users across skill levels to help them find the right tool and enjoy video editing.
User Comments :