This post starts with a brief introduction to VP9 videos and then introduces you to an easy and free VP9 video editor – MiniTool MovieMaker. Most importantly, it offers detailed instructions on how to use this free video editor to edit VP9 videos.
What Is a VP9 Video
VP9, developed by Google, is an open-source and royalty-free video encoder. A VP9 video is a video coded by the VP9 encoder. VP9 encoder offers high compression rates, allowing for smaller file sizes without compromising much quality. Thus, VP9 videos typically are small yet offer high visual quality. They are widely used across various video applications, including online playback, video conferencing, and more.
Reliable VP9 Video Editor
Many editors can edit AV1-coded videos. When it comes to VP9-coded videos, the number of available editors is relatively limited. At least, I haven’t found a lot. However, we don’t really need a large number. Just one useful tool will do. Luckily, I know one. That is MiniTool MovieMaker.
![How to Make a Study with Me Video [A Comprehensive Guide]](https://images.minitool.com/moviemaker.minitool.com/images/uploads/2025/05/how-to-make-a-study-with-me-video-thumbnail.jpg)
Brief Introduction to MiniTool MovieMaker
MiniTool MovieMaker is a free video editor. Its interface is clean and intuitive. Even though you are a beginner, you can easily navigate it and make a decent video with a few simple clicks. Meanwhile, it offers a wide range of editing tools. You can trim and cut video clips to remove unwanted parts. It also allows you to merge multiple clips seamlessly. To make your video flows smoothly, you can add some transitions. Adjusting the speed of a clip is also possible. This tool also enables you to add filters and texts to make your video more engaging and attractive.
Audio editing is not overlooked either. You can add background music to your video, adjust the volume levels of different audio tracks, and apply fade-in and fade-out effects. What’s more, MiniTool MovieMaker supports various popular video formats, so you can export your finished video in a format that suits your needs.
How to Edit VP9 Videos Using MiniTool MovieMaker
Now hit the button below to download and install MiniTool MovieMaker and start editing VP9 videos with me.
MiniTool MovieMakerClick to Download100%Clean & Safe
Step 1. Open MiniTool MovieMaker
Once installed, launch MiniTool MovieMaker and then close the promotion window.
Step 2. Import Your VP9 Video
Click the Import Media Files button, select the VP9 video you want to edit, and click Open to add it to MiniTool MovieMaker. Alternatively, you can drag and drop it to the software.
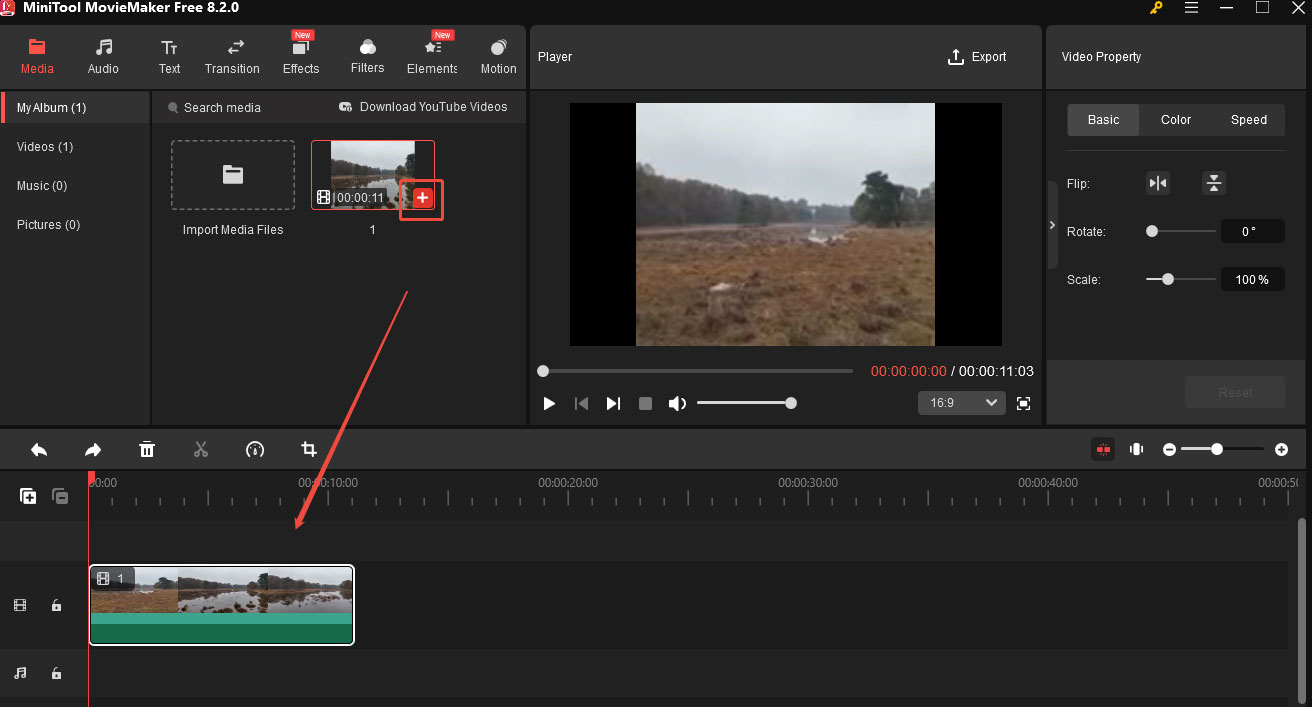
Step 3. Add the Video to the Timeline
You can directly drag the video to the Timeline. You can also click the + icon on the video thumbnail to add it to the timeline.
Step 4. Edit the Video
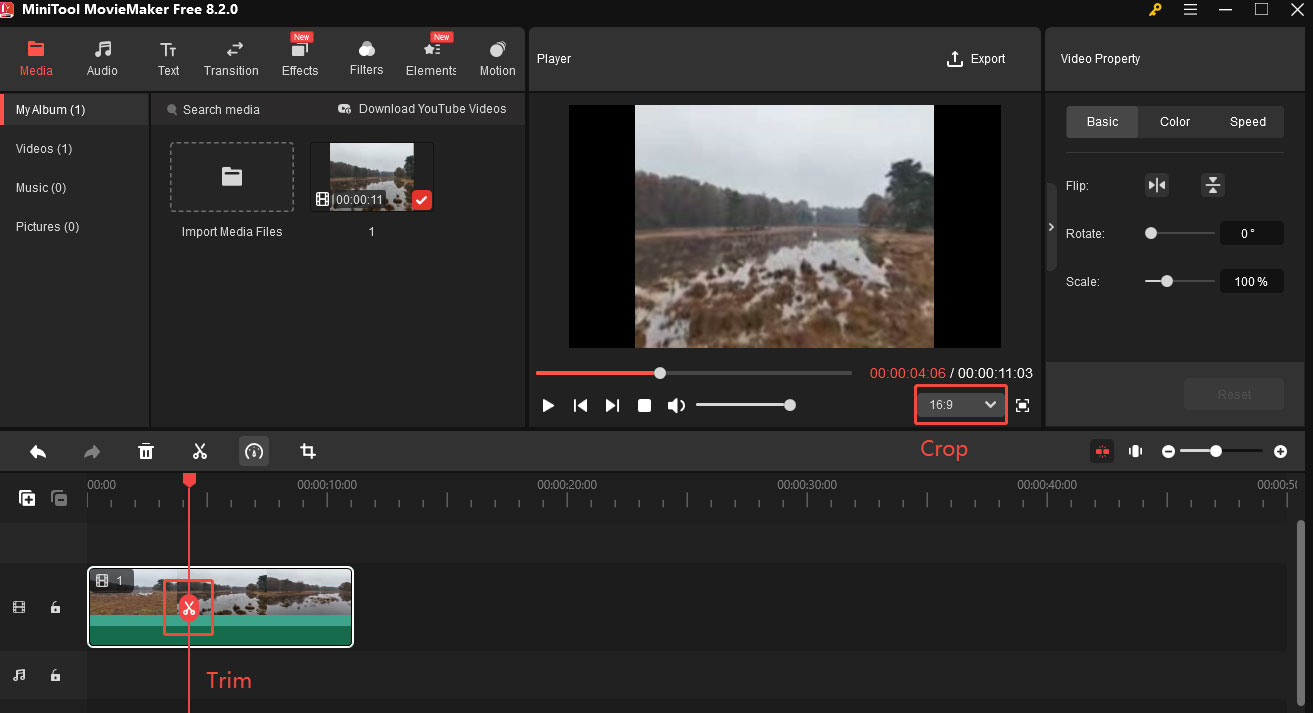
1. Trim the video: If you want to cut the unnecessary part, just place the playhead at the starting point of the unwanted part and click the scissors icon on the playhead. Then move the playhead to the end point of the unwanted part and click the scissors icon on the playhead. Then, right-click the unwanted part. From the list, choose Delete to cut it.
2. Crop the video: If you want to change the aspect ratio of the video, you can crop it. Expand the Ratio drop-down menu at the bottom-right corner of the Player section and choose a proper aspect ratio. You can also click the crop icon on the timeline toolbar and adjust the size in the player section manually.
3. Add subtitles: Adding subtitles can make your video more engaging and explainable. Select the clip on the timeline and drag the playhead to where you want to add the subtitles.
Click Text tab and choose Caption from the left submenu. Select a style you want and click the + icon to add it to the timeline. Go to the Text Editor to enter your captions and edit the text font, size, color, etc.
4. Add background music: Click the audio on the top menu, choose your desired music, and add it to the timeline. You can also add your own music. Apply the fade in/out effect and adjust the volume at the Music Property window.
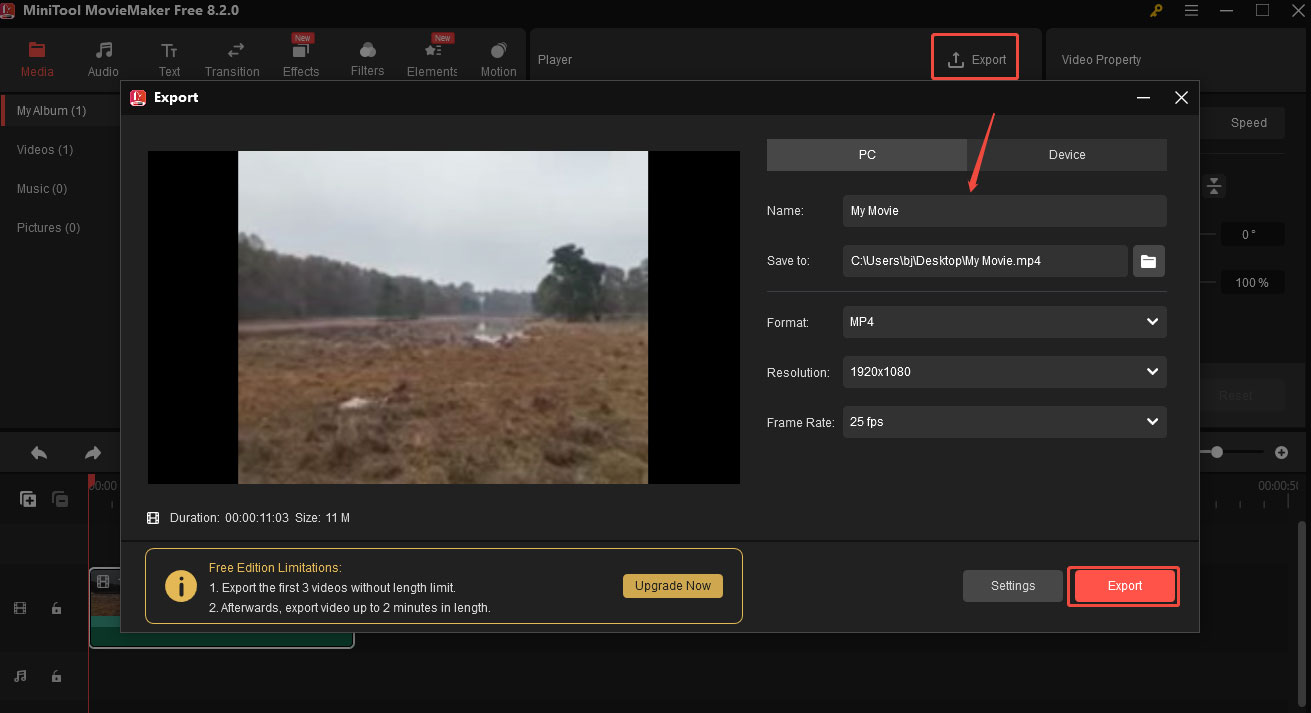
Step 5: Export the Video
Click the Export to open the Export window. Here, you can name the video, change its format, etc. Finally, click the red Export button.
Conclusion
This post walks you through a step-by-step guide to using MiniTool MovieMaker to edit VP9 videos. I hope you find it useful.
User Comments :