How to Create a Vignette in Premiere Pro?
Method 1: Use the Vignette Option in the Lumetri Color Panel
The fastest method to create a vignette Premiere Pro effect is to use the appropriate feature in the Lumetri Color panel. But if you go this path, you must live with a lack of flexibility. For instance, you cannot reposition a vignette if the subject is off-kilter. For the majority of shooting scenarios, though, this way works just fine. Follow these steps:
Step 1: Sign into Adobe Premiere Pro. Create a new project or open a previous one.
Step 2: Navigate to the Effects tab and select Lumetri Color.
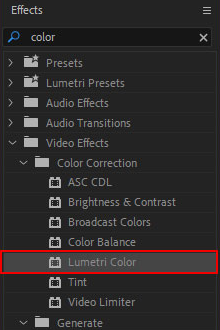
Step 3: Once the Premiere Pro vignette effect is added, open the Effects Controls Panel.
Step 4: Make the necessary settings, including Amount, Midpoint, Roundness, and Feather, to get the best possible results for your footage.
Method 2: Use Brightness & Contrast and a Mask
Another method to darken parts of an image is to create a mask around your subject. When you apply the Brightness & Contrast effect, everything within the selected area will remain intact. This way is also quite simple but it will seem restricting to those who wish to experiment with colors. Do the following:
Step 1: Launch Premiere Pro and create a new project.
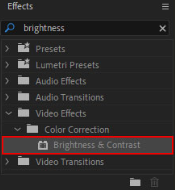
Step 2: Click on Effects in the toolbar to enter the Effects Workspace. Locate Brightness & Contrast, then drag and drop it onto your clip.
Step 3: In the Effect Controls panel, decrease the Brightness and create an Ellipse Mask below the Brightness & Contrast parameters.
Step 4: Change the mask Feather, Opacity, and Expansion to get the look you desire. To relocate or adjust the shape of the mask, move the handles in the Program Monitor.
MiniTool MovieMakerClick to Download100%Clean & Safe
Method 3: Use the Circle Effect
Using the Circle tool, you can add a vignette Premiere Pro effect as well. In this situation, however, you’ll receive a circle-shaped result. Proceed as follows:
Step 1: Open a project that you would like to work on further or start a new one.
Step 2: Access the Effects Workspace by clicking on Effects in the toolbar. In the Effects panel, find Circle and drag and drop it to your clip. Choose the Circle parameters.

Step 3: Modify the Blending Mode to Darken, alter the Color to black, and click the Invert Circle checkbox.
Step 4: Make sure the circle frames your subject by adjusting the Radius and Center parameters. Increase Feather Outer Edge.
To take this method further, try selecting different colors and different blend modes.
Method 4: Use Curves and a Mask
The most flexible method of how to create a vignette in Premiere Pro is to combine a mask using Lumetri Color Curves. In this case, you’ll be able to position a vignette anywhere you need and play around with a color palette. Follow the steps below:
Step 1: Start a new project or open your previous one.
Step 2: Click Color in the toolbar to open the Color Workspace. In the Lumetri Color panel, use RGB Curves to darken the photo.
Step 3: In the Effect Controls panel, create an Ellipse Mask below the Lumetri Color parameters and alter the mask Feather, Opacity, and Expansion to achieve the look you desire.
Step 4: To relocate or modify the shape of your mask, move the handles in the Program Monitor.
Step 5: Go back to the Lumetri Color Panel to further improve your image. Play with the brightness and hue values in your clip by experimenting with the different Curves charts.
Method 5: Download a Premiere Pro Vignette Template
If you wish to simplify the process of applying a vignette Premiere Pro effect, you can make use of superior templates, which are ready-made files that require minimum customizations to achieve a polished look. Browse the collection and select an appropriate template for your video project. Do as follows:
Step 1: Go to the Assembly tab, open and choose templates.
Step 2: Upload a template and add your clip. Edit a clip’s position.
Step 3: Go back to the Assembly tab and assess the effect.
Conclusion
You are now familiar with all of the methods that you can use to create a vignette in Premiere Pro. Just select the best choice for your specific video project, based on the look and customizations you may want to create.
User Comments :