Syncing audio and video is a common challenge in video editing. In this guide, I will explore both automatic and manual ways to sync audio and video in DaVinci Resolve. Additionally, I will show you an easier alternative using MiniTool MovieMaker.
How to Sync Audio and Video in DaVinci Resolve
DaVinci Resolve provides two ways to sync audio and video, so let’s see the detailed steps.
Method 1: Sync Audio and Video Automatically
DaVinci Resolve offers a simple way to automatically sync audio and video using the software’s built-in features. Here’s how to do it:
Step 1: Open the program, and click New Project to create a project. Then, go to the Media Pool tab, import your video and audio files, and drop them into the timeline.
Step 2: Click on both the audio and video clips to select them. Right-click on the selected clips and choose Auto Sync Audio in the dropdown menu. You will see two options: Based on Waveform, Based on Timecode and Append Tracks, Based on Waveform, and Based on Waveform and Append Tracks. You can choose one option according to your needs.
Step 3: Go to the Clip Attributes window to set your primary and safety audio tracks.
Step 4: Drag the synced clips onto the timeline and observe if they align properly.
Step 5: Go to File and select Quick Export to save your work.
Method 2: Sync Audio and Video Manually
If automatic syncing doesn’t work or if you need more control over the process, DaVinci Resolve also offers a way to manually sync video and audio. Here’s how to manually sync audio and video in Davinci Resolve:
Step 1: Import your video and audio files, then drag the media files to the timeline.
Step 2: Play your video frame by frame and move the audio clip to match it with the audio in the timeline.
Step 3: To fine-tune the sync, you can use the Comma or Full Stop keys on your keyboard to nudge the audio clip slightly.
Step 4: Once the audio and video are perfectly synced, right-click on the clips and choose Link Clips to link them together.
Step 5: After finishing editing, export your work.
Bonus: Align Audio and Video in MiniTool MovieMaker
If you’re looking for an alternative to DaVinci Resolve or a simpler method, MiniTool MovieMaker offers a straightforward way to align audio and video clips using its adsorption auxiliary line. Here’s how to do it:
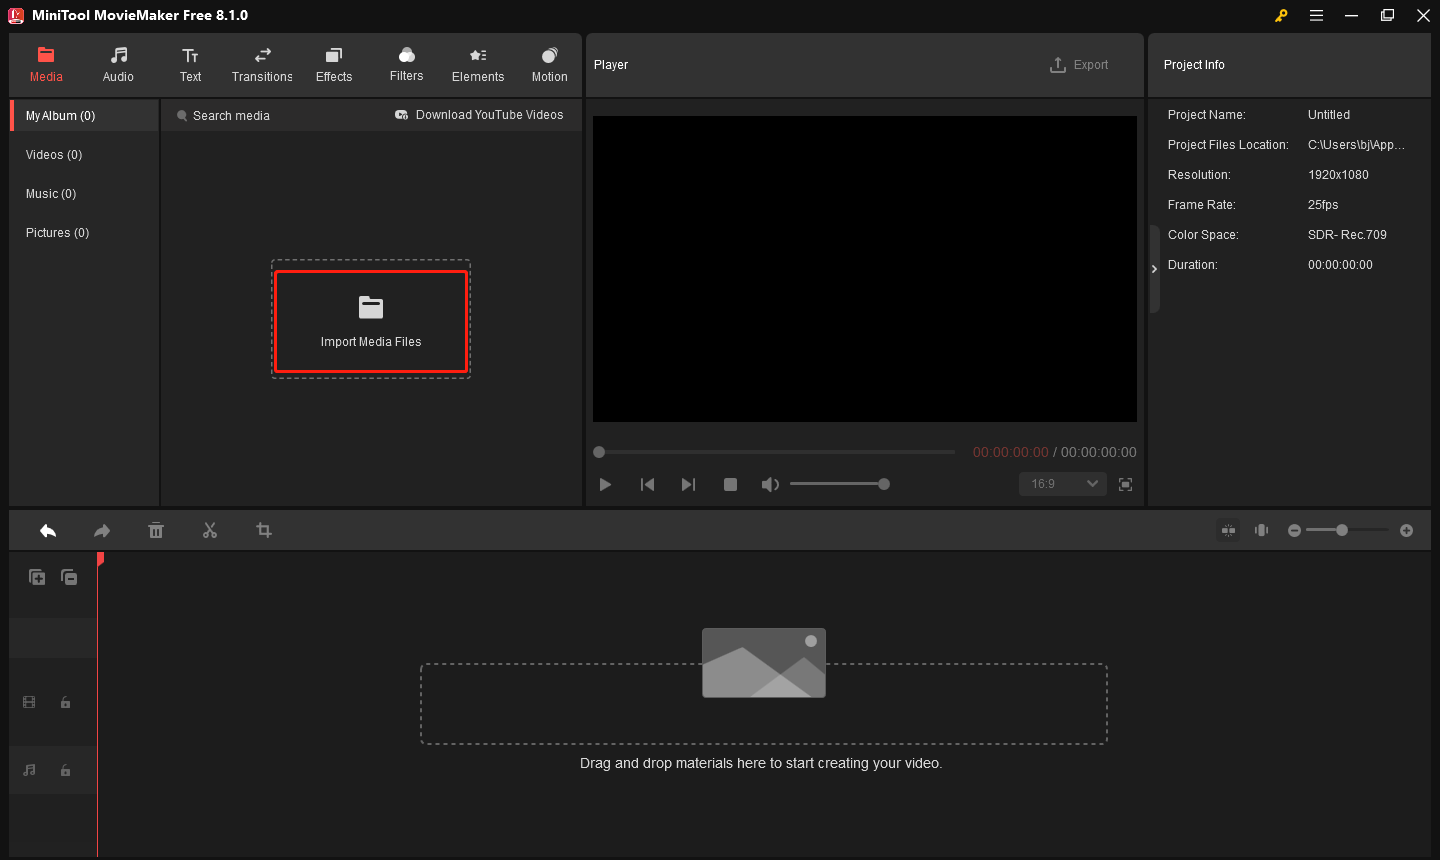
Step 1: Click the button below to download and install MiniTool MovieMaker on your computer. Once installed, open the software and close the promotion window.
MiniTool MovieMakerClick to Download100%Clean & Safe
Step 2: Click on Import Media Files to bring your audio and video files into the software. You can also drag and drop the files directly into the media library.
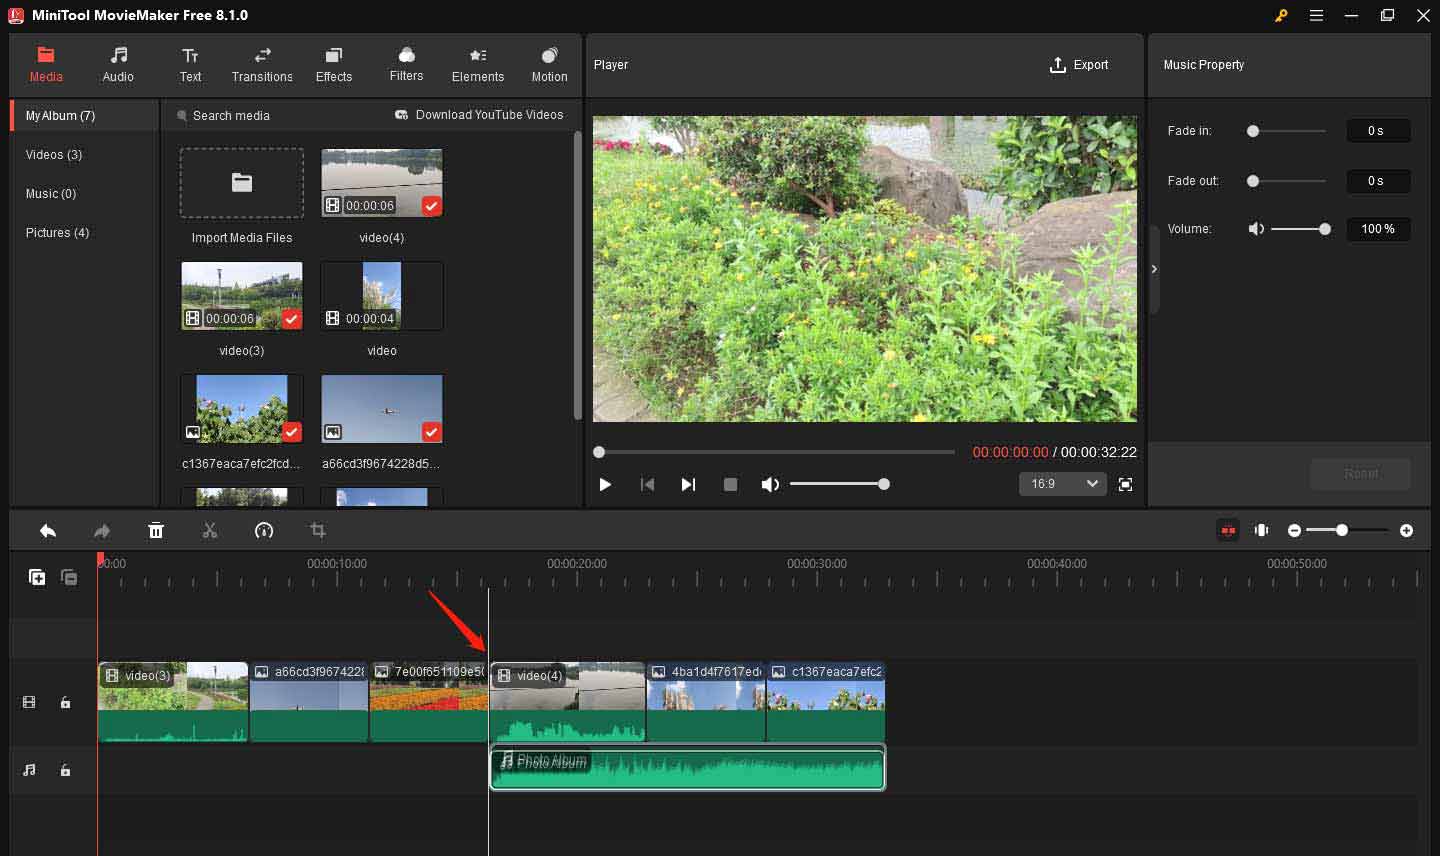
Step 3: Click the plus icon on the target file or directly drag the audio and video clips to the timeline.
Step 4: As you drag the audio clip, the software will automatically enable a white adsorption auxiliary line to help you align the audio with the video.
Step 5: Once you’re satisfied with the alignment, preview the video and audio by clicking the Play (Space) icon. If everything looks good, click the Export button in the top-right corner.
Bottom Line
This is all about how to sync audio and video in DaVinci Resolve. Syncing audio and video is an essential step in the video editing process. DaVinci Resolve provides powerful features for syncing audio and video automatically and manually. Automatic syncing based on waveforms is fast and efficient, while manual syncing gives you more control when the automatic method is insufficient. Additionally, for a simpler approach, MiniTool MovieMaker’s adsorption auxiliary line provides an easy way to align your audio and video.
About The Author

Position: Columnist
Yulia has a great passion for life. She enjoys photography and travel, and is always eager to record cherished moment through her lens. This also led to her strong interest in video editing, and she kept learning multimedia-related knowledge, hoping to bring readers better advice on images, audio, video, and related topics.
User Comments :