QuickTime is a multimedia player developed by Apple that supports a wide range of video and audio formats. If you have a long video to watch on QuickTime, you may want to speed it up to save time. How can you do that? Let’s have a look at how to speed up video on QuickTime player using different methods.
Method 1: Use the A/V Controls in QuickTime 7
If you are using QuickTime 7 on your Mac, you can easily adjust the playback speed of a video by using the A/V controls. Here are the steps:
Step 1. Open the QuickTime player on your device and import the video you want to speed up.
Step 2. Click on the Window menu and select Show A/V Controls. Alternatively, you can press Command + K on your keyboard to open the A/V controls window.
Step 3. In the A/V controls window, you will see a playback speed slider at the bottom.
Step 4. Drag the slider to the right to increase the speed of the video. You can speed up the video from 1x to 3x. You can also drag the slider to the left to slow down the video.
Method 2: Use the Hotkeys in QuickTime 10
If you are using QuickTime 10 on your Mac, you may have noticed that there is no playback speed setting to control the video speed. However, there’s an easy workaround you can use to quickly speed up or slow down your videos using hotkeys. Here’s how:
Step 1. Launch QuickTime on your Mac and select the video you want to adjust the playback speed for.
Step 2. Press and hold the Option key on your keyboard and click on Fast Forward in the popping-up window.
Step 3. Each click on the Fast Forward button will increase the playback speed by 0.1x, up to 2x. Similarly, you can use the Rewind button to decrease the speed by 0.1x for each click, down to 0.5x.
Bonus Tip: How to Speed Up Videos on Windows
How to speed up videos on Windows? If you want to have more control over the video speed and save the edited video for later use, you can use a video editing program such as MiniTool MovieMaker. This software allows you to change the video speed from 0.01x to 50x and also edit other aspects of the video such as resolution, frame rate, bitrate, etc.
Here’s a step-by-step guide on how to speed up videos on Windows with MiniTool MovieMaker:
Step 1. Download and install MiniTool MovieMaker by clicking the download button below, and then launch it.
MiniTool MovieMakerClick to Download100%Clean & Safe
Step 2. To import videos to this tool, click on Import Media Files, and then drag and drop it to the timeline.
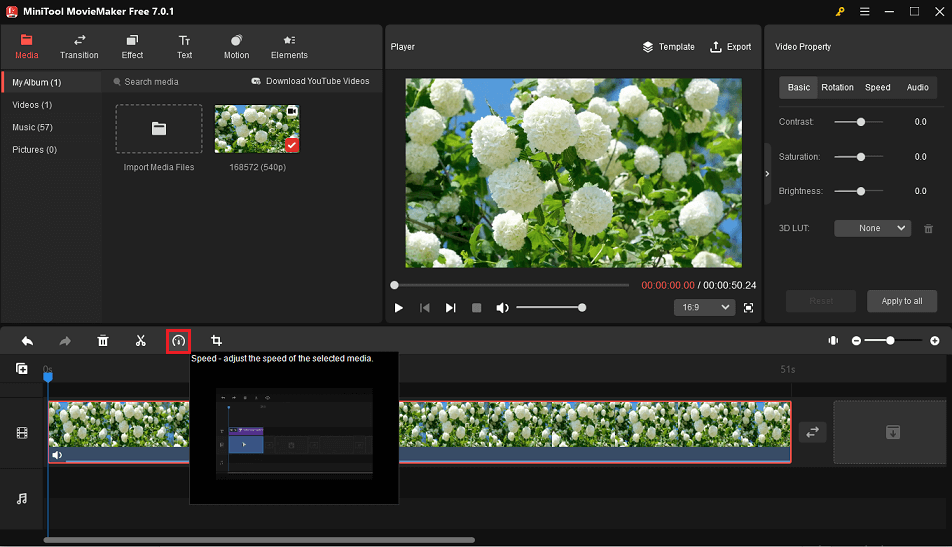
Step 3. Select the video clip on the timeline and click the Speed icon on the timeline toolbar.

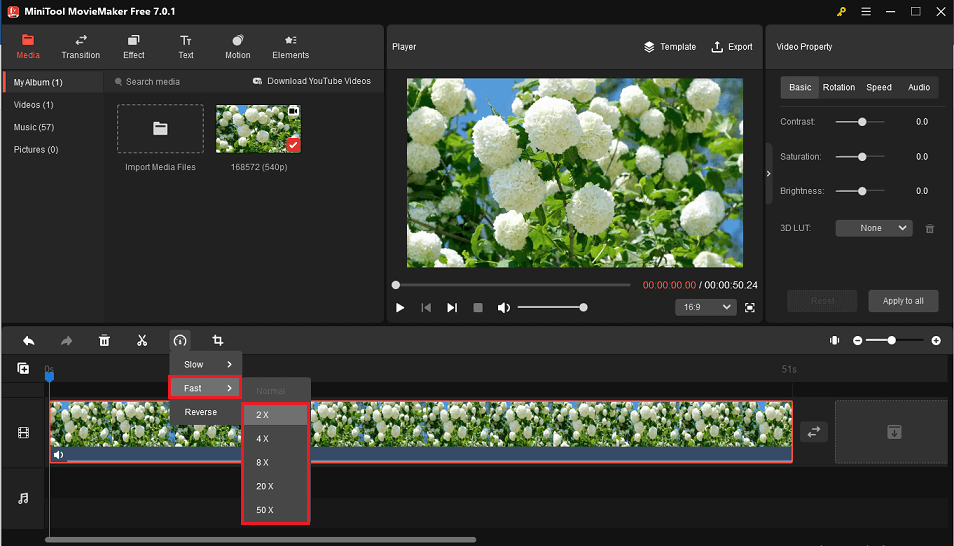
Step 4. Select Fast and choose a speed option from the given options: 2x, 4x, 8x, 20x, and 50x.

Step 5. Click on Export to save the sped-up video.
Conclusion
In conclusion, we’ve offered a guide on how to speed up a video in QuickTime using different methods. You can use the built-in A/V controls or hotkeys if you just want to watch a video faster on your Mac. You can also use a video editor if you want to speed up your videos on Windows.


User Comments :