Sometimes you may see a black border around the video. Its presence often affects the viewing experience. Therefore, this article from MiniTool MovieMaker (a Windows movie maker) will introduce how to remove black bars in Premiere Pro to improve your video content.
How to Remove Black Bars in Premiere Pro
During video editing, black bars often appear on the sides, top and bottom, or both, affecting the visual effect. When editing with Premiere Pro, many people may be confused if they encounter black bars. However, Premiere Pro also provides tools to remove these black bars to make the video image more refined. Next, I will introduce how to easily remove black bars in Premiere Pro and optimize your editing results.
Here’s how to remove black border in Premiere Pro.
Step 1: Launch Premiere Pro on your computer. Go to File > New > Project, give the project a name, and choose other settings. Then, click the OK button.
Step 2: Click File in the top toolbar and select Import to upload the video you want to edit from your computer.
Step 3: Drag and drop the video to the timeline from the project panel.
Step 4: Here are two methods to remove the black borders from a video in Premiere Pro. If the first method doesn’t work, you can try the second one.
- Method 1: Right-click on the video in the timeline panel. Then select Set to Frame Size or Scale to Frame Size.
- Method 2: Select the video in the timeline panel. Go to the Effect Controls tab, Under Fx Motion, uncheck the Uniform Scale option, then manually adjust the video scale using your mouse to fit the frame.
Step 5: Once you’ve made adjustments, click the play icon in the preview window to see the video effect. Make sure the black bars are completely removed.
Step 6: After getting the desired effect, go to File > Export > Media to save your video without black bars.
How to Remove Black Bars in Premiere Pro Alternative
If you find Premiere Pro complicated to operate or doesn’t suit your needs, MiniTool MovieMaker is an easy-to-use and powerful alternative. It provides easy solutions to help you quickly remove black edges. In addition, it also allows you to easily trim video, adjust video ratio, add effects, etc. to improve video quality. Next, I will show you how to remove black bars from videos with MiniTool MovieMaker.
Step 1: Click the button below to download and install MiniTool MovieMaker on your PC.
MiniTool MovieMakerClick to Download100%Clean & Safe
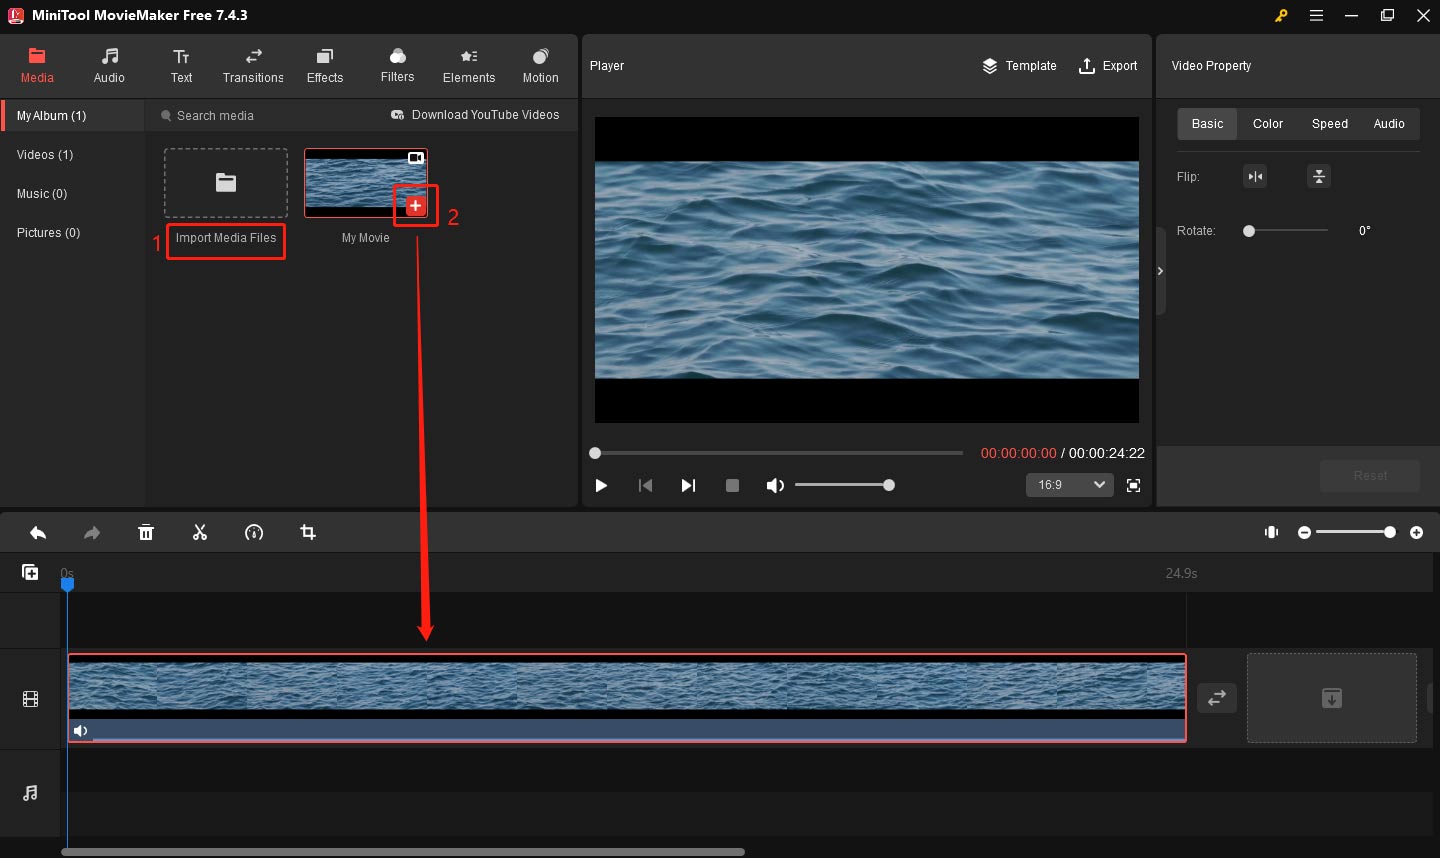
Step 2: Click Import Media Files to import your video with black bars. Then, click the plus icon (+) on the video or directly drag the video to the timeline.

Step 3: Select your video in the timeline to highlight it. Click the Crop icon above the timeline.
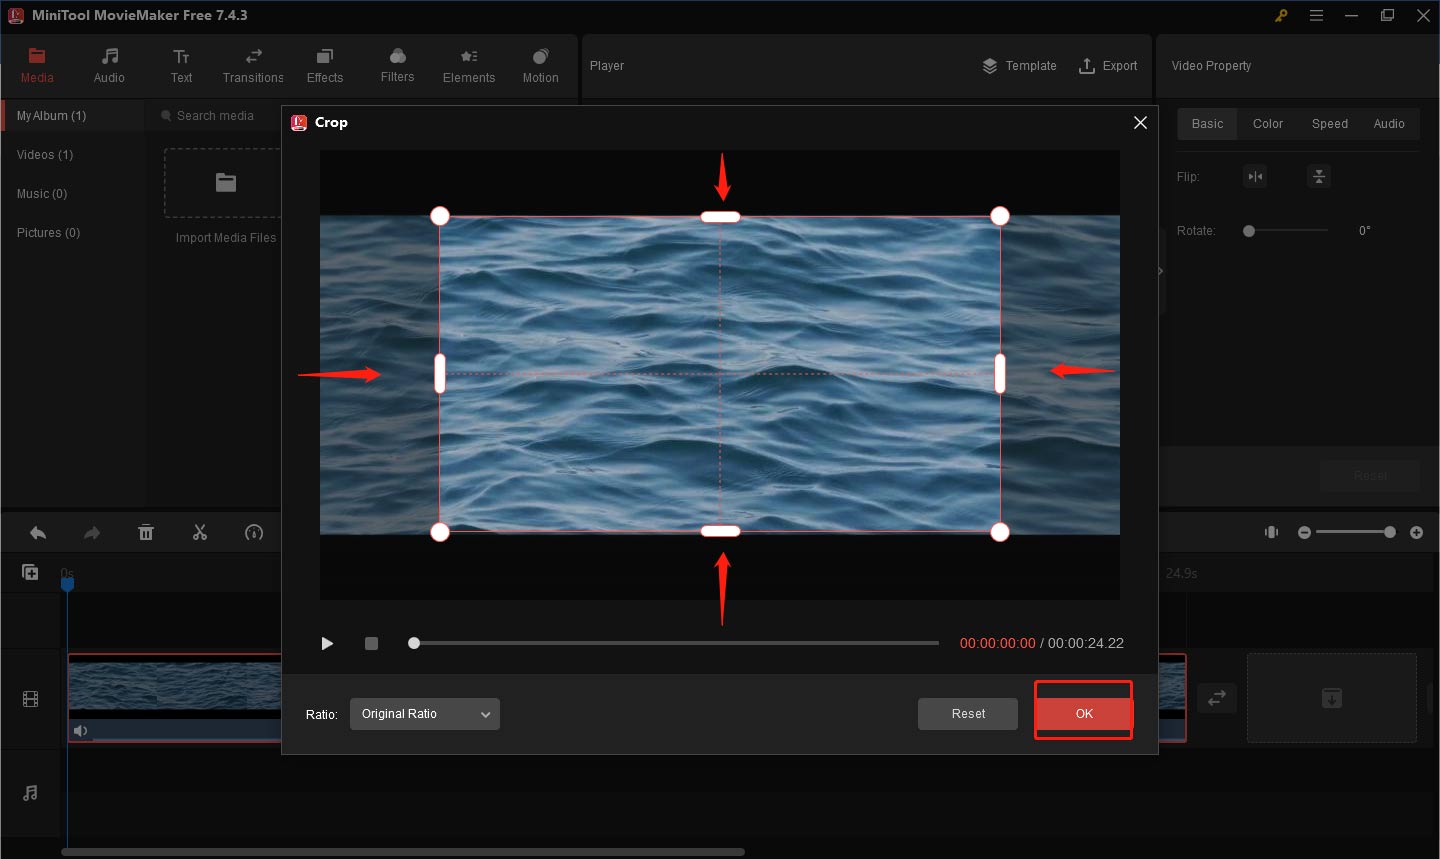
Step 4: A crop window will appear, where you can adjust the crop area. For the top and bottom black bars, you can drag the top and bottom crop handles to remove the black bars. For the left and right black bars, you can drag the left and right crop handles to eliminate the black bars. After that, click the OK button to save the changes.

Step 5: Once done, click the play icon to preview the video effect and confirm that the black bar is removed from the video.
Step 6: After completing all operations, click Export in the upper right corner. Set the file name, location, and format in the output window. Finally, click the Export button to save your new work.
Bottom Line
This is all about how to remove black bars in Premiere Pro. To summarize, the process of removing black edges is very flexible in Premiere Pro. And if you’re looking for a simpler alternative, MiniTool MovieMaker is also a good choice. It offers convenient editing features and is especially suitable for those who don’t want to spend too much time on complicated software.


User Comments :