How to Add Border to Video in Premiere Pro
In the process of video production, adding borders can enhance the visual effect, and help to highlight the video theme. Premiere Pro as a powerful video editing software, provides 2 ways to add borders to videos. Next, we will introduce how to add border to video in Premiere Pro to help you quickly master this skill.
Method 1: Using a Grid Effect
In Premiere Pro, using the grid effect is an easy way to add a border to your video. By applying the grid effect, you can easily create a neat and regular border around your video for a variety of video styles. Let’s see how to add a border to a video clip in Premiere Pro.
Step 1: Launch Premiere Pro on your computer. Click New Project, name the project file, select the file location, and click the OK button. Go to File > Import to upload your videos and drag them to the timeline.
Step 2: Click Effects in the upper right corner and search for Grid. Then drag the Grid effect to the timeline.
Step 3: Go to the Effect Controls panel and you can see the Grid effect. Adjust the grid’s border, opacity, size, and blending mode according to your needs.
Step 4: After adjusting the parameters, the border will be presented. You can drag the border to make it fit better with the video.
Step 5: Go to File > Export > Media to save your video with a border.
Method 2: Using the Essential Graphics Panel
The essential graphics panel is a powerful tool in Premiere Pro that lets you create custom borders. With this tool, you can easily design a border effect that meets your personal needs. Unlike the grid effect, the essential graphics panel offers greater flexibility to adjust the color, thickness, shape, and various other details of the border. You can make adjustments according to the specific video content or style to create a personalized visual effect.
Here’s how to add a border in Premiere Pro using the essential graphics panel.
Step 1: Create a new project and import your video. Then, directly drag them to the timeline.
Step 2: Go to the Essential Graphics panel and click the Edit button. Then click the folding symbol and select Rectangle from the dropdown menu.
Step 3: After adding the rectangle shape, turn off Fill, turn on Stroke, and change the Stroke color to your preferred border color.
Step 4: Change the Anchor Points of the rectangle shape to -5.0, -5.0. Of course, you can adjust it to your favorite value, and this is just a reference.
Step 5: Click and drag that corner of your rectangle to the right place.
Step 6: After getting the desired effect, go to File > Export > Media to save your work.
How to Add Border to Video in Premiere Pro Alternative
You may find the above process a bit tedious and want to quickly add a border to your video. Then you can try MiniTool MovieMaker, and it has an intuitive interface and rich choices of borders. You only need a few simple steps to realize the border effect.
Step 1: Download and install MiniTool MovieMaker on your computer.
MiniTool MovieMakerClick to Download100%Clean & Safe
Step 2: Launch this app, click Import Media Files to import your videos, and click the plus icon to add it to the timeline.
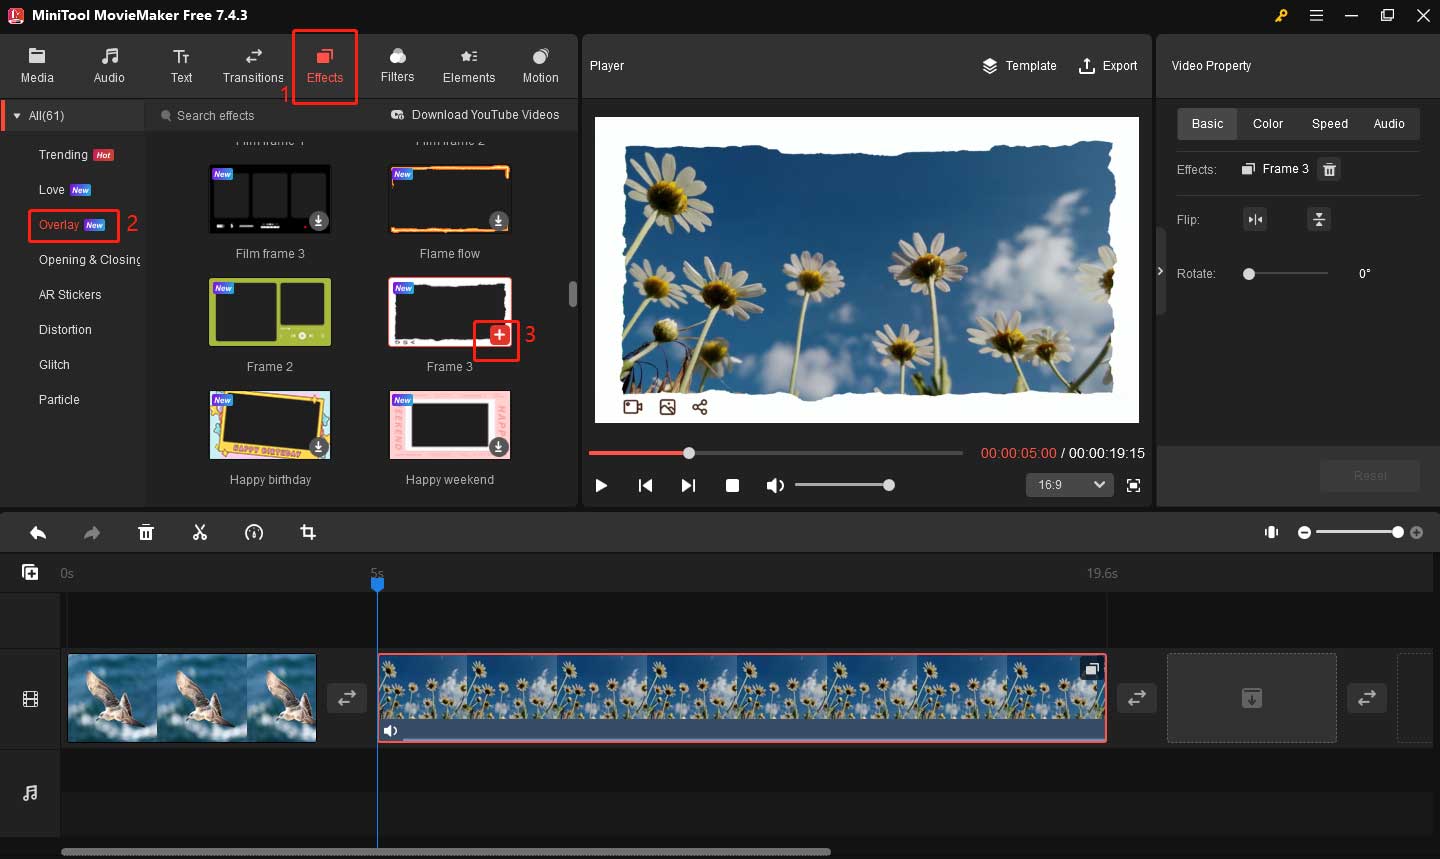
Step 3: Click Effects on the top, and select the Overlay option. Find your desired border effect, download this effect, and click the plus icon on it to apply this effect.

Step 4: Click Export in the upper right corner, and set the video name, location, format, and resolution. Finally, click the Export button to save it.
Bottom Line
From the above, I believe you have learned how to add border to video in Premiere Pro. You can also try MiniTool MovieMaker to broaden your options.


User Comments :