A glitch effect is a great way to add a bit of mystery and intrigue to your videos. In this post, you’ll learn how to make a glitch effect in Premiere Pro, the industry-leading video editing software, and discover an easier way to apply a glitch effect to your projects.
Effects are indispensable parts of video editing to achieve various visual effects. In this tutorial, we’ll focus on the glitch effect in Premiere Pro and learn how to make a glitch effect in Premiere Pro to add visual distortion.
How to Make a Glitch Effect in Premiere Pro
Glitches are popular video effects across YouTube, Instagram, TikTok, and other social media channels. A glitch effect can simulate a distortion in the image, such as a glitch, jump movements, digital errors, bad signals, shifts, and more.
Adding glitch effects is an effective way to make your videos creative and add a sense of nostalgia. Now, let’s see how to make a video glitch in Premiere Pro.
Step 1. Launch Adobe Premiere Pro and import your video into the timeline.
Step 2. Go to Effects, type “glitch” in the search box, and drag the VR Digital Glitch effect in the Immersive Video folder to the top of the video on the timeline.
Step 3. Select the clip on the timeline and go to Effects Controls. Expand Distortion, you can modify the effect parameters. Set the Color Distortion value to 100 and lower the Distortion Rate value to 0. Then, expand the Noise tab and set Noise Strength to around 70.
Step 4. Select where you want the glitch effect to start by moving the playhead, head over to Effects Controls, click the icon next to Master Amplitude, and change its value to 0.
Next, use your keyboard’s right arrow key to move the playhead 3 frames forward, and set the Master Amplitude value to 100. Move the playhead another 3 frames forward and set it back to 0.
Step 5. Go to the first keyframe you created and set the Scale settings to 120. Click the icon next to Position and move forward one frame, then use the X and Y position controls to change the location of your video frame, which will create a second keyframe.
Move forward one frame and reset the position; move the playhead forward another frame and reposition the video. Keep this for a while to create a longer glitch effect.
Step 6. Preview your video and export it.
How to Add a Glitch Effect to Video in MiniTool MovieMaker
It seems that it’s a bit complicated to make a glitch effect in Premiere Pro, so there’s an easier method for you, especially beginners. MiniTool MovieMaker is one of the best alternatives to Premiere Pro for novices in the video editing industry.
MiniTool MovieMaker is an easy-to-use and feature-rich video editor without watermark, offering all the necessary tools to make amazing videos, such as various effects, filters, transitions, animated stickers, and more.
Here’s how to add a glitch effect to a video in MiniTool MovieMaker.
Step 1. Open MiniTool MovieMaker after completing the installation and close the promotion window to access its main user interface.
Step 2. Click the Import Media Files button to open your video and drag it to the timeline.
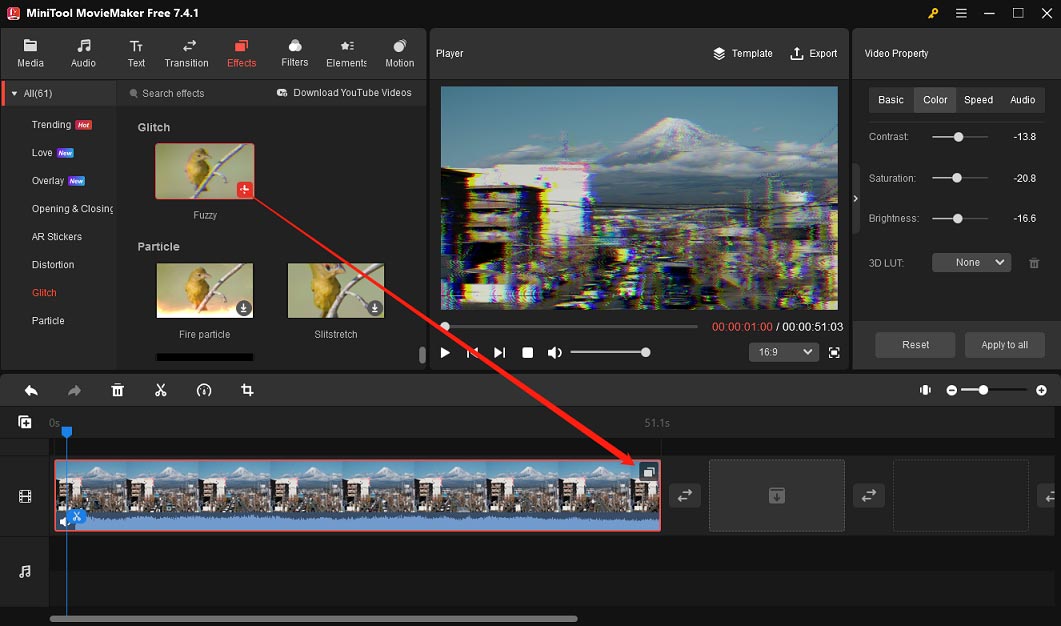
Step 3. Go to Effects at the top, select Glitch on the left sidebar, download the Fuzzy effect, and add it to the clip on the timeline by clicking the + icon.

Step 4. Click the Export button to export your video.
Conclusion
Now you can follow the steps above to create a glitch effect for your video in Premiere Pro to make it stand out. Alternatively, you can try MiniTool MovieMaker to apply a glitch effect to your video. Hopefully, this post can help you create stunning videos with glitch effects.


User Comments :