The audio ducking feature can automatically optimize the audio files mix in videos with narration or dialogue by fading backing music tracks, so speech can be heard clearly. In this guide, I will explain step by step how to use PowerDirector audio ducking.
About the PowerDirector Audio Ducking Feature
Audio ducking assists users in making voiceovers or dialogue be heard more clearly by automatically reducing the volume of background music or other audio files. To use audio ducking feature in PowerDirector, choose a video or audio clip on the timeline and click Tools > Audio Ducking. The chosen video or audio clip will be changed automatically after hitting OK.
Turn your attention to the next part to learn about the specific operations.
How to Use the PowerDirector Audio Ducking Feature?
CyberLink PowerDirector is a video editing application that includes exquisite features, such as Magic Movie Wizard, Motion Tracking, Action Camera Tools, Encoding, and more. The audio ducking feature in PowerDirector has automated the audio modification based on keyframes.
You can refer to the following steps to learn how to use PowerDirector audio ducking.
Step 1. Import the Video and Background Music
If you have downloaded and installed the PowerDirector app on your device, launch it. Click the + New Project button to enter the primary user interface.
Then, import your video into the app and add it to the timeline. Additionally, you can import the background music that you want to add to the video.
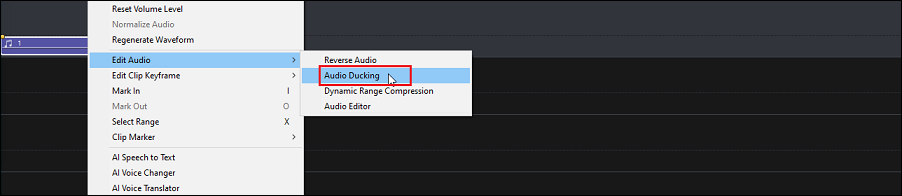
Step 2. Use the Audio Ducking Feature
Right-click on the video or audio segment on the timeline you would like to have a lower volume and navigate to Edit Audio > Audio Ducking.
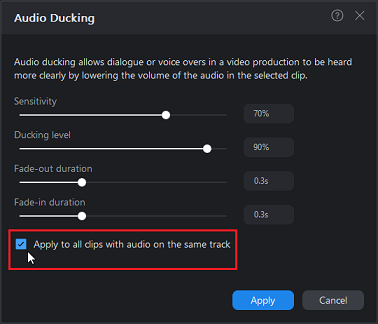
You can adjust the controls below from the Audio Ducking window:
- Sensitivity – controls the level of narration or dialogue detection in other segments.
- Ducking level – controls how much you’d like to lower the volume in the chosen segment.
- Fade-out duration – controls the duration for reducing the volume in the chosen segment.
- Fade-in duration – controls the duration for restoring the audio level as soon as the narration or dialogue in the other segment ends.
Check the Apply to all clips with audio on the same track option if you desire the audio ducking applied to all of the segments in the video project timeline. After that, click the Apply button to save the adjustments.
At this point, you should be able to see on the timeline that when there is narration on the main video segment, the audio level of the background music track is lower.
Step 3. Export the Video
Finally, click the Export button in the upper left corner, set some output parameters appropriate for your video project, like format, resolution, bit rate, and frame rate, and then complete the export process.

Bonus Tip: A Simpler Approach to Fading In/Out Music – MiniTool MovieMaker
MiniTool MovieMaker is a free and simple-to-use video editor for Windows 11/10 that comes with tons of editing tools to make your video projects stand out. This is a great option if you want the audio in your video to fade or the background music to fade in and fade out.
Follow the steps below to fade in and fade out music using MiniTool MovieMaker:
MiniTool MovieMakerClick to Download100%Clean & Safe
- Download and install the MiniTool MovieMaker app on your PC.
- Launch it and click the New Project button.
- Import your video and music files into the app by clicking the Import Media Files button.
- Drag and drop the imported video and music files onto the timeline.
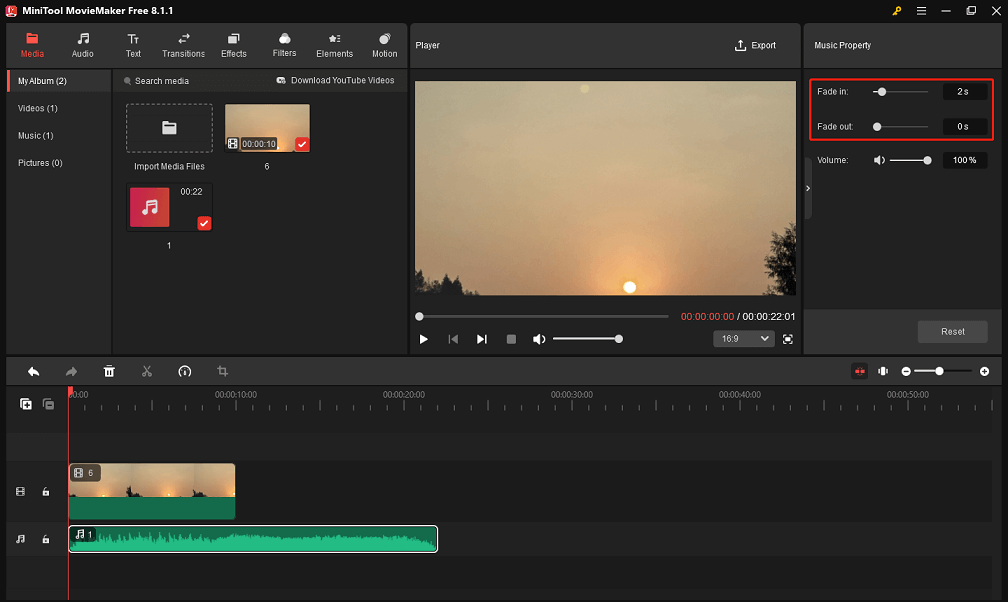
- Click on the video clip on the timeline to show the Video Property panel. In the Audio tab, slide the Fade in / Fade out slider to adjust the duration of the effect.
- Or, select the music clip on the timeline to show the Music Property panel. From there, move the Fade in / Fade out slider to modify the duration of the effect.
- Once done, click the Export button to configure the suitable export parameters and then finish the export.

Conclusion
How to use PowerDirector audio ducking? See the step-by-step guide above to use the feature to balance background music and voice-overs.
User Comments :