In this post from the MiniTool video editing software, we will guide you through how to export video in Kdenlive. Then you may show off your work in its full glory.
Welcome to Kdenlive, where you can bring your creative visions to life. You have carefully crafted your masterpiece utilizing Kdenlive’s array of editing tools, and now it’s time to show it off to the world. In this guide, you will learn how to export video in Kdenlive seamlessly.
From visual brilliance preservation to format optimization, we will walk you through the procedure step by step. Therefore, get ready to go on a journey of exporting greatness, and unleash your creativity at Kdenlive.
About Kdenlive
Kdenlive is a multi-purpose open-source video editor appropriate for users at all levels. With its easy-to-use interface and rich functionality, it enables you to cut, trim, add effects, alter audio levels, and so on.
The software is a popular option for filmmakers and content creators, supporting a variety of formats and providing advanced features such as multi-track editing. Whether you are working on an easy home video or a complicated professional project, it helps you make your creative ideas come to life.
How to Export Video in Kdenlive?
Steps to Export All Videos in Kdenlive
To export all of the videos in Kdenlive, follow the instructions below:
- First, make sure you’ve imported your video material and performed all the necessary cuts and tweaks to your project.
- Once the editing is to your satisfaction, go to the toolbar above and hit Project.
- Select Render from the drop-down menu. Or use the Ctrl+Return keyboard shortcut, as shown next to the option itself.
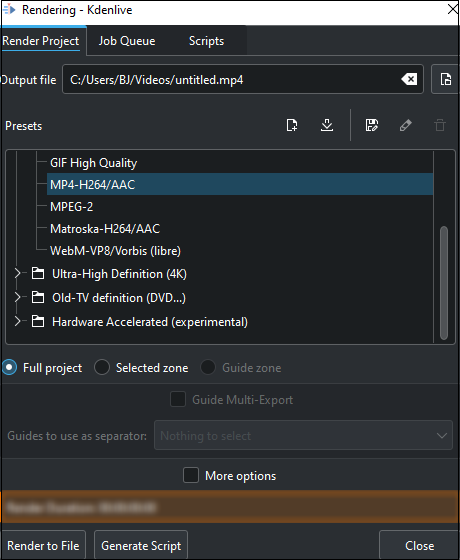
- This will bring up the Rendering window, offering a variety of options for exporting the video.
- In the Rendering window, ensure that you are in the Render Project tab. From there, you can find a set of format presets to select from. The default MP4 preset should be sufficient for a standard export. But you can consider other format options depending on your specific needs.
- Confirm Full project is clicked on. This makes sure that the exported video will include the entire edited project.
- Hit the Render to File button. This will start the video export process.
- Give Kdenlive some time to finish the export. The duration may differ according to the complexity and length of your project.
- After the export process is complete, your video will be available in the default location where it is saved. Kdenlive often saves the exported file in the project folder you designated or your specified location during the export.
Steps to Export Part of a Video in Kdenlive
To export a particular portion of the video in Kdenlive, follow the actions listed below:
- To start, mark the in and out points of the required section. Place the timeline marker at the beginning of the video segment you would like to export.
- Press I on the keyboard in order to mark the video in point. This will show the start of the selected zone.
- Then, place the timeline marker at the end of the video segment.
- Press O to mark the video out point. The chosen zone will be highlighted in blue in the timestamp area, which indicates the range you’ve chosen.
- If needed, you can change the selected zone by dragging the edges to adjust its length or dragging its center to another position. This lets you fine-tune the specific part you wish to export.
- Once you’re happy with the chosen zone, go to the toolbar and hit Project.
- Select Render in the drop-down menu to bring up the Rendering window.
- In the Rendering window, make sure that the Selected zone option is clicked on at the bottom. This will make sure just the marked section will be exported.
- Lastly, hit the Render to File button. This will start the export process for the selected zone.
MiniTool MovieMakerClick to Download100%Clean & Safe
Conclusion
How to export video in Kdenlive? You can know after reading the instructions above, no matter if you want to export all the videos or only a part of a video using this video editor.
User Comments :