This post published by a movie maker from MiniTool will show you how to adjust volume in Premiere Pro. There are four methods available to you. Let’s get started!
Undoubtedly, the quality of audio heavily affects a video editing project. The sound quality determines users’ first experience directly when they watch a movie or video.
Issues like sound being too loud or soft, or fluctuating suddenly, can have a devastating effect on the quality of the work.
As a video content creator, if you can solve these audio challenges, your creations will undeniably be taken to a new level.
In this guide, we will walk you through how to adjust audio volume in Premiere Pro. To ensure your video has a professional look, check out the four methods we offer below.
How to Adjust Volume in Premiere Pro?
First, launch Adobe Premiere Pro. Open up a project and find the sequence you wish to adjust the volume for.
Once you have found the sequence, locate the audio file you wish to adjust. You will usually locate this in the timeline at the bottom of the screen. The audio clip is typically shown as a waveform.
Or, you can directly drag the audio segment you wish to adjust the volume onto the timeline.
After successfully importing your audio files, here are four ways you can learn how to adjust the volume in Premiere Pro.
Way 1. Adjust the Volume Level Line
When you examine the audio on the timeline, you’ll notice a line that runs through the middle of the audio track.
To adjust the volume, click and hold the line using your left mouse button, then drag it up/down. Move upwards to increase the volume. Pull downwards to decrease it.
If you cannot find the volume level line, you just need to expand the audio track. Place the mouse between two audio tracks, click on and hold your left mouse button, and then move up/down to change the track size.
Or, use the shortcut keys “[” or “]” to respectively lower or raise volume.
Select the audio in the timeline you want to adjust. Lower the volume by pressing the left bracket key while increasing it by pressing the right bracket key.
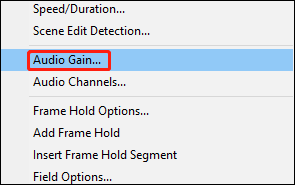
Way 2. Adjust the Audio Gain
Right-click on the selected audio and select Audio Gain to adjust its volume.
In the dialog box that shows up, input a value in the Adjust Gain by area. Enter a positive value if you would like to increase the volume. Enter a negative value if you would like to decrease it.
The Adjust Gain by feature increases/decreases the volume by a specific number of decibels from the current level, instead of adjusting the volume to a certain decibel level.
For example, to raise the volume by 5 decibels, just enter 5 and hit OK.
Also, you can use the shortcut key “G” to open the Audio Gain panel.
Way 3. Adjust the Audio Clip Mixer
Look towards the upper left of the interface and you’ll see the Audio Clip Mixer panel. Don’t worry if it’s not there. Just head over to Window > Audio Clip Mixer and it will appear.
You’ll find different sliders for each audio track in the sequence within the Audio Clip Mixer panel. Identify the track the audio segment is in and you’ll find a matching slider.
Just click and drag the volume slider up/down to adjust the volume.
Drag the slider up to increase the volume and pull it down to decrease it. Volume levels are measured in decibels (dB), and you’ll notice the dB levels when you move the sliders.

Way 4. Use Keyframes
If you wish the volume to change over time, like gradually fading out, you can adjust the volume by using keyframes.
For example, when you are editing a clip with background music, you’ll want to decrease the volume of the music when there is a voiceover track and increase it when there is not.
The three ways we’ve described above cannot achieve this, however, using keyframes can do the trick fairly simply.
At the beginning of the background music, you wish the music to fade in slowly from soft to loud. To accomplish this, you need to insert two keyframes at the start of the music.
Drag your timeline marker to the point where you wish to add a keyframe, click and choose the audio track that requires volume adjustment, then click on the activated button Add-Remove Keyframe on the left side (it looks like a stopwatch icon). This adds the first keyframe.
Choose the first keyframe and drag it to the audio track’s bottom right now. This will decrease the volume of the keyframe to 0, making a fade-in effect.
By getting to know the principles of keyframes in Adobe Premiere Pro, you can accomplish fade-in and fade-out effects on your desired audio.
In addition, you can right-click on a keyframe and configure a keyframe animation to make a transition even smoother.
MiniTool MovieMakerClick to Download100%Clean & Safe
Conclusion
We’ve presented four methods to help you understand how to adjust volume in Premiere Pro. These include adjusting the Volume Level Line, Audio Gain, and Audio Clip Mixer, as well as using Keyframes.
User Comments :