Are you curious about the audio track mixer? This post from MiniTool MovieMaker will show you how to use the Audio Track Mixer in Premiere Pro to handle audio within a video. Continue reading.
If you enjoy mixing audio, you’ll want to take advantage of this little-known function in Adobe Premiere Pro. While you probably know about the Audio Clip Mixer, which allows you to manipulate the audio between clips, the Audio Track Mixer enables you to control an entire track, which can be useful in its own right.
In some cases, you need to make huge adjustments that touch everything, and no one wants to adjust all the sounds clip by clip. That’s where the audio track mixer comes into play.
What Is the Function of the Audio Track Mixer?
Mixing tracks is while audio is mixed and blended in a sequence, with multiple sounds on one channel. As you watch a TV show and the music cuts over two characters conversing, that is an example of mixed tracks. To make a seamless completed product, you can mix music, voiceovers, dialogue, sound effects, and other elements.

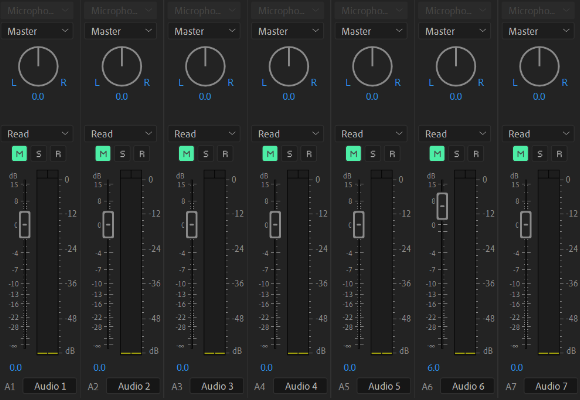
Using Premiere Pro Audio Track Mixer, you can see how each track is playing in real-time, not only on the timeline but on its own screen. Then, for each track, you can do the following:
- Rename tracks.
- Listen to tracks together or separately.
- Adjust the volume and type of audio produced by each track.
Additionally, you can see meters when the main window is closed, which is useful if you need to clear some space or organize the sounds when other data is displayed.
You can look at the sequence being played in real-time as well as the peaks and valleys of the sound, and make sure you have control over the volume of each track. Furthermore, you will have complete control over the sound and playback.
How to Adjust the Audio Track Mixer Settings?
You can work with the sound as it occurs if you are the type of person who enjoys doing so. Mixing and recording on the fly is simple if you can avoid a few mistakes.
Utilizing mono tracks lets you change the sound for left and right settings, whereas stereo tracks generate two different signals for two different speakers. Therefore, if you would like to control where the sound is coming from, you can do so with an easy tweak.
Also read: Mono vs Stereo: Differences and Which Is Better
The audio files are edited in the audio interface as well as in a timeline, where it’s imported or recorded directly. Then, the waveforms can be seen, the sounds and volume can be changed, and the larger audio mixes can be split into sub-mixes.
All of your adjustments will be reflected on the timeline, and you will be able to listen to the new track immediately.
Using Audio Track Mixer in Your Next Project
If you’re a budding filmmaker working on a project, or simply putting together some clips and music for fun, Audio Track Mixer is a must-have tool.
Working with tracks, especially while you have several tracks overlapping each other, can be a frustrating process requiring tapping and straining your ears to make sure everything is perfect.
Rather than wasting time staring at your computer screen, using the Audio Track Mixer in Premiere Pro is an excellent method to reduce micromanagement and focus on what really matters. That is to get great sound from your video and audio.
Utilize the track mixer to customize and manage the sounds, see the volume and base of each track in real-time, and set when tracks fade in and out. Moreover, using the mixer will enable you to have image-perfect sound quality every time.
MiniTool MovieMakerClick to Download100%Clean & Safe
Conclusion
To sum up, this post explains how the audio track mixer works, how to adjust the audio track mixer settings, and how to use the Audio Track Mixer in Premiere Pro for your next project. Hope these contents are helpful to you!


![[SOLVED] How to Fix Bad Audio Quality from Video?](https://images.minitool.com/moviemaker.minitool.com/images/uploads/2022/11/how-to-fix-bad-audio-quality-from-video-thumbnail.png)
User Comments :