How to Add Vignette in Photoshop?
If you would like to learn how to add a vignette in Photoshop, it gives you a ton of possibilities. The following are some of the most common ways.
Way 1. Use the Lens Correction Filter
Step 1: Go to the Lens Correction Window
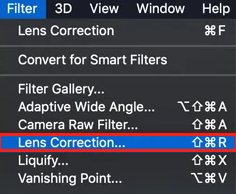
Open the image you would like to use for the vignette effect. From the Filter menu, select the Lens Correction… option.

Step 2: Add a Vignette Effect
Click the Custom tab. You’ll notice two sliders for controlling the vignette effect. One for setting the amount and one for setting the midpoint. The preview picture shows how it will look.
This is certainly the simplest guide on how to vignette in Photoshop. The problem, however, is that this way does not let you customize the effect.
MiniTool MovieMakerClick to Download100%Clean & Safe
Way 2. Use a Levels Layer
Step 1: Create a Levels Layer
Click the Create new fill or adjustment layer icon and select the Levels… option. The Levels panel will appear.
Drag the grey triangle to the right. This will darken the photo. If you would like to make the effect even more intense, drag the slider’s white triangle below to the left.
Step 2: Masking
Choose the Paint Brush tool and ensure that the color is set to black. Select the Curves layer’s layer mask thumbnail.
Next, choose a large, soft brush and paint over the middle of the image. Where you paint with black, the darkening will disappear. The mask thumbnail changes as you can see. If you wish to add darkening again, paint over your picture with white.
You can adjust the shape of the vignette effect in addition to its size using this way. According to your needs, you can choose a circular, an oval, or even a straight line.
By double-clicking on the Levels layer, you can always alter the intensity of the vignette effect.
Way 3. Use the Solid Color Layer
Step 1: Add a Solid Color
Click the Create new fill or adjustment layer icon and select the Solid Color option. In the Color Picker, choose Set the color to black and click OK.
Step 2: Modify Blending Mode
Set the opacity to about 30%. Modify the blending mode to Multiply.
Step 3: Masking
To create a vignette effect, follow step 2 of the previous way. This approach is similar, but it is far more versatile. You can now try different colors as well. Select brown to make a subtle difference or apply white to create something completely different.
If you go for a light color, ensure that the blending mode is set to Lighten rather than Multiply.
Conclusion
That’s all the methods provided in this post on how to add vignette in Photoshop. Anyway, the best vignette brings attention to the subject instead of the effect itself. Experiment with different colors and shapes based on your picture and the location of the subject. Meanwhile, keep the vignette from becoming too dark since it will lose its power.


User Comments :