OBS Studio is an open-source video editing software extremely popular for live streaming on online platforms. Although OBS is a 100% free application, its features are comparable to those of any premium video editing software. We always search for available transitions in a video editing program and OBS takes it to a new level by letting users add custom transitions.
Stinger transitions, among custom transitions, have received much traction from the users. They’re made popular by sports channels that frequently use Stinger every time there is a change in the scene. We will show you how to make custom transitions in OBS. Read on.
What Is the Stinger in OBS?
Stinger is a special kind of custom animated video transition effect available in the most recent version of OBS Studio. It combines a transparent video animation with a cut transition. It starts with the transparent video animation growing into a full-screen overlay and is followed by the cut transition.
You place the next video clip or scene after the cut transition. You’ll see the Stinger transition every time a sports channel shows an instant replay during a live match.
The transparent video animation begins on top of the current video that you’re editing. When the animation expands and covers up the whole screen, you place the cut transition and then the next scene or video clip as needed. Also, some custom Stinger effect includes audio effects as well as video effect.
How to Add Custom Transitions in Streamlabs OBS?
The Stinger transition is available in OBS Studio and Streamlabs, both of which are free and open-source programs. Before adding the Stinger transition, make sure you have a video animation ready that you’ll play on top of the current video followed by the cut transition. You can get several Stinger video animations from the Internet and insert any of them in OBS while you add Stinger transition.
How to add custom transitions in OBS? Follow these steps:
Step 1: Go to the Scene Transitions area and click the Effects option to bring up the drop-down menu.
Step 2: Then, click Add: Stinger in the drop-down menu.
Step 3: Name the Stinger transition and hit the OK button.
Step 4: You’ll now see the Properties window. Click the Browser button against the Video File and choose the transparent video animation file that you would like to play on top of the current video before you apply the cut transition.
Step 5: Choose Time (milliseconds) for Transition Point Type. In the Transition Point area, add the duration of the transparent video animation, so the transition to the next scene occurs instantly after the video animation is finished.
Step 6: Go to Audio Monitoring and choose Monitor and Output in the dropdown if the video animation has audio. For Audio Fade Style, choose Crossfade for better output.
Step 7: Scroll down and click the Preview Transition button to check whether the Stinger transition is happening as expected. You can change the transition point and other parameters to make it ideal.
Step 8: Lastly, click OK and play the video to see the Stinger transition on the big screen.

Bonus Tip: OBS Replacement for Adding Transitions
In this part, we recommend MiniTool MovieMaker as a great alternative to OBS Studio for adding transition effects. Because it is a professional video editing application with a variety of transition effects, like dissolve, flash, burn, fold, blind, swap, etc. It is worth noting that MiniTool MovieMaker is well-praised by both amateurs and professionals due to its intuitive user interface.
MiniTool MovieMakerClick to Download100%Clean & Safe
Here’s how to add a transition between two video clips using MiniTool MovieMaker.
- Download, install, and open MiniTool MovieMaker on your computer.
- Close the pop-up window to access its main user interface.
- Click Import Media Files under Media to import your video files into the application.
- Drag and drop the imported video files onto the timeline’s video track.
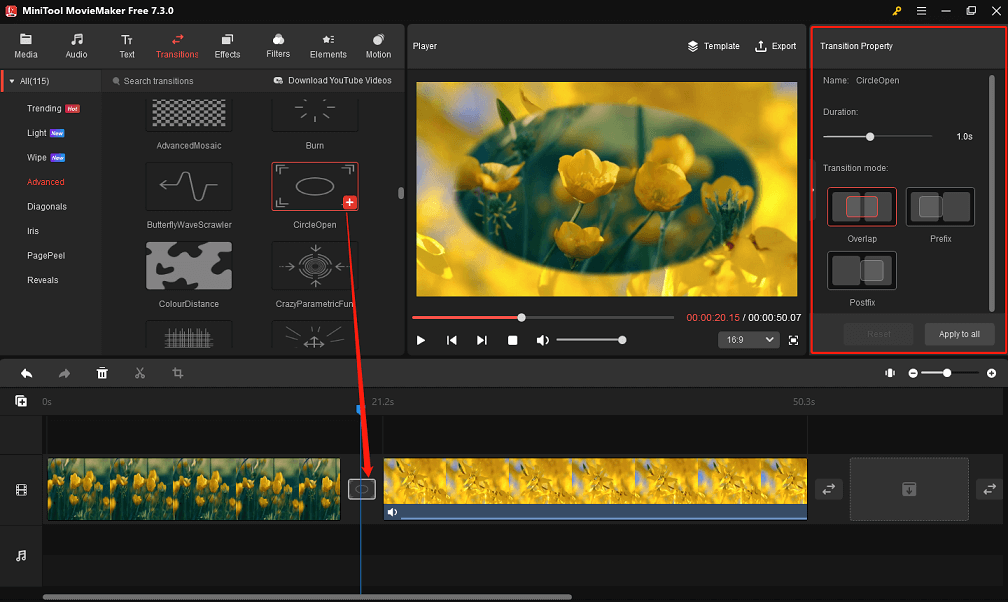
- Select the target video clip on the timeline. Click the Transition tab, get the desired transition effect, and click + to add it between the selected video clip and the next one.
- Go to the Transition Property section in the upper right corner. You can adjust the added transition effect’s duration and mode.
- Click Export at the top to change some output options and then save the final video to your computer.

Conclusion
That’s it, a step-by-step guide on how to add custom transitions in OBS. We hope you find this post helpful. Plus, you can try out MiniTool MovieMaker to add various transition effects.
User Comments :