For adding transitions in Lightworks, in this post created by MiniTool MovieMaker, we will introduce you to how to add a video or an audio transition respectively.
Transitions are a very easy and effective technique for smoothing the cut between two separate segments on a sequence timeline. Instead of switching directly from one segment to another, transitions can make for smoother cuts to convey specific moods or time shifts.
For adding transitions in Lightworks, there should be enough media available on the outcoming and incoming segments on the sequence timeline for the effect to be integrated. A pop-up will appear to inform the user if there is insufficient material.
Now, let’s learn how to add transitions in Lightworks by checking out the following step-by-step guide.
How to Add a Transition in Lightworks?
Steps for Adding a Video Transition
Step 1: Ensure the VFX or Edit tab is selected.
Step 2: Right-click the cut point in which you want the transition.
Step 3: From the menu that appears below Cut Commands, select Transitions.
Step 4: Choose any of the following transitions: Dissolve, Wipe, Squeeze, Push or Luma Wipe.
Step 5: From the drop-down menu, select where you want the transition to begin and end. The options include:
- Centered Here – Apply the transition centered on the park position.
- From Here – Apply the transition forward from the park position.
- To Here – Apply the transition backward from the park position.
Step 6: Choose the number of frames you desire for the transition to take effect from the Length drop-down menu.
Step 7: Click on the Add button to apply the transition to your sequence.
Steps for Adding an Audio Transition
Step 1: Ensure the VFX or Edit tab is selected.
Step 2: Right-click the cut where you would like to add the transition to the audio track.
Step 3: From the menu that appears below Cut Commands, select Crossfade.
Step 4: Select where you want the transition to begin and end from the drop-down list. The options include:
- Centered Here – Apply the transition centered on the park position.
- From Here – Apply the transition forward from the park position.
- To Here – Apply the transition backward from the park position.
Step 5: Choose the number of frames you desire for the transition to take effect from the Length drop-down list.
Step 6: Click on the Add button. The chosen transition is added to the audio track.
Bonus Tip: How to Add a Transition in Another Decent Video Editor?
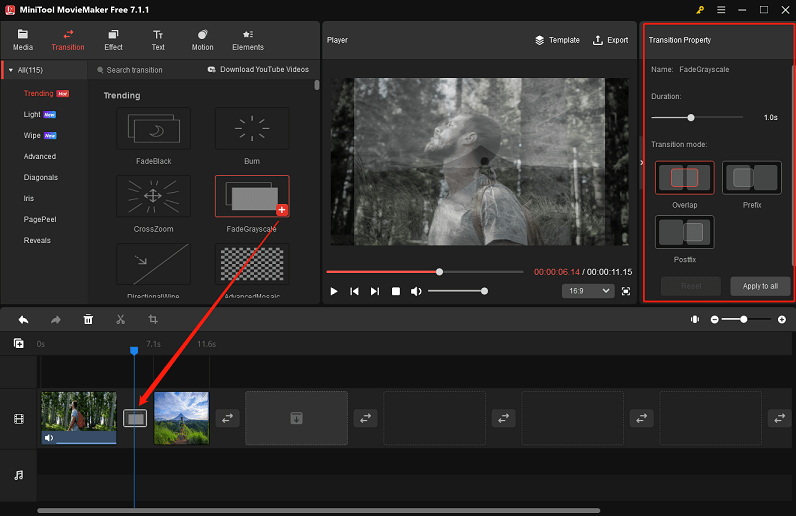
Besides Lightworks, many other decent video editing apps let you add a transition to a video to give it a more polished look. MiniTool MovieMaker is the one you can’t ignore, and it currently covers over 100 transitions, separated into Light, Wipe, Advanced, Diagonals, Iris, PagePeel, and Reveals categories.
MiniTool MovieMakerClick to Download100%Clean & Safe
Here’s how to add a transition to a video with MiniTool MovieMaker.
- Download, install, and start MiniTool MovieMaker on your computer.
- Close the pop-up window to get access to the main user interface.
- Click Import Media Files to import your material into the app.
- Drag and drop the imported material onto the timeline.
- Select the target material on the timeline. Go to the Transition tab and download the one you want from the above-mentioned transition categories.
- Click the + icon to add the downloaded transition between the selected material and the next one.
- In the Transition Property section at the top right, modify the added transition’s duration and mode.
- Click Export on the toolbar to save the final video to your computer.

Conclusion
In addition to adding transitions in Lightworks using the step-by-step guide we outlined above, you can utilize another fantastic video editing app – MiniTool MovieMaker – to make your video stand out by adding this type of special effect. Start your journey of creation right now!


User Comments :