Hologram effects have become one of the favorite visual effects for many creators. With the help of Photoshop, you can easily create stunning hologram effects. This article from MiniTool MovieMaker - one of the best video editing software will introduce how to create a hologram effect in Photoshop.
The hologram effect is a visual effect that simulates a three-dimensional image. It gives the impression that a virtual object is suspended in real space through specific techniques. Holograms were originally realized through techniques such as lasers and optical interferences. Nowadays, with the help of image editing software such as Photoshop, you can create similar virtual effects. The following will describe how to create a hologram effect in Photoshop.
MiniTool MovieMakerClick to Download100%Clean & Safe
How to Create a Hologram Effect in Photoshop
Photoshop, the most widely used image-processing software in the world, has powerful editing features. You can blend layers, add filters, make color corrections, and more to your image. Of course, you can also use Photoshop to create hologram effects for your images. Although Photoshop doesn’t have a direct hologram effect generator, you can blend layers and add filters to achieve the desired effect.
Here are the detailed steps to create a hologram effect in Photoshop.
Step 1: Go to the official Photoshop website, download and install this software on your computer.
Step 2: Launch this app, go to File > New, and set the size and resolution in the pop-up window. Then, click the File button again and select Place Embedded to import your image.
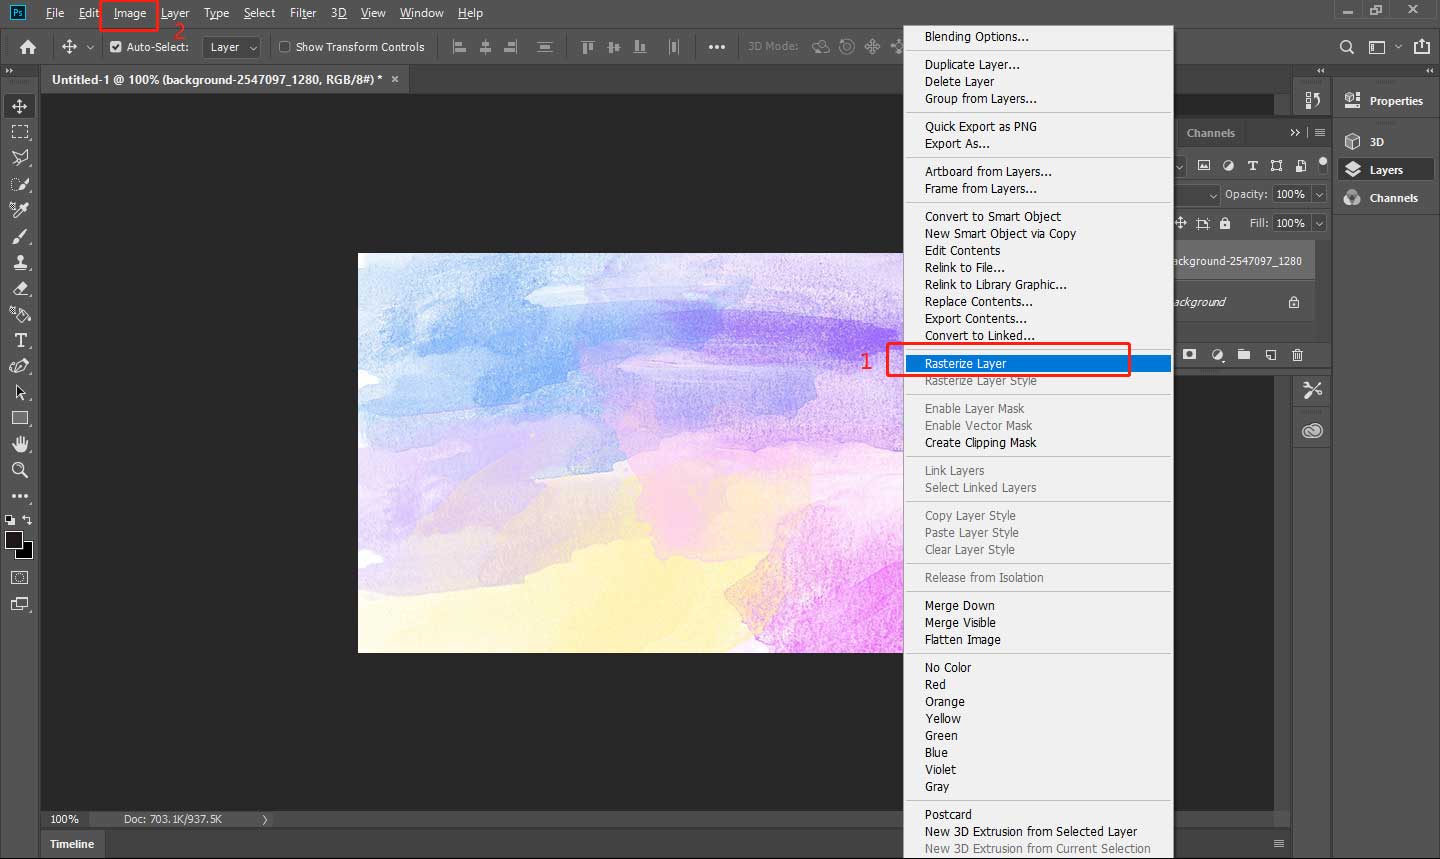
Step 3: Go to the Layers panel, right-click on the image layer, and select Rasterize Layer. Then, press Ctrl + A to select your image, and go to Image > Crop to crop your image. After that, press Ctrl + D to deselect.

Step 4: Right-click on the image layer in the Layers window, and choose Convert to Smart Object in the dropdown menu.
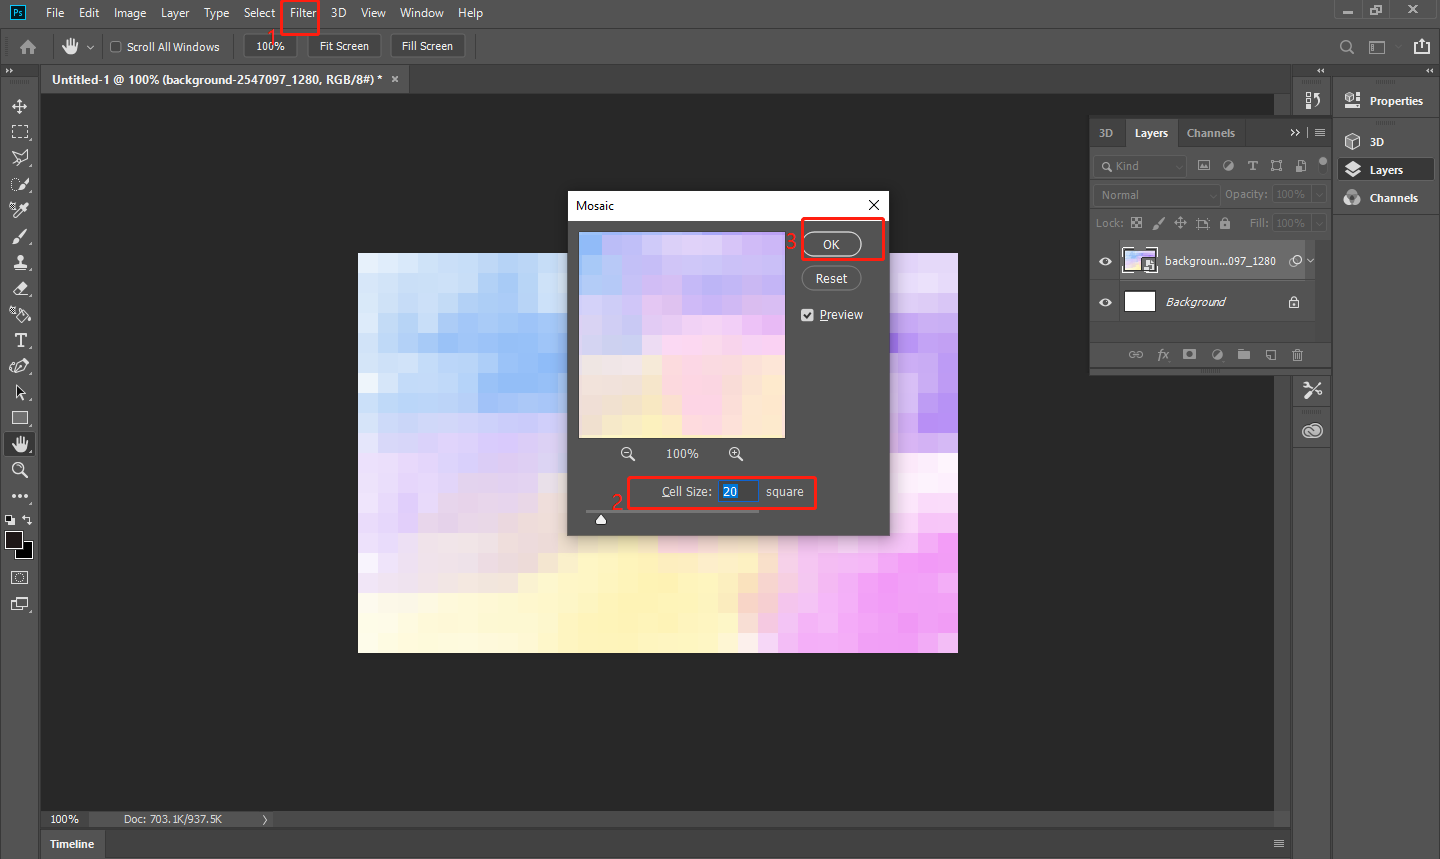
Step 5: Go to Filter > Pixelate > Mosaic in the top toolbar, set the Cell Size value to 20 square, and click the OK button to save your editing.

Step 6: Go to Filter > Filter Gallery > Texture > Patchwork. Then set the Square Size to 5 and the Relief to 0. Finally, click OK to save the changes.
Step 7: Go to Filter > Filter Gallery > Sketch > Halftone Pattern. Then set the Size to 5, Contrast to 0, and Pattern Type to Line. Click OK to save your editing.
Step 8: Double-click on the Halftone Pattern filter layer, set the blending mode to Hard Light, and click OK to save.
Step 9: Go to Filter > Distort > Polar Coordinates and select Rectangular to Polar. Finally, click OK to save the filter.
Step 10: Go to the Layers window, right-click on the image layer, and choose Blending Options. Click Gradient Overlay in the Layer Style window, click the Gradient box, and choose a cool gradient to show the hologram effect better.
Step 11: After completing all operations, go to File > Export > Export As to save your work on your computer.
Bottom Line
By utilizing the many features of Photoshop, you can create an impressive hologram effect. Every detail can add layers and depth to the overall effect, giving it a more futuristic and technological feel. Although creating a hologram effect in Photoshop may seem complex, you can find the most suitable way to express yourself and make the image more appealing.
Understanding the relationship between different elements is key in the creative process. Whether you are doing advertising design, visual art, or fiction theme creation, mastering hologram effects can make your work more modern and innovative, attracting the audience’s attention and bringing a new visual experience.


User Comments :