Adding a video is a great way to make an amazing presentation. When you insert a video into PowerPoint, you may want to trim it to remove the beginning or the end parts to shorten this video.
In this post, we’ll explain how to trim a video in PowerPoint and how to trim audio in PowerPoint. Alternatively, you can try MiniTool MovieMaker to trim videos for free, and then add it to your PowerPoint Presentation.
MiniTool MovieMakerClick to Download100%Clean & Safe
How to Trim a Video in PowerPoint
This part will show you how to trim an existing video from your computer in PowerPoint.
Step 1. Open a PowerPoint Presentation file, in the Normal view, and select the slide you want to add a video to. Click Insert > Video > This Device… to browse for your video, and click the Insert.
Step 2. Select the target video, then you’ll see the Video Tools section at the top, and tap Playback, then click the Trim Video.
After clicking Playback, you can see the Crop and Rotate options. Tap Crop, then drag your mouse to crop the video in PowerPoint. Click Rotate to rotate or flip the video.
Step 3. Alternatively, you can right-click on the video and then select Trim to open the Trim Video dialog box.
Then drag the green handle to the right and move the red handle to the right to cut out the beginning and the end parts of the video.
Alternatively, you can manually enter the value of Start Time and End Time to trim this video.
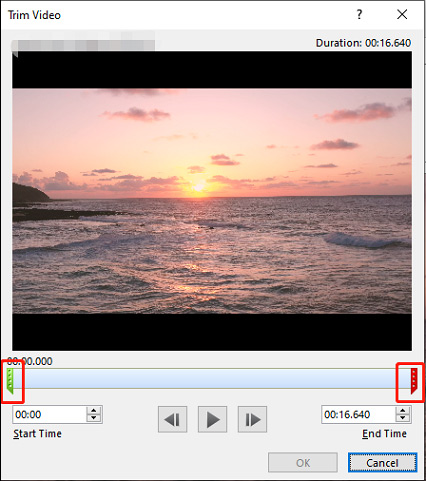
Step 4. Click the Play button to preview this video. Then click the OK to save changes. To save the trimmed video on your computer, right-click it, select Save Media as…, then choose a folder and click Save to save the video in MP4.
Also read: How to Trim and Cut a Video in Shotcut? – Solved
How to Trim a YouTube Video in PowerPoint
Can you directly trim a video from YouTube in PowerPoint? How to trim a YouTube video in PowerPoint?
In the latest version of PowerPoint (Microsoft PowerPoint 2019), you’ll find the Trim Video not available in PowerPoint after inserting a video from YouTube.
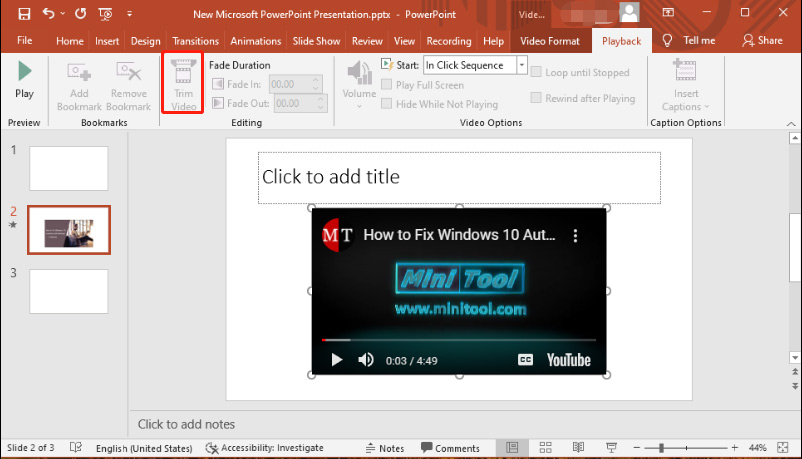
It means you can not continue to trim this YouTube video in PowerPoint or other online videos inserted from the web currently.
You need to download this video from YouTube or other supported sites on your computer, then follow the previous steps to trim it.
How to Trim Audio in PowerPoint
Step 1. Click Insert > Audio > Audio on My PC… to add audio from your computer.
Step 2. With the audio clip selected, click Trim Audio on the Playback tab under Audio Tools.
Step 3. Click the Play button to play the audio, click the Pause and stop where you want to make the cut, and drag the green handle to that place.
Play the audio again and mark the endpoint of the audio clip you want to keep, drag the red handle to that place. Tap OK to save changes.
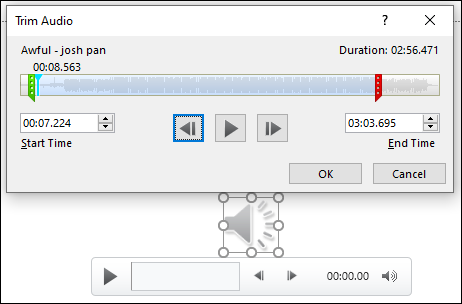
Step 4. To save a copy of the trimmed audio, right-click the audio button and click the Save Media as…, then choose a folder, and click Save to save the file in MP3.
Want to trim audio online? Check this post – 6 Best Online Audio Trimmers to Trim Audio Easily.
How to Trim a Video with MiniTool MovieMaker
MiniTool MovieMaker is a free video editor for Windows. It’s simple to use and has no watermarks. It allows you to trim, split, rotate, flip, reverse, slow down, speed up videos, apply transitions and filters to the video, add text and background music, and more.
Here’s how to trim a video with MiniTool MovieMaker.
MiniTool MovieMakerClick to Download100%Clean & Safe
1. Open MiniTool MovieMaker after installation, and close the pop-up window.
2. Click the Import Media Files to add the video you’d like to trim. Then drag it to the timeline.
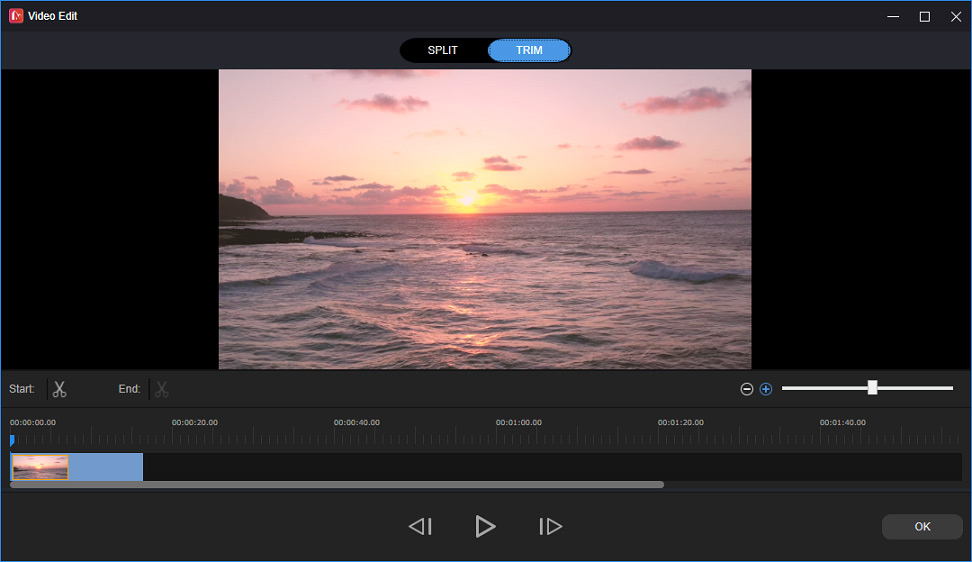
3. You can drag the clip’s start point or end point on the timeline to trim this video. Alternatively, select the video, click the Split (scissor) icon, choose the Full Split, and go to TRIM.
4. Move the playhead to the beginning point of the wanted part, and click the scissor icon behind the Start. Drag the playhead to the end point of the wanted part and click the scissor icon behind the End.
Click OK to save changes.
5. Optionally, you can continue to edit this video. After editing, click Export, then choose the output format and folder, and tap Export to export the trimmed video.
Conclusion
It’s easy to trim a video in PowerPoint. Now, you can follow the steps to trim video and audio in PowerPoint. If you want to trim a YouTube video in the latest version of Microsoft PowerPoint, first you should download the video from YouTube on your desktop.
About The Author

Position: Columnist
Cora is a tech writer specializing in digital media workflows, with over six years of hands-on experience in video post-production, media transcoding, and screen capture. Her writing is always clear and practical. Cora also produces in-depth software reviews for users across skill levels to help them find the right tool and enjoy video editing.
User Comments :