Would you like to rotate an image in Lightroom? How to rotate an image in Lightroom? If you have these questions, you’re in the perfect place. This post on MiniTool MovieMaker covers everything you want to know.
There are several different ways to rotate an image in Lightroom. Which options are available to you depends on whether you are in the Library Module or in the Develop Module.
How to Rotate an Image in Lightroom in the Library Module
The Library Module is where you can organize all your images at once. You cannot make any color adjustments in the Library Module, as it is only used for organizing and viewing images. In this module, you have several options to rotate an image.
#1. Use toolbar arrows
The easiest to rotate an image in the Library Module in Lightroom is to use the toolbar arrows, which can be seen beneath the image when in loupe view. If you don’t see the toolbar, press T or go to View, then Show Toolbar.
The right arrow will rotate your image 90 degrees counterclockwise, and the left arrow will rotate it 90 degrees clockwise.
#2. Use the top menu bar
The second way is using the top menu bar at the top of your screen. After selecting your photo, go to the Photo tab and choose Rotate Left or Rotate Right. Each click will rotate your image 90 degrees.
#3. Use the right-click method
You can also rotate an image in Lightroom by right-clicking it. The steps are slightly different in loupe view or grid view.
In loupe view: right-click the image, go to Transform > Rotate Left or Rotate Right.
In grid view: right-click the selected photos and select Rotate Left or Rotate Right.
#4. Use keyboard shortcut
Another way is to use the shortcut to rotate photo in Lightroom. This method works for both the Develop and Library Modules. You just need to select the image first. Then, press the keyboard shortcut Ctrl + ] (Windows) or Command + ] (Mac) to rotate the image 90 degrees clockwise. Or press Ctrl + [ (Windows) or Command + [ to rotate the image 90 degrees counterclockwise.
How to Rotate an Image in Lightroom in the Develop Module
Rotating an image in lightroom in the Develop Module is similar to those in the Library Module. The second and fourth methods in the Library Module also apply to the Develop Module. Rotate it using the top menu bar or using the keyboard shortcut.
Lightroom Alternative to Rotate an Image
Apart from Lightroom, there’s another tool to rotate an image easily – MiniTool MovieMaker. It allows you to flip an image horizontally or vertically, or rotate the image from 0 to 360 degrees. Here are the steps:
Step 1. Download and install MiniTool MovieMaker on your Windows PC by clicking Free Download below. Then, open it and close the pop-up window.
MiniTool MovieMakerClick to Download100%Clean & Safe
Step 2. Tap on Import Media Files to import an image.
Step 3. Add the image to the timeline by clicking + in the lower right corner of it.
Step 4. Under the Image Property tab, switch to Rotation.
Step 5. Select Flip Horizontal or Flip Vertical to flip the image.
Step 6. Drag the slider beside Rotation to rotate the image at a certain angle.
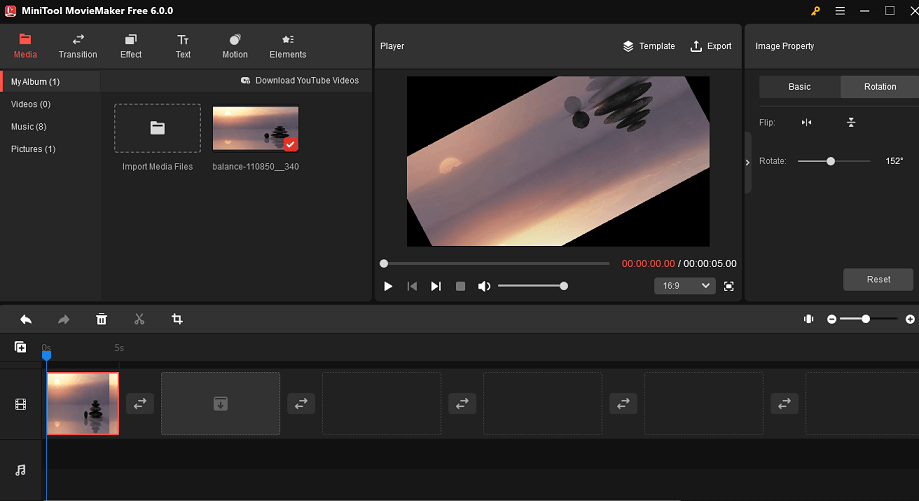
Step 7. Click on Export on the toolbar to save and download the rotated image.
Conclusion
As you can see, Lightroom gives you several options to rotate an image. How to rotate in Lightroom? Simply select one method or two methods and stick to them. Alternatively, use an alternative to lightroom – MiniTool MovieMaker to rotate your images.
User Comments :