This post explains how to edit GoPro videos using GoPro Player and MiniTool MovieMaker. Use GoPro Player to process the original 360 file, reframe, fix shaky clips, or trim videos simply. Try MiniTool MovieMaker to add text, apply filters, and crop videos after converting the 360 video to MP4 using GoPro Player.
GoPro cameras are known for their excellent capture performance and are widely used in extreme sports like driving, skating, and wakeboarding. As short videos gain popularity, GoPro has become a favorite among both amateur and professional videographers due to its portability and high quality. GoPro videos are typically saved as MP4 files encoded with H.264 or H.265 (HEVC). To edit them, connect the GoPro to a computer using a Micro USB cable, or a MicroSD card is accessible.
Does GoPro Have a Video Editor
Yes, GoPro offers the GoPro Quik app to help users edit their footage effortlessly. GoPro Quick is available for mobile devices (iOS/Android), and the desktop version was discontinued at the end of 2024 as GoPro shifted its focus from PC software to mobile applications since 2022.
How to edit GoPro videos on a PC? There is another official GoPro video editor – GoPro Player, which provides professional stabilization, lens correction, and basic functions like trimming. But for more editing tools, such as effects, filters, and text, the all-in-one video editor – MiniTool MovieMaker is more suitable for you.
In the following section, let’s walk through how to edit GoPro videos on a PC using GoPro Player and MiniTool MovieMaker. Choose the right tool based on your needs.
| Feature | GoPro Player | MiniTool MovieMaker |
| HyperSmooth Stabilization | Yes (pro-grade, adjustable) | No |
| Lens Correction (Distortion Fix) | Yes | No |
| 360 Video Reframing | Yes (drag to change angle) | No (raw 360 files not directly supported) |
| Trimming / Splitting | Yes (basic) | Yes (precise) |
| Add Subtitles / Text | No | Yes (multiple styles) |
| Add Background Music | No | Yes (library + local) |
| Filters / Effects / Transitions | No | Yes (rich selection) |
| Picture-in-picture effect | No | Yes |
| Color Adjustment / Speed Control | No | Yes |
| Watermark-Free Export | Yes | Yes |
| Price | Free | Free |
| Best For | Pre-processing (stabilization, correction, 360 reframing) | Fine editing after processing the original 360 file |
How to Edit GoPro Videos with GoPro Player
Fast Track:
- Make sure GoPro Player is installed on the PC.
- Import videos from GoPro to the application.
- Stabilize videos with HyperSmooth Pro.
- Change the point of view of 360-degree videos.
- Trim the footage or save a frame from the video.
- Export the edited GoPro videos.
GoPro Player is a video editor without watermark. It allows users to trim clips precisely, grab frames from videos, level horizons, and batch export with ease. As an easy-to-use editing software program, it is suitable for users of all levels to create stunning videos. Besides, GoPro Player is the essential solution for editing GoPro 360 videos, as 360 files need to be processed via GoPro’s official video editor before being edited on other platforms.
Let’s see how to edit GoPro videos on a computer using GoPro Player.
Step 1: Download and Install
Visit the Microsoft Store to search for GoPro Player and download it. Follow the on-screen instructions to complete the installation with a few clicks.
Step 2: Import Videos
Launch the program and click Open Media in the center. Select your desired video and upload it to GoPro Player.

Step 3: Edit Videos
1. HyperSmooth Pro for Improved Stabilization
When you open your GoPro video within GoPro Player, there will be a small pop-up window on the right side. Click Yes to apply HyperSmooth Pro to improve stabilization.
Next, click the Hamburger icon above the HyperSmooth Pro icon and select Advanced Settings. Here, you can drag the sliders to fine-tune smoothness, cropping speed, and lens correction to enhance the visual quality of your video.
You can also click Aspect Ratio and select the desired ratio for your video.
2. Editing 360-degree Videos
If your video format is 360-degree, additional editing options become available. You can freely change the point of view by dragging your cursor across the screen. Besides, you can find two icons in the center of the screen. Click the first 360 icon to adjust Direction Lock, Horizon Level, and Antishake.
Then, select the second Circle icon. At the same time, the first three options have been locked. If you want to reset them, you need to click the 360 icon again. Besides, click the appeared Aspect Ratio to change the video dimensions.
To rotate the point of view, click Rotate or hold Ctrl and drag your mouse. To zoom in or out, click Zoom or hold Alt while dragging your mouse up or down. You can also scroll your mouse wheel to achieve it.
Click the timeline and hit the Pencil icon to adjust the lens correction using the slider. It is also an excellent way to add transitions and improve visual smoothness.
3. Trim Videos
Click the Scissors icon below the timeline to trim your video. Drag the clip on the timeline and hit Scissors at your desired starting point to begin trimming. Then, play the video to the point where you want it to end and hit the Scissors again.
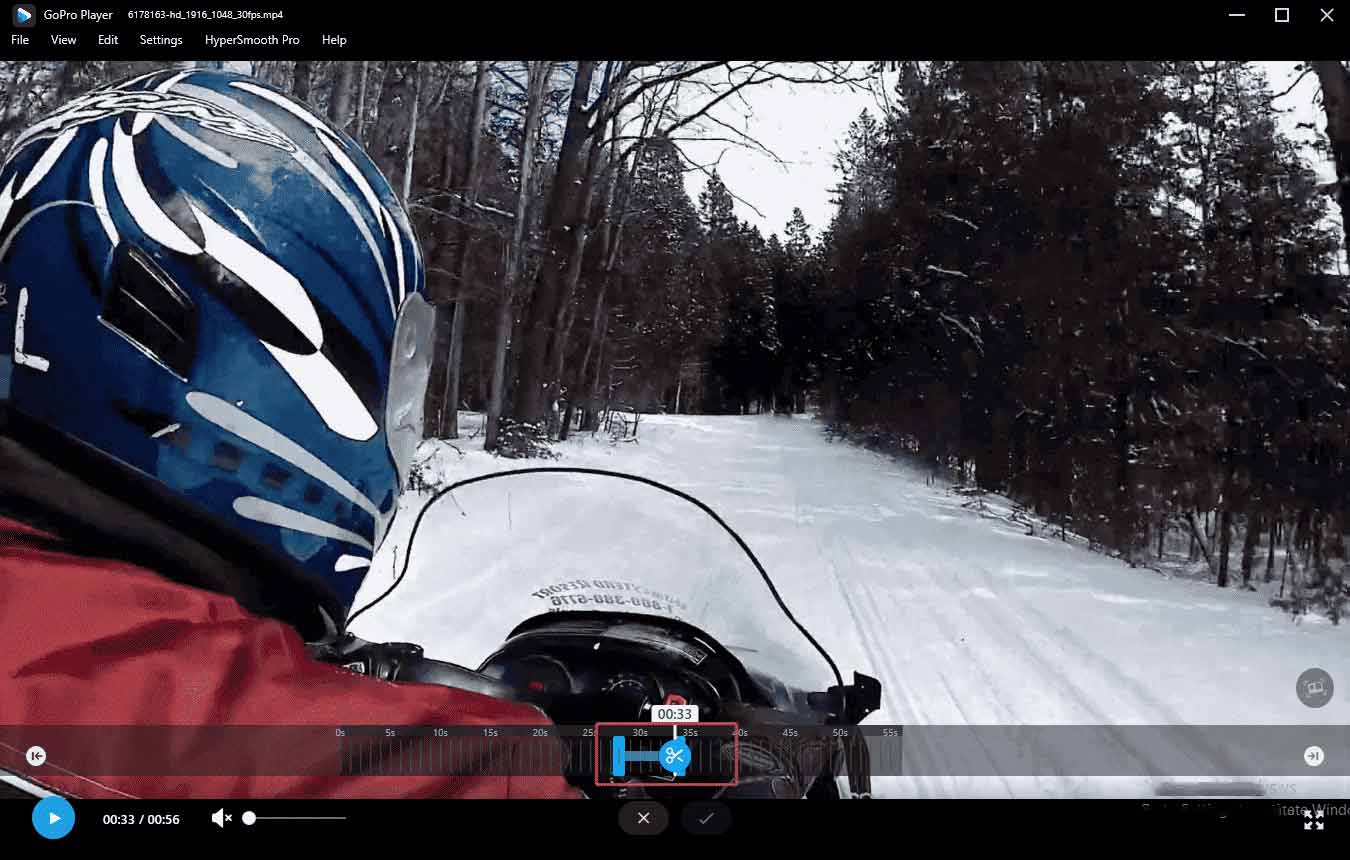
The selected section will now be trimmed and displayed on the timeline. If you are not satisfied with the result, simply click Reset Trim to restore the original imported video.
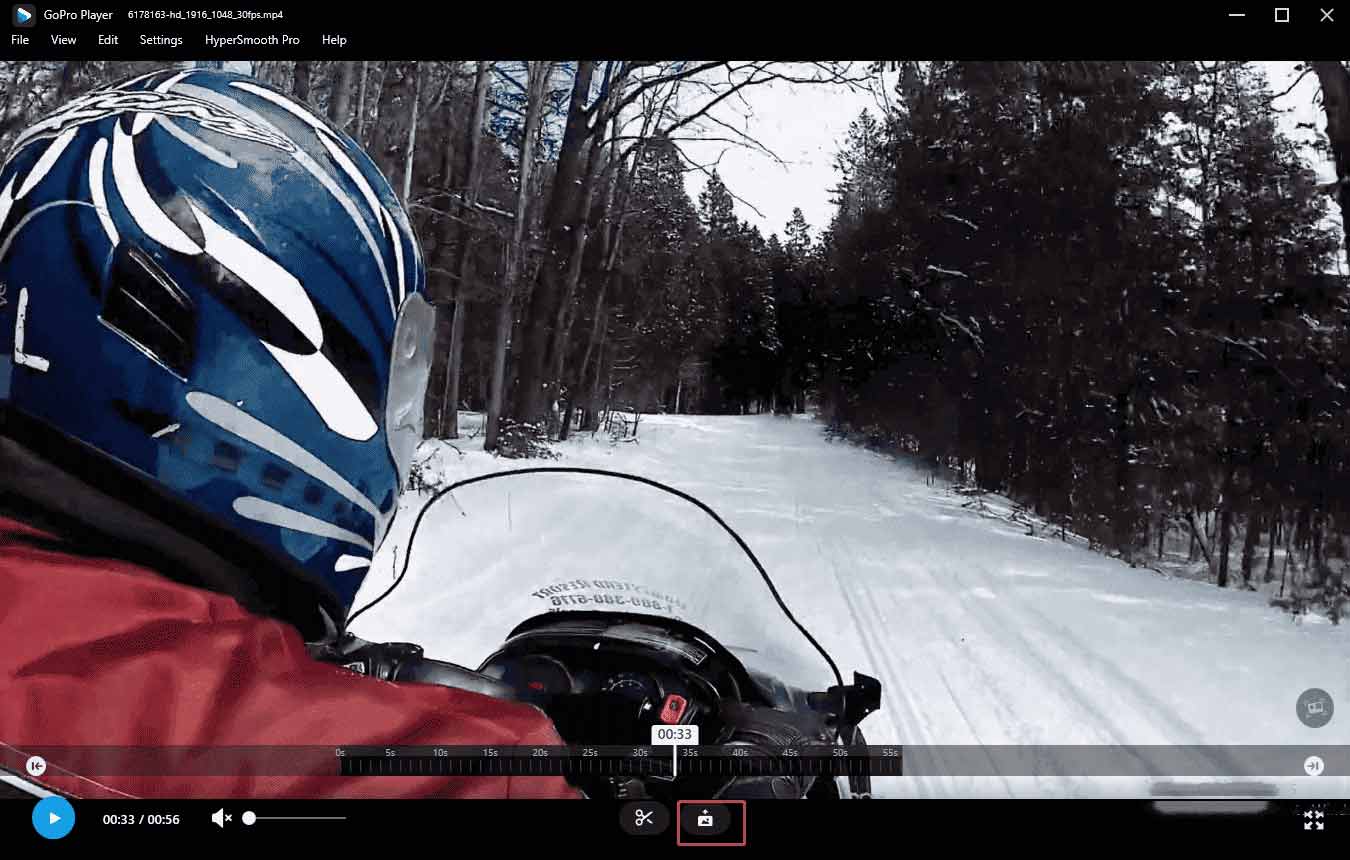
4. Extract Current Frame
Drag the clip on the timeline until the playhead reaches your desired frame. Then, click the Photo icon next to the Scissors. The frame will be automatically captured and opened in GoPro Player for preview and editing.
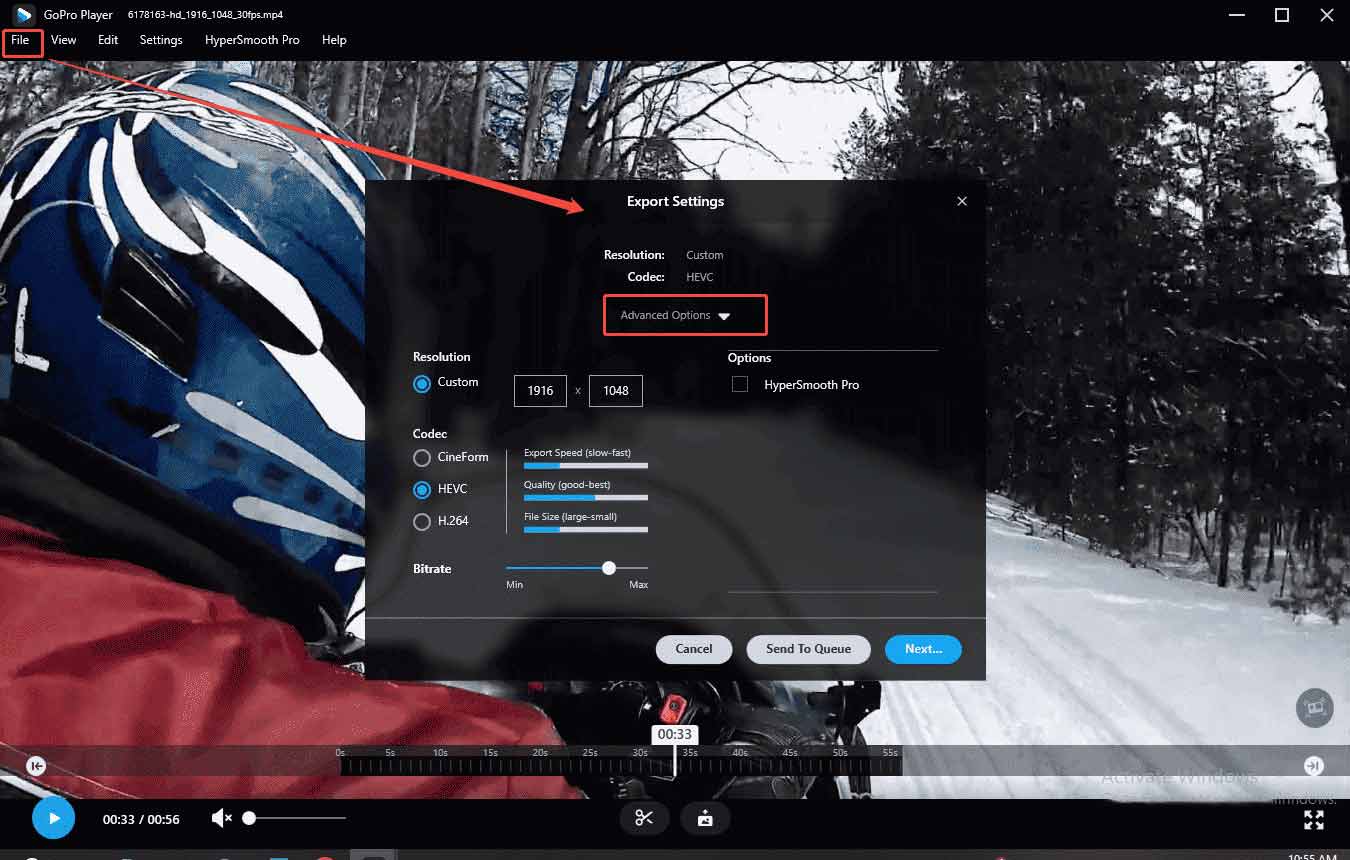
Step 4: Export the Video
After editing, you can click File at the top of the menu and select Export. An Export Setting pop-up window will appear. Click Advanced Options to customize the resolution and codec for your video.
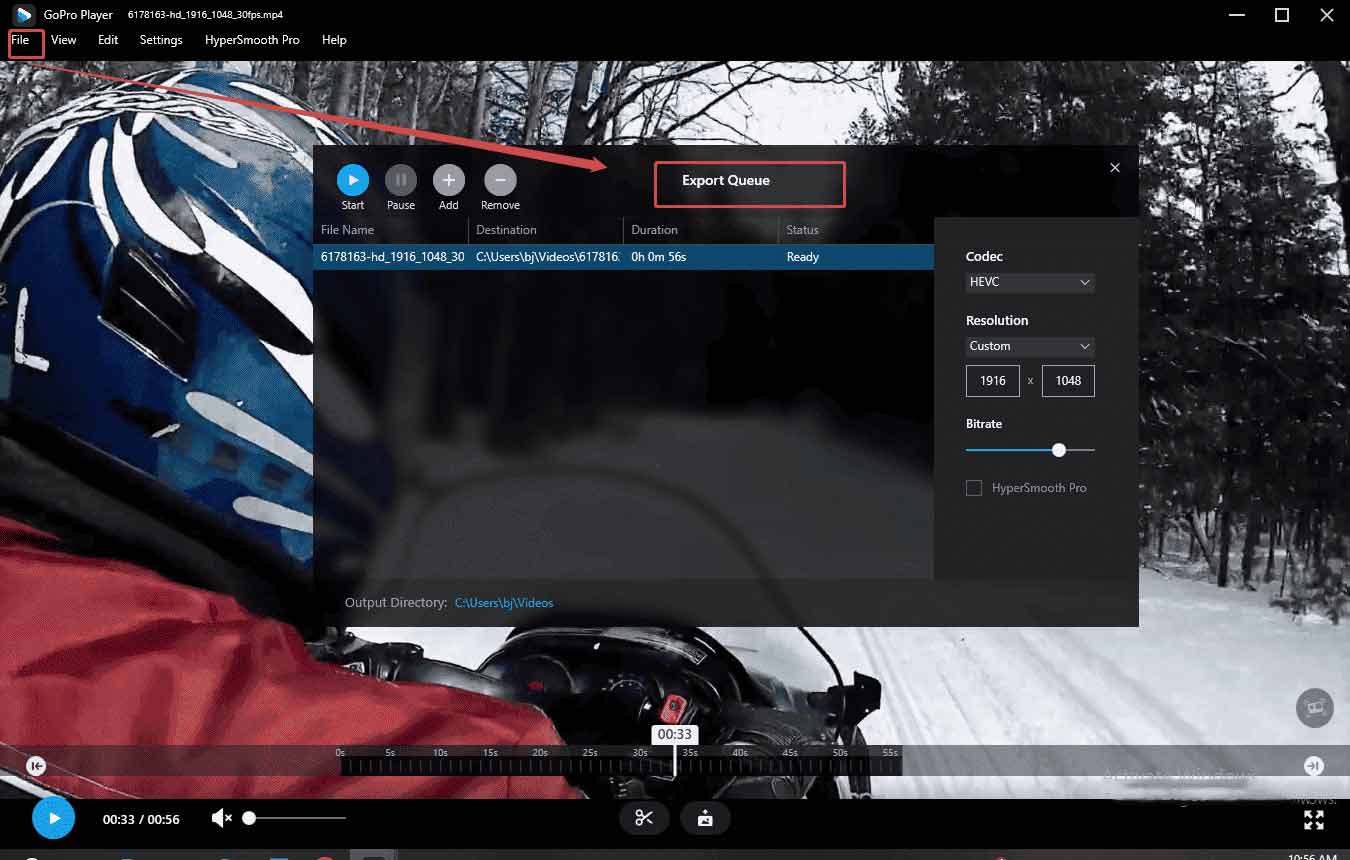
GoPro Player also supports batch export. You can click Send to Queue to add multiple files for export. Then, go back to File and select Export Queue. Click Start to export all files at once.
How to Edit GoPro Videos with MiniTool MovieMaker
Fast Track:
- Install MiniTool MovieMaker.
- Import the target video clips.
- Trim, split, crop, and reverse clips.
- Add background music, text, elements, filters, etc.
- Export the video.
MiniTool MovieMaker is another great option for creators to explore how to edit videos from a GoPro. As a versatile multimedia tool, it enables users to create video from images, decorate videos with effects, elements, music, and more effortlessly. Additionally, boasting an easy-to-use and intuitive interface, MiniTool MovieMaker allows beginners to get acquainted with it without a steep curve.
Here is how to edit videos from a GoPro in MiniTool MovieMaker.
Step 1: Download and Install
Click the button below to download. Once it is complete, follow the setup instructions to finish the installation process.
MiniTool MovieMakerClick to Download100%Clean & Safe
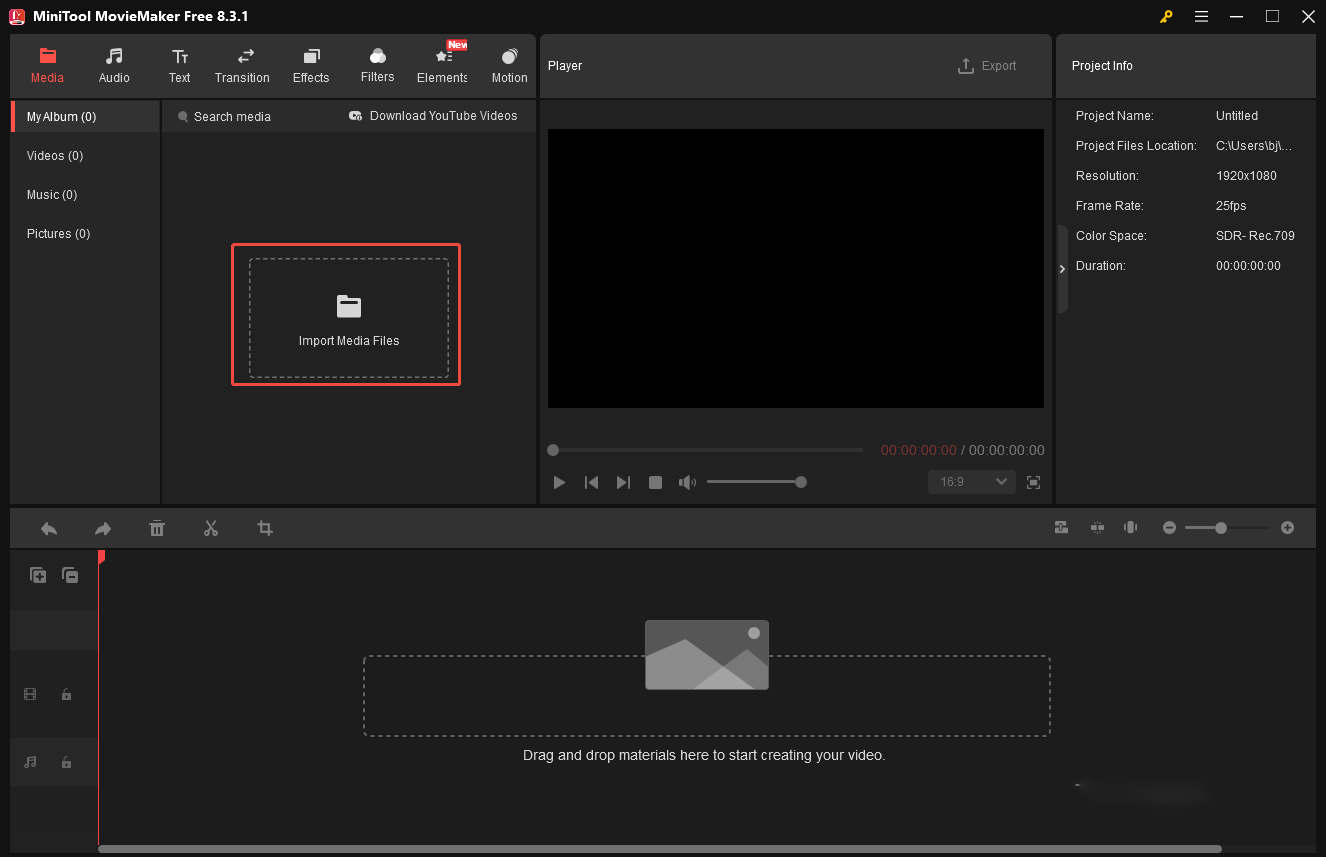
Step 2: Import Videos
Click New Project in the pop-up Project Library window to access the main interface. Next, click the Import Media Files icon to upload your videos from your local computer. Then, hit the Plus icon at the corner of the imported video to add it to the timeline.
Step 3: Edit Videos
You can start your video creations with the wide range of tools provided by MiniTool MovieMaker.
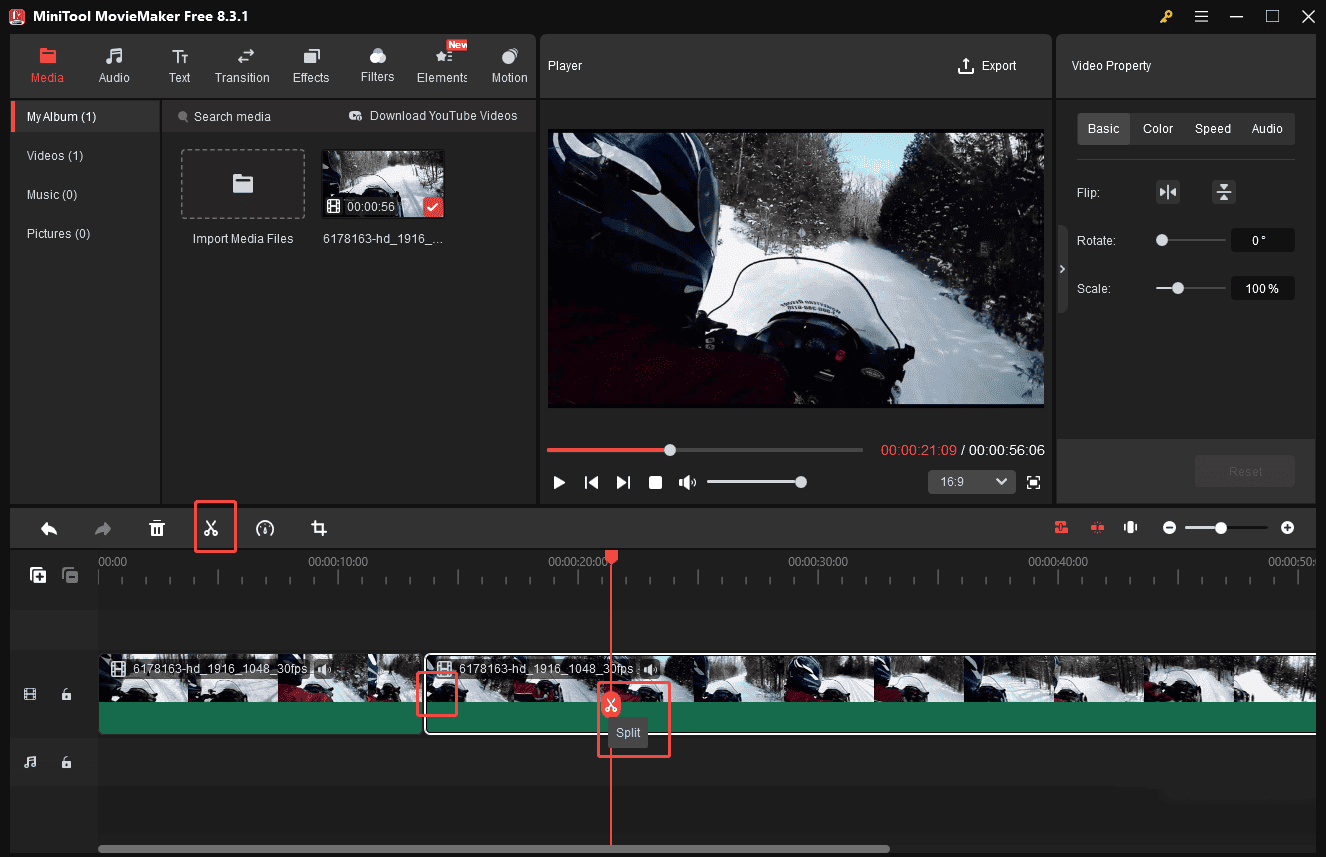
1. Trim and Split
To remove unwanted sections from your GoPro footage, use the Trim or Split tools. Hover your mouse over the start or end of a clip until the Trim icon appears, then drag it left or right to cut out unnecessary parts.
You can also drag the playhead to specific points of the clip and select the scissors icon to split the video. Then, right-click the unwanted segment and choose Delete to remove it.
2. Crop the Video
Click the Crop icon on the timeline toolbar to enter a pop-up window. Select the proper Ratio in the left corner and drag the frame to position it where you want it on the screen – any area outside the frame will be removed. Click OK, and you can preview the video in the Player section.
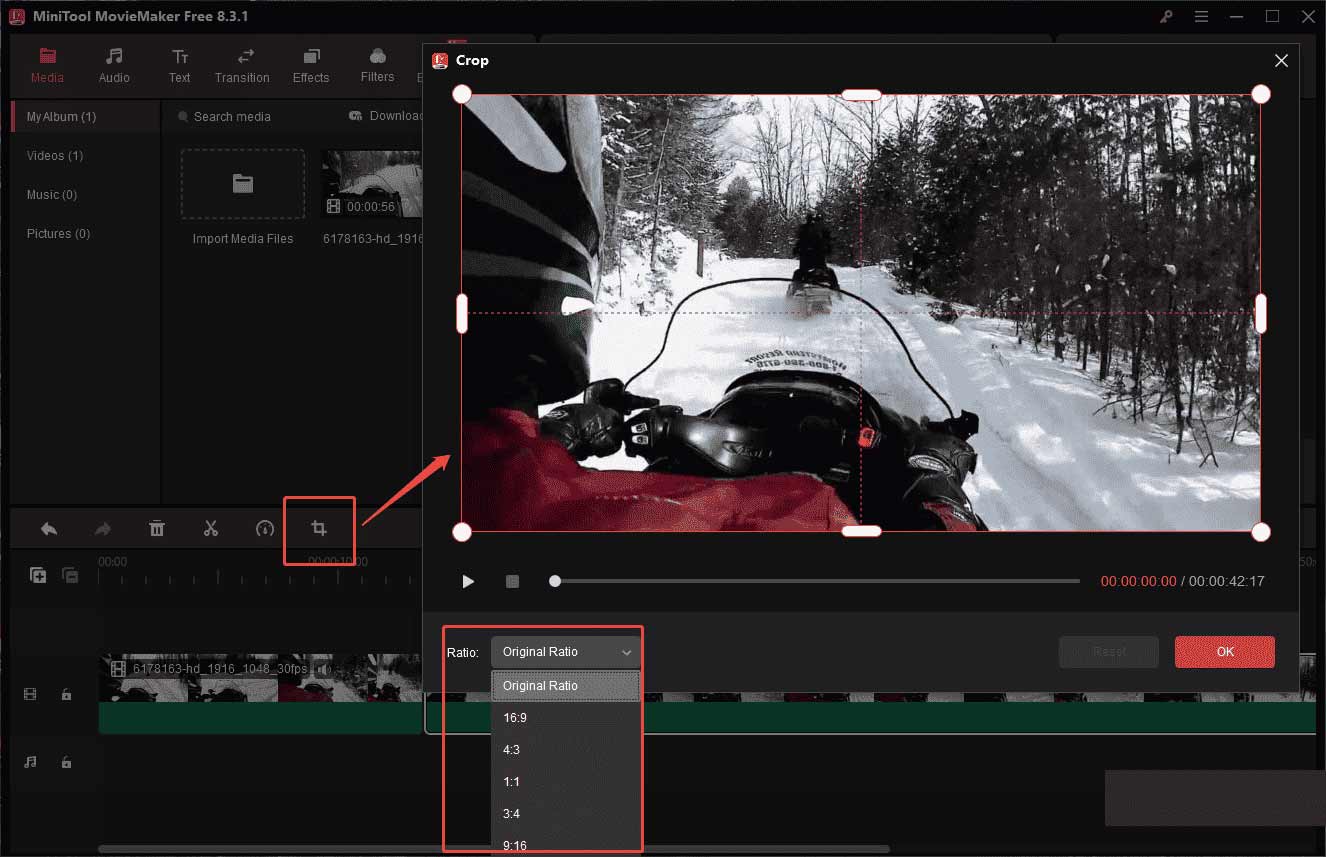
Besides, hit the Aspect Ratio icon in the lower-right corner of the player section to adjust the width and height of the video.
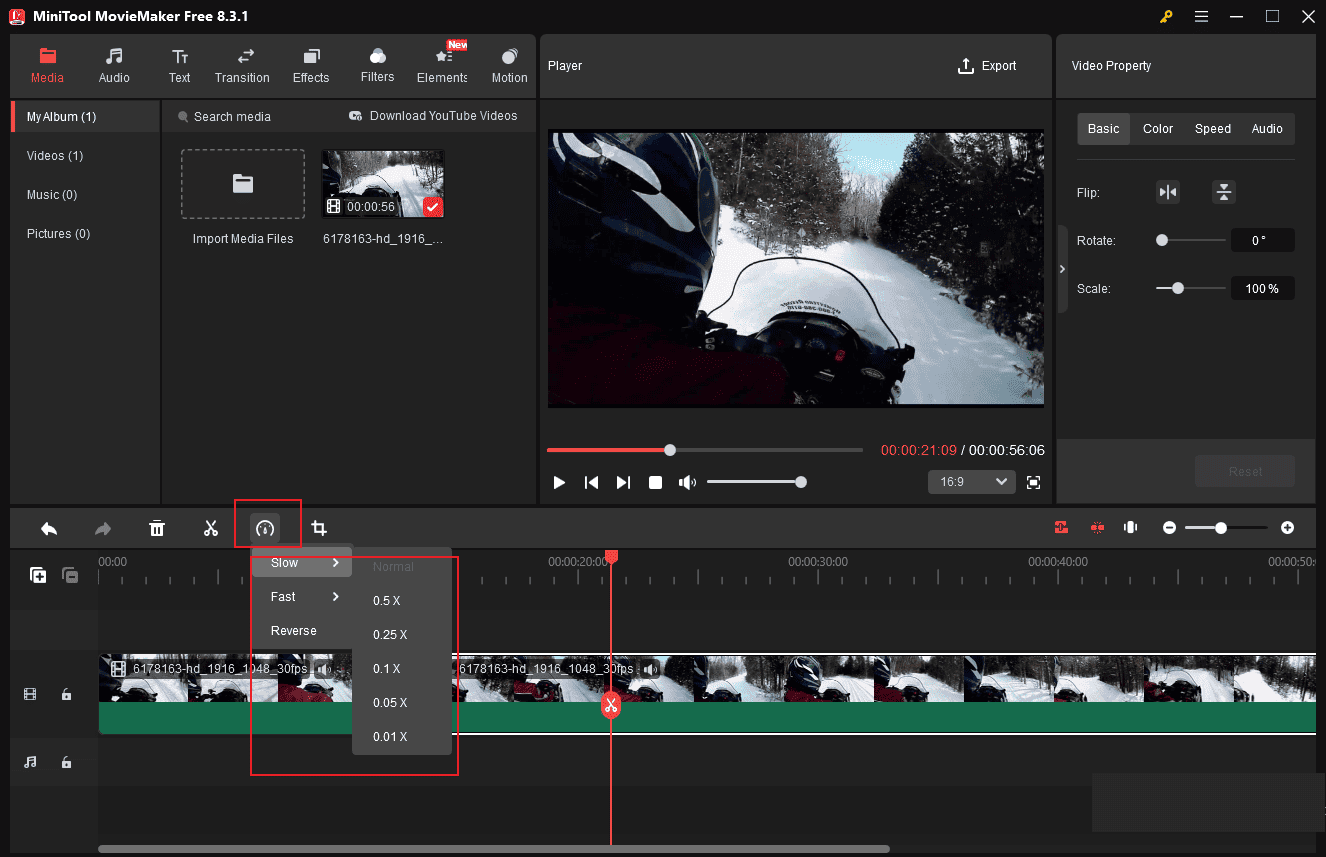
3. Reverse & Speed
Click on the Speed icon on the timeline toolbar. You can choose Slow or Fast to slow down or speed up your video. It’s also a good way to decrease or increase your video length. To add a creative touch, use the Reverse option to play your GoPro video backward and capture viewers’ attention.
4. Add Background Music
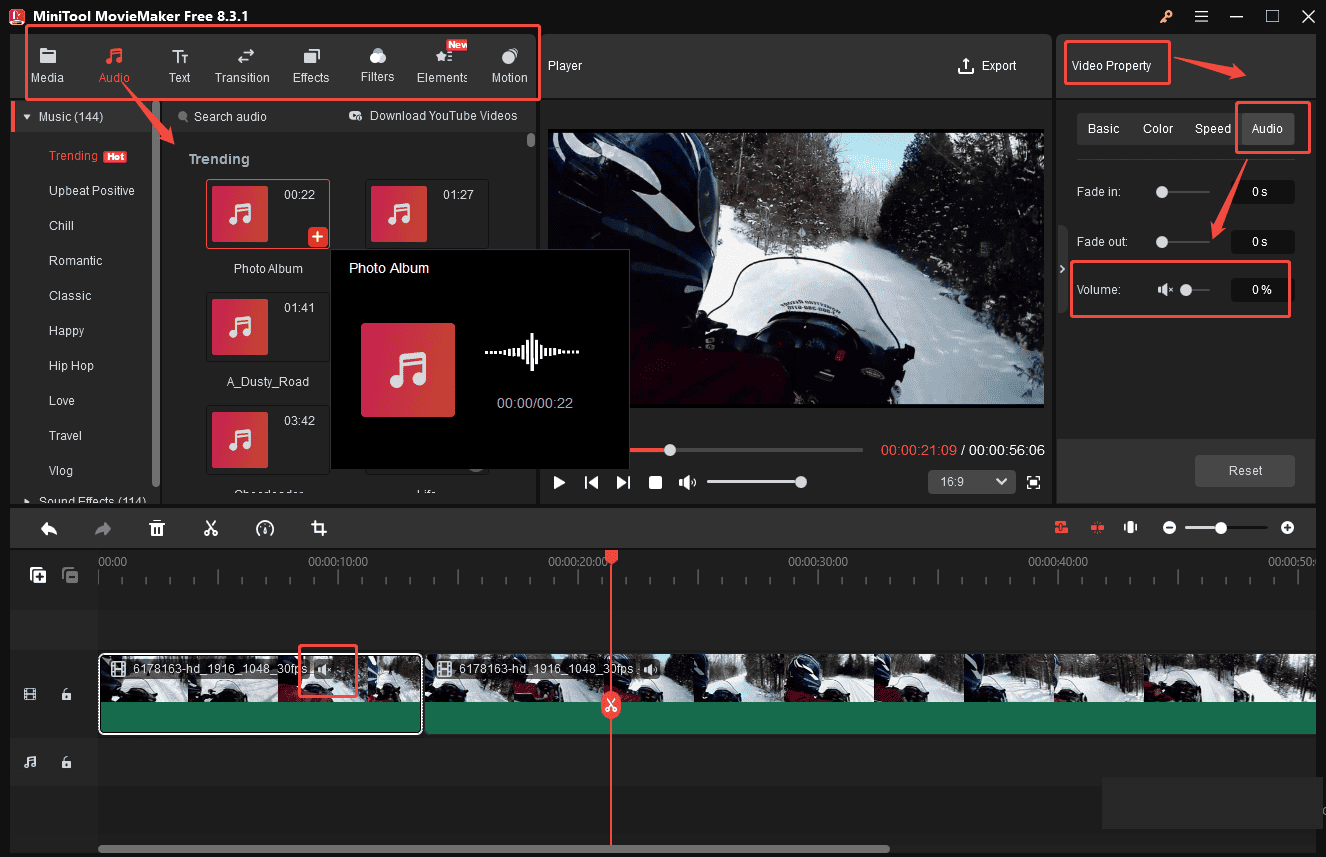
If you want to replace the original radio in your GoPro video, click the Speaker icon on the video track or set the audio volume to 0% in the Video Property panel.
Then, click the Audio tab in the top-left menu and add your desired music and sound effects to your video. You can adjust the music volume and apply fade-in/out effects in the upper Music Property part.
More advanced editing tools you can apply to solve how to edit GoPro 360 videos on Windows with MiniTool MovieMaker:
1. Add text to make narration in videos
2. Add filters, elements, effects, transitions, and motion to clips.
3. Add 3D LUT to footage.
4. Change video contrast, saturation, and brightness.
Step 4: Export the Video
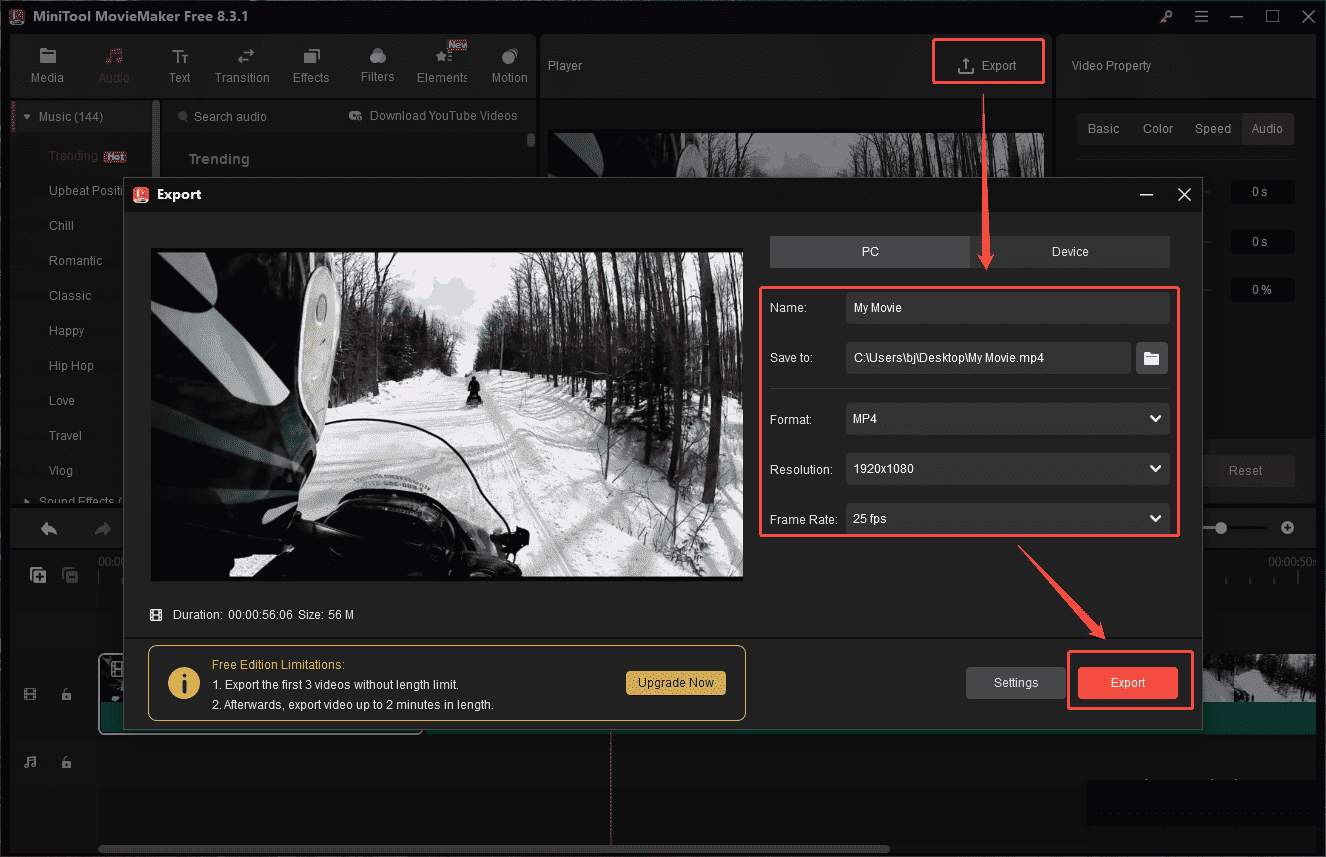
Once you complete the final video, click Export in the upper part of the Player window to access the Export settings. In the pop-up window, you can customize your video name and location, and select the desired format, resolution, and frame rate to save it to your computer. Then, click Export again to save the video to your computer.
MovieMaker by MiniTool is an inexpensive, easy-to-use video editing program. It includes a fair number of effects and gives you easy ways to join your clips, add transitions, and overlay objects and text.https://www.pcmag.com/reviews/minitool-moviemaker
Conclusion
This post introduces how to edit GoPro videos on PC with two powerful video editors. Select the one that best covers your needs to elevate your GoPro footage effortlessly.
If you have any questions and suggestions while using MiniTool MovieMaker, please do not hesitate to contact us via [email protected].
How to Edit GoPro Videos FAQ
Then, copy video files to your PC after your computer recognizes the SD card or the camera. Next, view GoPro footage with GoPro Player, VLC, or other GoPro video players.
About The Author

Position: Columnist
Cora is a tech writer specializing in digital media workflows, with over six years of hands-on experience in video post-production, media transcoding, and screen capture. Her writing is always clear and practical. Cora also produces in-depth software reviews for users across skill levels to help them find the right tool and enjoy video editing.
User Comments :