If you want to combine two photos to show the before and after comparisons or blend two different ideas into a single visual effect, you can’t miss this post. Continue to read and learn how to combine two images into one.
Related article: Top 10 Best Photo Viewers for Windows 10
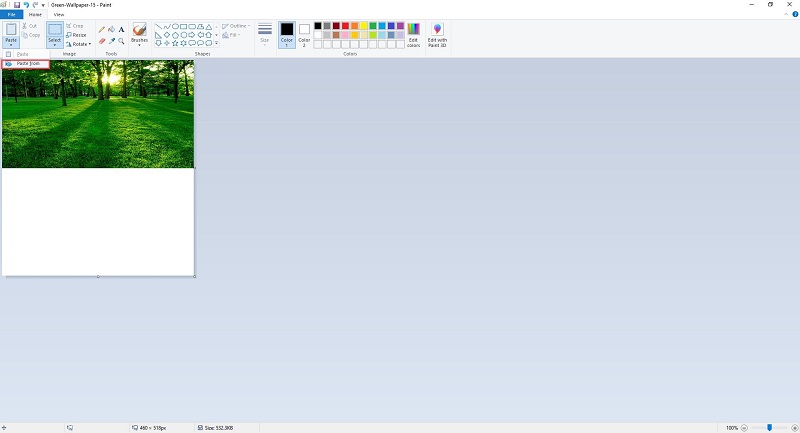
How to Combine Two Images in Paint
Microsoft’s built-in software Paint to complete smaller tasks such as merging two pictures. This is the easiest way to merge two pictures without needing any additional software, and you can merge as many pictures as you like with this free image combiner. Now, let’s check how to merge two photos in Paint.
Step 1. Open Paint on your PC at first.
Step 2. Navigate to File > Open to import any one of the two images you want to merge.
Step 3. If needed, click Resize from the toolbar to resize the image. Resizing can be done in percentages or pixels.
Step 4. Drag the small box in the lower right corner of the image to increase the size of the white background. More canvas space means you can import other images.
Step 5. Click on the drop-down arrow under the Paste button and select Paste from to import your second image. Then resize it to be the same as the first image. Simply drag it to the white space you created earlier.
Step 6. Open the drop-down list of the Selection tool and choose Rectangular selection or Free-form selection to trim out the unwanted background and excess canvas space you don’t need.
Step 7. Go to File > Save as to save the merged image as a new image.
You might be interested in: How to Make a GIF in Photoshop – SOLVED
How to Combine Two Images in Photoshop
Adobe Photoshop is a raster graphics editor developed by Adobe Inc. for Windows and macOS. Photoshop can perform some impressive photo editing tasks, including combining two images into one. The following will show you how to combine two photos in Adobe Photoshop CS6.
Step 1. Launch Adobe Photoshop CS6 on your computer.
Step 2. Go to File > New and then give the values of the resolution exactly how much you require.

Step 3. After the canvas opens, click File > Place to import any one of the two images that you want to merge.
Step 4. Place this image exactly where you want to place it on the canvas. You can resize the image and place it anywhere you want. Once you are satisfied with the result, right-click on the image, and select the Place option to save your changes.
Step 5. Repeat step 2 to upload the second image to the software and then you can resize or reposition it.
Step 6. Once finished, just right-click on the newly added image and select the Place option to execute the operation.
Step 7. Now, the two images have been placed on one canvas. Navigate to File > Save to save this combined image.

Conclusion
Have you mastered how to combine two images after reading this post? If you have any questions or suggestions about it, please let us know via [email protected] or share them in the comments section below.
User Comments :