In this post from MiniTool MovieMaker, you will learn more about what is a Gaussian blur, how to use this filter in Photoshop, and the difference between Gaussian blur and Lens blur.
What Is a Gaussian Blur?
Gaussian blur is applied in the image processing, also called Gaussian smoothing. It’s named after scientist-mathematician Carl Friedrich Gauss. The main purpose of the filter is to reduce noise and detail in an image. To put it in simple terms, this blur effect is appropriate for hiding areas of a picture without ruining them while exposing the beauty of the image.
Also, the Gaussian blur is beneficial if you’re trying to imitate or mimic a depth of field. You can use this blur effect to control what is in and out of focus. This technique is often implemented with a high-end camera using pricey lenses. Still, with Gaussian blur, you can do it with or without using expensive lenses.
How to Use Gaussian Blur?
Gaussian blur is simple to achieve on a picture. Actually, some photo editing tools contain this feature for professional photo modifications. Photoshop is among them and it’s equipped with a variety of impressive features that produce great results. More importantly, you’ll be able to accomplish Photoshop Gaussian blur.
If you want to find out how to use Gaussian blur in Photoshop, follow these steps:
Step 1: Go to the software’s download page and obtain its installer. It is available for both Windows and macOS. Please comply with the minimum requirements and make sure your computer meets the necessary requirements.
Step 2: Create a new project and add the image you wish to edit or to which you want to apply the Gaussian blur.
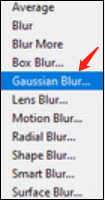
Step 3: There are two techniques for implementing Gaussian blur. One is to apply the effect to the whole image. Another is to select the subject and blur the background. Click the Filter option on the top menu, then hover your mouse pointer over Blur and select Gaussian Blur.

Step 4: If you’re already happy with the image’s results, export the photo based on your requirements. Go to File > Export > Export As, and change the export settings according to how you like.
MiniTool MovieMakerClick to Download100%Clean & Safe
Gaussian Blur vs Lens Blur
In this section, we will focus more on distinguishing between Gaussian blur and Lens blur. Primarily, we will talk about the basics of both effects of filters. So, keep reading if you would like to understand Gaussian blur vs Lens blur.
Gaussian Blur
Basically, Gaussian blur softens everything out in an image. It’s a low-pass filter involving cutting out the extreme outliers to implement even pixel values. This filter helps you effectively minimize the image’s noise, particularly when the image is too busy. It can make a text, person, or object stand out by softening the photo. One thing to keep in mind about the blur effect is that it achieves greater blur intensity which might reduce the sharpness.
Lens Blur
When it comes to Lens blur, it implements a bokeh effect of shallow depth of field. The filter makes the foreground stand out and blurs the background. Lens blur has the upper hand in terms of blurring control. It provides a great deal of control over the effect. Lens blur, on the other hand, is desirable if you wish to implement a creamy blur effect. This means it’s subtle in comparison to Gaussian blur.
Conclusion
What is a Gaussian blur? It is helpful in a wide range of scenarios such as subject isolation. And, it might almost replace those high-end camera lenses to implement the blur effect you desire for your images. Now, go ahead and unlock the beauty of a photo with the help of the tutorial above.
More Reading


![How to Add Motion Blur in Photoshop [Step-by-Step Guide]](https://images.minitool.com/moviemaker.minitool.com/images/uploads/2024/02/how-to-add-motion-blur-in-photoshop-thumbnail.png)

User Comments :