Motion blur photography is a fantastic method to create dynamic images. Typically, an image can only capture a moment in time. But the photographer can tell an entire story with motion blur. They can show passing cars or busy streets. Not to mention that it looks awesome.
However, not everyone has a professional camera that can pull off this effect. Even if you own a wonderful camera on your phone, you probably don’t know how to use it to create motion blur. In this guide, we will show you how to add motion blur to photo in Photoshop.
MiniTool MovieMakerClick to Download100%Clean & Safe
How to Add Motion Blur in Photoshop?
Photoshop offers various blurring options. You can use the program to hide text or faces, or you’ll be able to blur the background to make someone stand out. Now, let’s see how to add motion blur to an image in Photoshop.
Create a Blurred Background
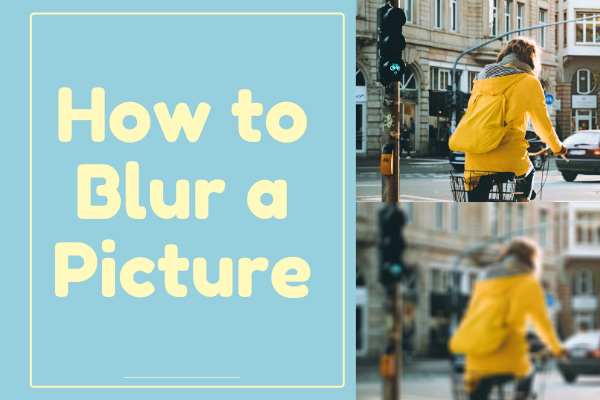
First of all, we’ll teach you how to create motion blur for the background. For example, if a cyclist is standing still in the image, we can use motion blur to make it look like the rider is riding fast while the background is whizzing by. Follow the procedure below:
Step 1: Open the image in Photoshop.
Step 2: In the Layers menu on the right-hand side, click the lock icon to make the background into a layer.
Step 3: Navigate to Select > Subject.
Step 4: Press the W key to use the Quick Selection Tool if you want to add or delete pixels from the selection (Alt-clicking will remove portions).
Step 5: Navigate to Select > Inverse.
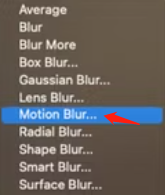
Step 6: Select Filter > Blur > Motion Blur.
Step 7: You can adjust the Distance in the pop-up to make the motion appear faster. Using Angle, you can change the motion if the subject is going uphill or downhill.
Step 8: Click OK and choose Select > Deselect to view the results.
Another common method to take advantage of this effect is when you have someone standing in front of a bus or train. You can make the vehicle look like it’s moving even if it’s still in the picture.
Create Motion Blur for the Movement
In some circumstances, you might want to create a more sophisticated motion blur. For example, when several movements occur simultaneously. Or when you only would like to blur to affect a small part of the picture.
In this example, the image looks like a dancer flipping the skirt in real time, rather than a completely still image. To do this, we use the Path Blur tool:
Step 1: Like before, open the image and click on the lock in Layers.
Step 2: Right-click on the layer and select Convert to Smart Object.
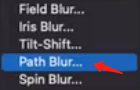
Step 3: Same as the first example, you’ll need to navigate to Filter > Blur Gallery > Path Blur.
Step 4: To remove the automatically created blur, press Delete.
Step 5: Click the screen to create the direction in which you wish the object to move. Double-click to complete the path. Add as many pathways as you like if, for example, someone is moving his or her head in one direction and his or her hands in the opposite direction. Also, you can curve the paths to make a circular movement. In the example, we’d like to blur the skirt upwards.
Step 6: Click OK at the top of the screen.
Step 7: Select the Smart Filters in the Layers.
Step 8: Navigate to the Brush tool. Adjust the Hardness to 30% as well as make the size bigger.
Step 9: Ensure that the brush color is black.
Step 10: Go over the areas of the image that you wish to keep in focus. In this case, we just want the skirt to appear blurry, yet the rest of the dancer remains still. Thus, you can brush over the body, feet, and floor, while the rest is in motion blur.
You can have fun with this effect to add movement to various situations. It’s particularly helpful in cases where there’s movement in real life, however, the photo was taken with a fast shutter speed and appears to be completely still.
Conclusion
Hopefully, the above step-by-step instructions on how to add motion blur in Photoshop can help you create professional-looking motion images.
User Comments :